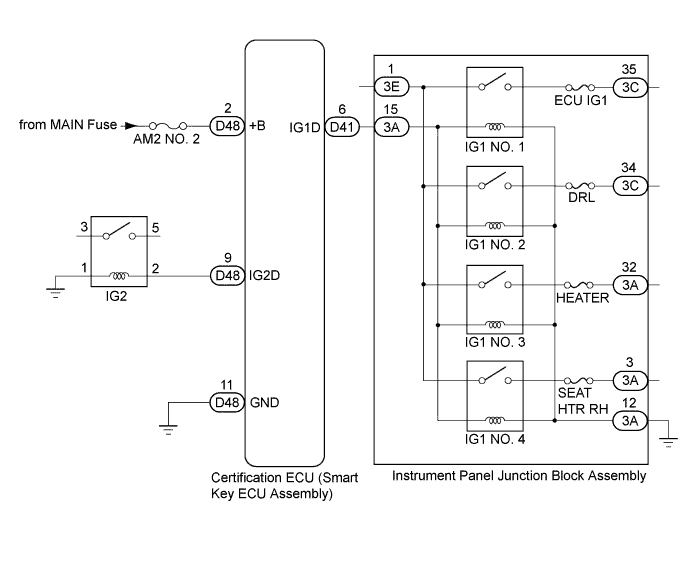
ENTRY AND START SYSTEM (for Start Function) > Power Source Mode does not Change to ON (IG) |
| 1.CHECK HARNESS AND CONNECTOR (CERTIFICATION ECU (SMART KEY ECU ASSEMBLY) - IG2 RELAY) |
Disconnect the D48 certification ECU (smart key ECU assembly) connector.
Remove the IG2 relay from the engine room relay block.
Measure the resistance according to the value(s) in the table below.
| Tester Connection | Condition | Specified Condition |
| D48-9 (IG2D) - IG2 relay terminal 2 | Always | Below 1 Ω |
| IG2 relay terminal 1 - Body ground | Always | Below 1 Ω |
|
| ||||
| OK | |
 |
| 2.INSPECT IG2 RELAY |
Inspect the IG2 relay .
|
| ||||
| OK | |
|
| 3.CHECK HARNESS AND CONNECTOR (CERTIFICATION ECU - INSTRUMENT PANEL JUNCTION BLOCK ASSEMBLY) |
Disconnect the D41 certification ECU (smart key ECU assembly) connector.
Disconnect the 3A instrument panel junction block assembly connector.
Measure the resistance according to the value(s) in the table below.
| Tester Connection | Connection | Specified Condition |
| D41-6 (IG1D) - 3A-15 | Always | Below 1 Ω |
| 3A-12 - Body ground | Always | Below 1 Ω |
|
| ||||
| OK | |
|
| 4.INSPECT INSTRUMENT PANEL JUNCTION BLOCK ASSEMBLY ((IG1 NO. 1, IG1 NO. 2, IG1 NO. 3, IG1 NO. 4 RELAY) |
Remove the instrument panel junction block assembly (Click here).
Remove the main body ECU (network gateway ECU) from the instrument panel junction block assembly.
Measure the resistance according to the value(s) in the table below.
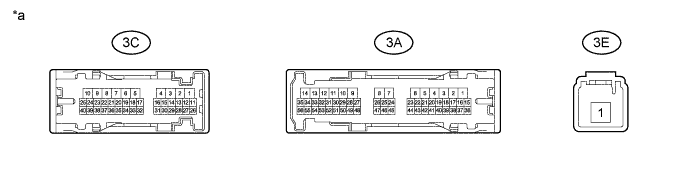
| *A | for LHD | *B | for RHD |
| *a | Component without harness connected (Instrument Panel Junction Block Assembly) | - | - |
| Tester Connection | Connection | Specified Condition |
| 3E-1 - 3C-35 | Battery voltage not applied to terminals 3A- 15 and 3A-12 | 10 kΩ or higher |
| Battery voltage applied to terminals 3A- 15 and 3A-12 | Below 1 Ω | |
| 3E-1 - 3C-34 | Battery voltage not applied to terminals 3A- 15 and 3A-12 | 10 kΩ or higher |
| Battery voltage applied to terminals 3A- 15 and 3A-12 | Below 1 Ω | |
| 3E-1 - 3A-32 | Battery voltage not applied to terminals 3A- 15 and 3A-12 | 10 kΩ or higher |
| Battery voltage applied to terminals 3A- 15 and 3A-12 | Below 1 Ω | |
| 3E-1 - 3A-3 | Battery voltage not applied to terminals 3A- 15 and 3A-12 | 10 kΩ or higher |
| Battery voltage applied to terminals 3A- 15 and 3A-12 | Below 1 Ω |
|
| ||||
| OK | |
|
| 5.INSPECT CERTIFICATION ECU (SMART KEY ECU ASSEMBLY) |
Reconnect the D41 and D48 certification ECU (smart key ECU assembly) connectors.
Measure the voltage according to the value(s) in the table below.
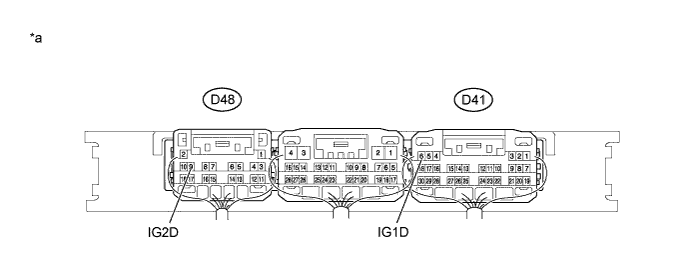
| *a | Component with harness connected (Certification ECU (Smart Key ECU Assembly)) | - | - |
| Tester Connection | Switch Condition | Specified Condition |
| D41-6 (IG1D) - Body ground | Engine switch on (ACC) → Engine switch on (IG) | Below 1 V → 9 V or higher |
| D48-9 (IG2D) - Body ground | Engine switch on (ACC) → Engine switch on (IG) | Below 1 V → 9 V or higher |
|
| ||||
| OK | ||
 | ||
| ||
