FA20 ENGINE MECHANICAL ENGINE UNIT REASSEMBLY
PROCEDURE

 11104F
1.INSTALL OIL SPACER LH
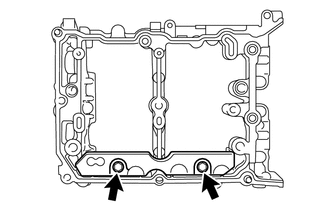
Install the oil spacer LH with the 2 bolts.
- Torque:
- 6.4 N*m (65 kgf*cm, 57 in.*lbf)
15678E
2.INSTALL OIL CONTROL VALVE FILTER (for Bank 2)
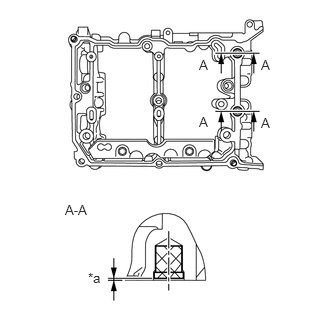
Install 2 new oil control valve filters to the camshaft housing sub-assembly LH as shown in the illustration.
| *a | 0 to 0.5 mm (0 to 0.0197 in.) from the face of the camshaft housing sub-assembly LH |
3.INSTALL CAMSHAFT (for Bank 2)
4.INSTALL CAMSHAFT CAP (for Bank 2)
001104
5.INSTALL HOLE PLUG (for Manual Transmission)
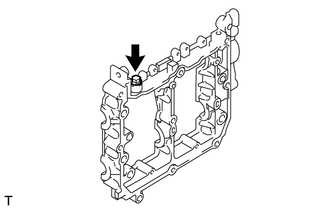
Install a new gasket and the hole plug to the camshaft housing sub-assembly RH.
- Torque:
- 25 N*m (255 kgf*cm, 18 ft.*lbf)
15044
6.INSTALL CAMSHAFT OIL FEED PIPE SUB-ASSEMBLY (for Automatic Transmission)
Temporarily install 2 new gaskets and the camshaft oil feed pipe sub-assembly with the bolt and 2 union bolts.
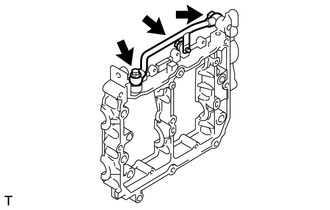
Tighten the 2 union bolts to the specified torque.
- Torque:
- 31 N*m (316 kgf*cm, 23 ft.*lbf)
Tighten the bolt to the specified torque.
- Torque:
- 6.4 N*m (65 kgf*cm, 57 in.*lbf)
11103G
7.INSTALL OIL SPACER RH
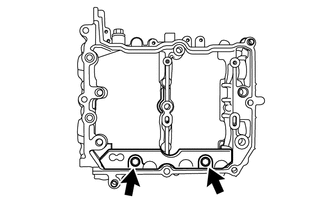
Install the oil spacer RH with the 2 bolts.
- Torque:
- 6.4 N*m (65 kgf*cm, 57 in.*lbf)
15678D
8.INSTALL OIL CONTROL VALVE FILTER (for Bank 1)
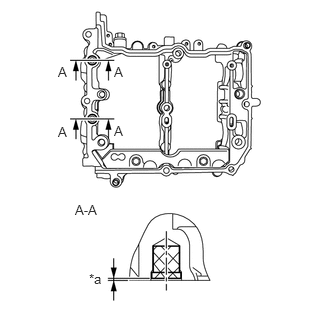
Install 2 new oil control valve filters to the camshaft housing sub-assembly RH as shown in the illustration.
| *a | 0 to 0.5 mm (0 to 0.0197 in.) from the face of the camshaft housing sub-assembly RH |
9.INSTALL CAMSHAFT (for Bank 1)
10.INSTALL CAMSHAFT CAP (for Bank 1)
12101
11.INSTALL OIL PAN SUB-ASSEMBLY
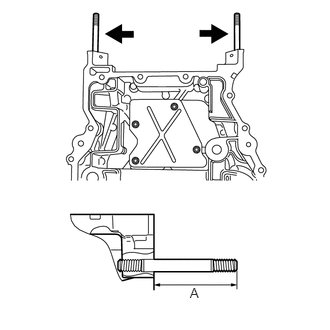
Install the 2 stud bolts to the oil pan sub-assembly.
- Torque:
- 10 N*m (102 kgf*cm, 7 ft.*lbf)
- Standard height (A):
70.0 mm (2.756 in.)
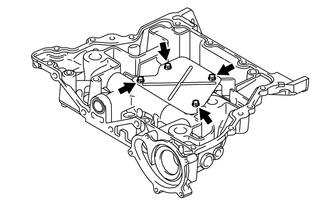
Install the baffle plate to the oil pan sub-assembly with the 4 bolts.
- Torque:
- 6.4 N*m (65 kgf*cm, 57 in.*lbf)
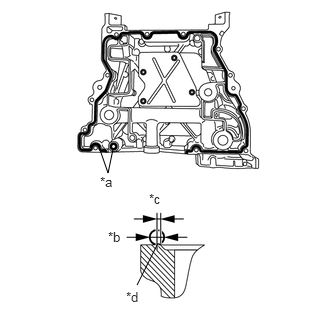
Using a sealer gun, apply seal packing in a continuous line as shown in the illustration.
- Seal packing:
Three Bond 1217G, 1217H or equivalent
| *a | Seal Packing |
| *b | φ4.0 to 6.0 mm (0.158 to 0.236 in.) |
| *c | 1.5 mm (0.059 in.) |
| *d | Chamfer edge |
- NOTICE:
- ·
Clean and degrease the contact surface.
·Install the oil pan sub-assembly within 5 minutes of applying seal packing.
·Apply seal packing 1.5 mm (0.0591 in.) away from the outer side of the chamfer edge. However, it is allowed to apply the seal packing on the chamfer around the bolt hole.
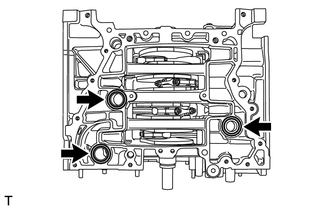
Install 3 new O-rings to the cylinder block.
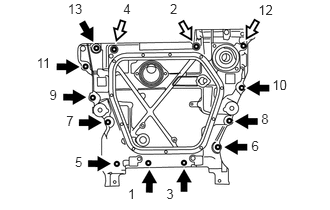
Tighten the 13 bolts in the order shown in the illustration to install the oil pan sub-assembly to the cylinder block.
- Torque:
- 18 N*m (184 kgf*cm, 13 ft.*lbf)

|
Bolt A |

|
Bolt B |
- Length of bolt A:
25.0 mm (0.984 in.)
- Length of bolt B:
75.0 mm (2.953 in.)
- HINT:
-
After tightening the bolts, if the seal packing is squeezed out onto the seal surface of the chain cover, completely remove it.
15104
12.INSTALL OIL STRAINER SUB-ASSEMBLY
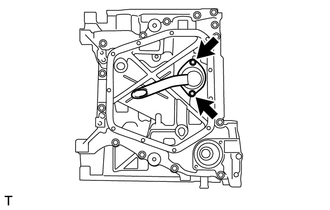
Install a new O-ring.
Install the oil strainer sub-assembly to the oil pan sub-assembly with the 2 bolts.
- Torque:
- 6.4 N*m (65 kgf*cm, 57 in.*lbf)
12102A
13.INSTALL NO. 2 OIL PAN SUB-ASSEMBLY
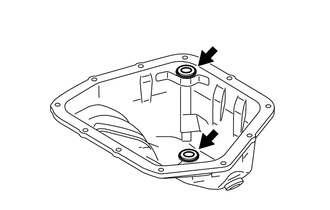
Install 2 new oil pan seal rings to the No. 2 oil pan sub-assembly.
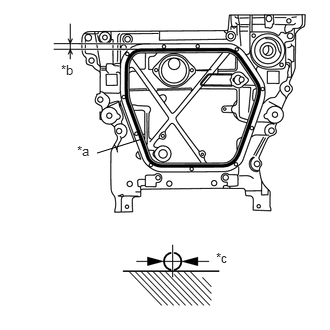
Using a sealer gun, apply seal packing in a continuous line as shown in the illustration.
- Seal packing:
Three Bond 1217G, 1217H or equivalent
- NOTICE:
- ·
Clean and degrease the contact surface.
·Install the No. 2 oil pan sub-assembly within 5 minutes of applying seal packing.
| *a | Seal Packing |
| *b | 9.5 mm (0.374 in.) |
| *c | φ4.0 to 6.0 mm (0.158 to 0.236 in.) |
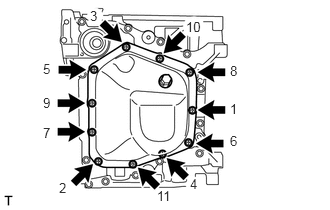
Tighten the 11 bolts in the order shown in the illustration to install the No. 2 oil pan sub-assembly.
- Torque:
- 6.4 N*m (65 kgf*cm, 57 in.*lbf)
Install a new gasket and the drain plug.
- Torque:
- 42 N*m (425 kgf*cm, 31 ft.*lbf)
14.INSTALL NO. 2 ENGINE HANGER
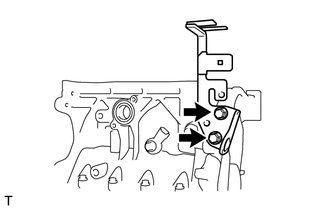
Install the No. 2 engine hanger to the cylinder block (for bank 1) with the 2 bolts.
- Torque:
- 21 N*m (214 kgf*cm, 16 ft.*lbf)
11116
15.INSTALL NO. 2 CYLINDER HEAD GASKET
11102
16.INSTALL CYLINDER HEAD SUB-ASSEMBLY LH
11104A
17.INSTALL CAMSHAFT HOUSING SUB-ASSEMBLY LH
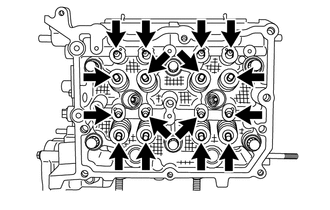
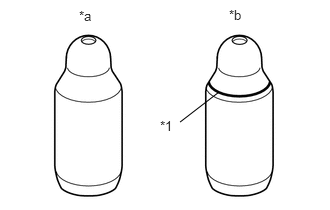
Apply engine oil to the 8 valve adjusting shims and 8 roller rocker arm pivots, and then install them to the cylinder head sub-assembly LH.
- HINT:
- ·
Be sure to install the removed parts in their original locations.
·The shape of the roller rocker arm pivot used for Bank 1 is different from that of the one for Bank 2. They can be distinguished by whether there is an identification groove or not.
| *1 | Identification Groove |
| *a | for Bank 1 |
| *b | for Bank 2 |
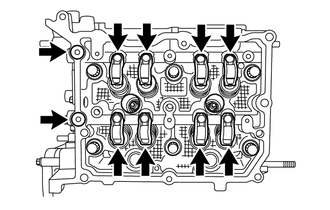
Apply engine oil to 2 new O-rings and the 8 No. 1 valve rocker arm sub-assemblies, and then install them to the cylinder head sub-assembly LH.
Using a sealer gun, apply seal packing in a continuous line as shown in the illustration.
- Seal packing:
Three Bond 1217G, 1217H or equivalent
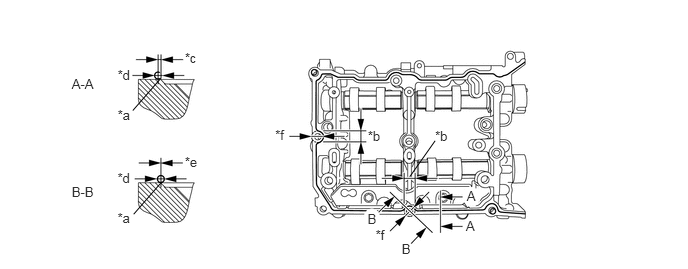
| *a | Chamfer edge | *b | Range of B-B |
| *c | within 1.0 mm (0.0394 in.) | *d | φ2.5 to 3.5 mm (0.098 to 0.138 in.) |
| *e | -0.5 to 0.5 mm (-0.0197 to 0.0197 in.) | *f | 18.0 mm (0.709 in.) |
- NOTICE:
- ·
Clean and degrease the contact surface.
·Do not apply excessive seal packing.
·Install the camshaft housing sub-assembly LH within 5 minutes of applying seal packing.
·After tightening the bolts, if the seal packing is squeezed out onto the seal surface of the chain cover, completely remove it.
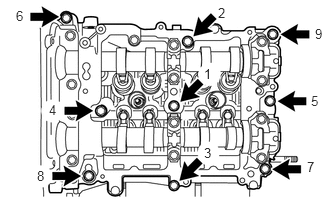
Tighten the 9 bolts in the order shown in the illustration to install the camshaft housing sub-assembly LH.
- Torque:
- 18 N*m (184 kgf*cm, 13 ft.*lbf)
- HINT:
-
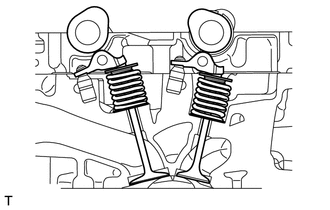
-
Set the intake camshaft LH and the exhaust camshaft LH to the zero-lift position.
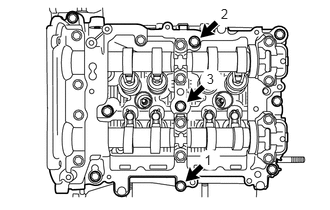
Loosen the 3 bolts by 180° in the order shown in the illustration.
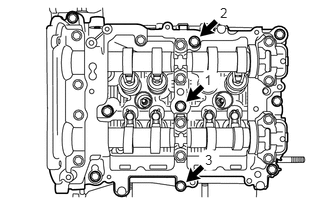
Tighten the 3 bolts in the order shown in the illustration.
- Torque:
- 18 N*m (184 kgf*cm, 13 ft.*lbf)
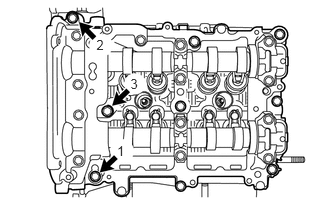
Loosen the 3 bolts by 180° in the order shown in the illustration.
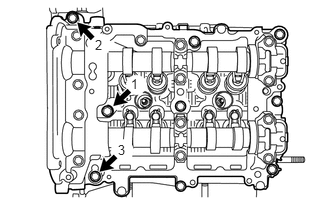
Tighten the 3 bolts in the order shown in the illustration.
- Torque:
- 18 N*m (184 kgf*cm, 13 ft.*lbf)
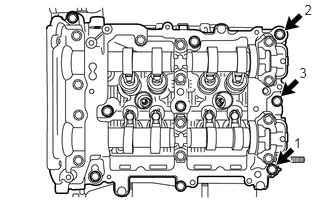
Loosen the 3 bolts by 180° in the order shown in the illustration.
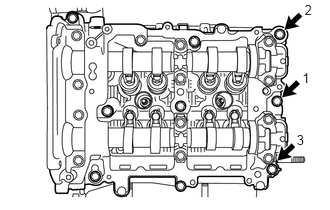
Tighten the 3 bolts in the order shown in the illustration.
- Torque:
- 18 N*m (184 kgf*cm, 13 ft.*lbf)
- HINT:
-
After tightening the bolts, if the seal packing is squeezed out onto the seal surface of the chain cover, completely remove it.
18.INSPECT VALVE CLEARANCE (for Bank 2)
- NOTICE:
-
With the chain sub-assembly (for bank 2) removed, valve heads may contact each other if the camshafts are turned, causing the valve stems to bend. To avoid this, do not turn the intake camshaft LH and exhaust camshaft LH more than the zero-lift rang (The range where the camshafts can be turned lightly by hand).
Using a feeler gauge, check the valve clearance between the cam base circle and the roller surface of the No. 1 valve rocker arm sub-assembly.
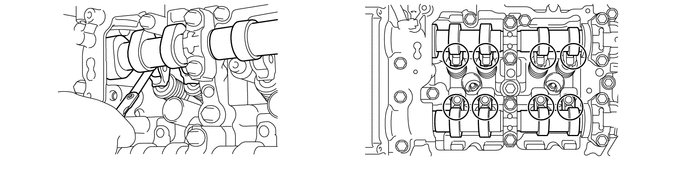
- Standard valve clearance (cold):
0.10 to 0.16 mm (0.0039 to 0.0063 in.) for intake
0.21 to 0.27 mm (0.0083 to 0.0106 in.) for exhaust
- HINT:
- ·
Set the intake camshaft LH and the exhaust camshaft LH to the zero-lift position.
·If the clearance is not as specified, take notes of the value in order to adjust the valve clearance later on.
19.ADJUST VALVE CLEARANCE (for Bank 2)
Remove the camshaft housing sub-assembly LH.
Remove the No. 1 valve rocker arm sub-assemblies.
Remove the valve adjusting shims.
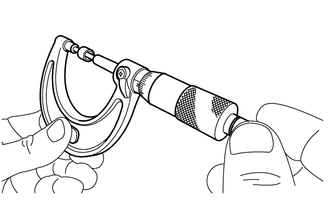
Using a micrometer, measure the thickness of the valve adjusting shims.
Calculate the thickness of the valve adjusting shim so that the valve clearance comes within the specified values.
- Intake side:
A = B + (C - 0.13 mm (0.0051 in.) x 1.54
- Exhaust side:
A = B + (C - 0.24 mm (0.0094 in.) x 1.69
- A:
Required valve adjusting shim thickness
- B:
Removed valve adjusting shim thickness
- C:
Measured valve clearance
Apply engine oil to the inner face of the valve adjusting shims and install them to the valves.
- NOTICE:
-
Check if the shims can be rotated smoothly on the valves.
Install the No. 1 valve rocker arm sub-assemblies.
Install the camshaft housing sub-assembly LH.
11202
20.INSTALL CYLINDER HEAD COVER SUB-ASSEMBLY LH
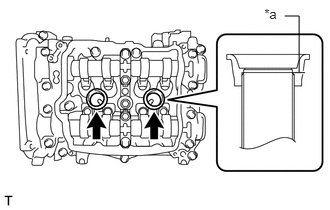
Apply a light layer of engine oil to 2 new spark plug tube gaskets and install them to the spark plug tubes as shown in the illustration.
| *a | Spark plug tube edge |
Install a new cylinder head cover gasket to the cylinder head cover sub-assembly LH.
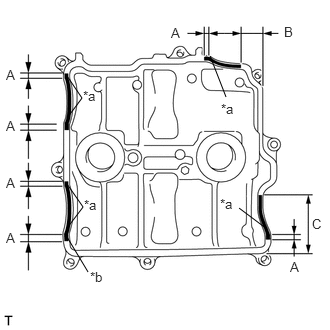
Using a sealer gun, apply seal packing to the mating surface of cylinder head cover sub-assembly LH as shown in the illustration.
- Seal packing:
Three Bond 1217G, 1217H or equivalent
| Area | Application Length |
|---|---|
| A | 10.0 mm (0.394 in.) or more |
| B | 18.8 mm (0.740 in.) or more |
| C | 63.0 mm (2.480 in.) or more |
| *a | Arch starting point |
| *b | φ2,0 to 4.0 mm (0.079 to 0.158 in.) |
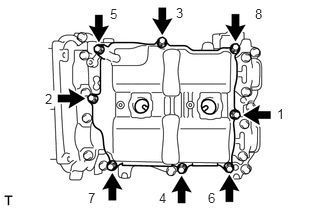
Tighten the 8 bolts in the order shown in the illustration and install the cylinder head cover sub-assembly LH.
- Torque:
- 6.4 N*m (65 kgf*cm, 57 in.*lbf)
11115
21.INSTALL CYLINDER HEAD GASKET
11101
22.INSTALL CYLINDER HEAD SUB-ASSEMBLY RH
11103C
23.INSTALL CAMSHAFT HOUSING SUB-ASSEMBLY RH
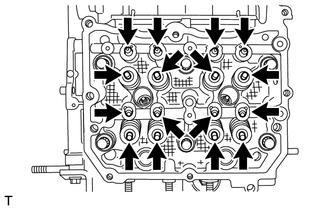
Apply engine oil to the 8 valve adjusting shims and 8 roller rocker arm pivots, and then install them to the cylinder head sub-assembly.
- HINT:
- ·
Be sure to install the removed parts in their original locations.
·The shape of the roller rocker arm pivot used for Bank 1 is different from that of the one for Bank 2. They can be distinguished by whether there is an identification groove or not.
| *1 | Identification Groove |
| *a | for Bank 1 |
| *b | for Bank 2 |
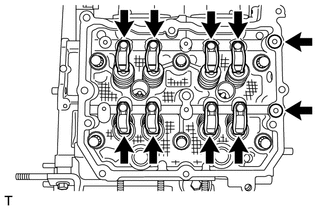
Apply engine oil to 2 new O-rings and the 8 No. 1 valve rocker arm sub-assemblies, and then install them to the cylinder head sub-assembly.
Using a sealer gun, apply seal packing in a continuous line as shown in the illustration.
- Seal packing:
Three Bond 1217G, 1217H or equivalent
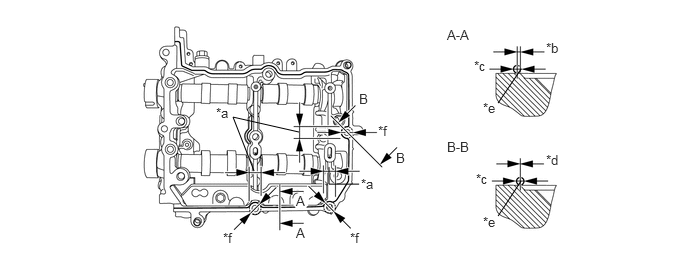
| *a | Range of B-B | *b | 0 to 1.0 mm (0 to 0.0394 in.) |
| *c | φ2.5 to 3.5 mm (0.098 to 0.138 in.) | *d | -0.5 to 0.5 mm (-0.0197 to 0.0197 in.) |
| *e | Chamfer edge | *f | 18.0 mm (0.709 in.) |
- NOTICE:
- ·
Clean and degrease the contact surface.
·Do not apply excessive seal packing.
·Install the camshaft housing sub-assembly RH within 5 minutes of applying seal packing.
- ·
After tightening the bolts, if the seal packing is squeezed out onto the seal surface of the chain cover, completely remove it.
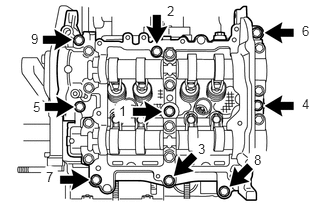
Tighten the 9 bolts in the order shown in the illustration to install the camshaft housing sub-assembly RH.
- Torque:
- 18 N*m (184 kgf*cm, 13 ft.*lbf)
- HINT:
-
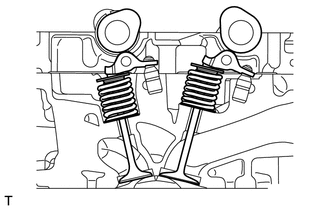
-
Set the intake camshaft RH and the exhaust camshaft RH to the zero-lift position.
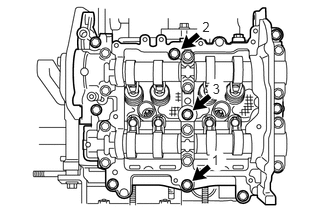
Loosen the 3 bolts by 180° in the order shown in the illustration.
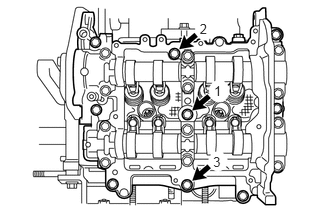
Tighten the 3 bolts in the order shown in the illustration.
- Torque:
- 18 N*m (184 kgf*cm, 13 ft.*lbf)
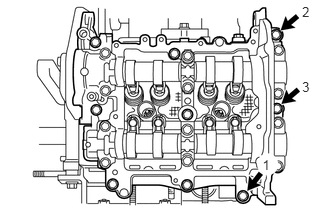
Loosen the 3 bolts by 180° in the order shown in the illustration.
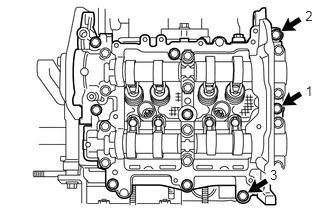
Tighten the 3 bolts in the order shown in the illustration.
- Torque:
- 18 N*m (184 kgf*cm, 13 ft.*lbf)
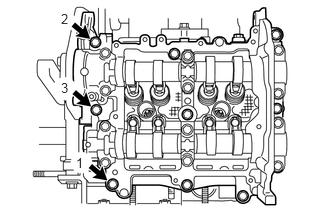
Loosen the 3 bolts by 180° in the order shown in the illustration.
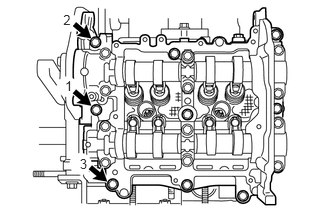
Tighten the 3 bolts in the order shown in the illustration.
- Torque:
- 18 N*m (184 kgf*cm, 13 ft.*lbf)
- HINT:
-
After tightening the bolts, if the seal packing is squeezed out onto the seal surface of the chain cover, completely remove it.
24.INSPECT VALVE CLEARANCE (for Bank 1)
- NOTICE:
-
With the chain sub-assembly (for bank 1) removed, valve heads may contact each other if the camshafts are turned, causing the valve stems to bend. To avoid this, do not turn the intake camshaft RH and exhaust camshaft RH more than the zero-lift rang (The range where the camshafts can be turned lightly by hand).
Using a feeler gauge, check the valve clearance between the cam base circle and the roller surface of the No. 1 valve rocker arm sub-assembly.
- Standard valve clearance (cold):
0.10 to 0.16 mm (0.0039 to 0.0063 in.) for intake
0.21 to 0.27 mm (0.0083 to 0.0106 in.) for exhaust
- HINT:
- ·
Set the intake camshaft RH and the exhaust camshaft RH to the zero-lift position.
·If the clearance is not as specified, take notes of the value in order to adjust the valve clearance later on.
25.ADJUST VALVE CLEARANCE (for Bank 1)
Remove the camshaft housing sub-assembly RH.
Remove the No. 1 valve rocker arm sub-assemblies.
Remove the valve adjusting shims.
Using a micrometer, measure the thickness of the valve adjusting shims.
Calculate the thickness of the valve adjusting shim so that the valve clearance comes within the specified values.
- Intake side:
A = B + (C - 0.13 mm (0.0051 in.) x 1.54
- Exhaust side:
A = B + (C - 0.24 mm (0.0094 in.) x 1.69
- A:
Required valve adjusting shim thickness
- B:
Removed valve adjusting shim thickness
- C:
Measured valve clearance
Apply engine oil to the inner face of the valve adjusting shims and install them to the valves.
- NOTICE:
-
Check if the shims can be rotated smoothly on the valves.
Install the No. 1 valve rocker arm sub-assemblies.
Install the camshaft housing sub-assembly RH.
11201
26.INSTALL CYLINDER HEAD COVER SUB-ASSEMBLY RH
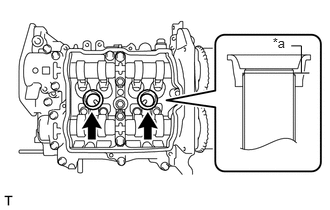
Apply a light layer of engine oil to 2 new spark plug tube gaskets and install them to the spark plug tubes as shown in the illustration.
| *a | Spark plug tube edge |
Install a new cylinder head cover gasket to the cylinder head cover sub-assembly RH.
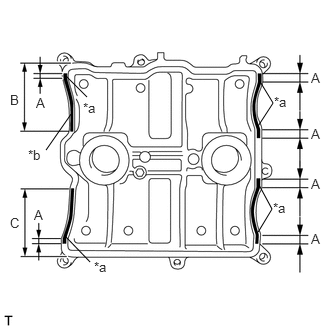
Using a sealer gun, apply seal packing to the mating surface of cylinder head cover sub-assembly RH as shown in the illustration.
- Seal packing:
Three Bond 1217G, 1217H or equivalent
| Area | Application Length |
|---|---|
| A | 10.0 mm (0.394 in.) or more |
| B | 68.0 mm (2.677 in.) or more |
| C | 70.7 mm (2.784 in.) or more |
| *a | Arch starting point |
| *b | φ2,0 to 4.0 mm (0.079 to 0.158 in.) |
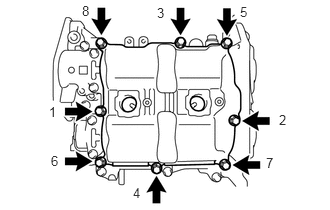
Tighten the 8 bolts in the order shown in the illustration and install the cylinder head cover sub-assembly RH.
- Torque:
- 6.4 N*m (65 kgf*cm, 57 in.*lbf)
89879
27.INSTALL INJECTOR DRIVER BRACKET
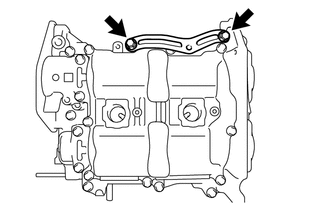
Install the injector driver bracket with the 2 bolts.
- Torque:
- 6.4 N*m (65 kgf*cm, 57 in.*lbf)
19100P
28.INSTALL SPARK PLUG
Using a 14 mm spark plug wrench, install the 4 spark plugs.
- Torque:
- 17 N*m (173 kgf*cm, 13 ft.*lbf)
13080
29.INSTALL CAMSHAFT TIMING EXHAUST GEAR ASSEMBLY LH
13060B
30.INSTALL CAMSHAFT TIMING INTAKE GEAR ASSEMBLY LH
13070
31.INSTALL CAMSHAFT TIMING EXHAUST GEAR ASSEMBLY RH
13050B
32.INSTALL CAMSHAFT TIMING INTAKE GEAR ASSEMBLY RH
13521
33.INSTALL CRANKSHAFT TIMING GEAR OR SPROCKET
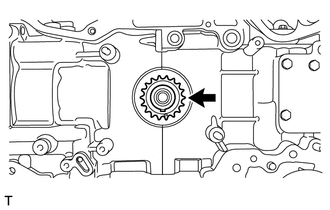
Install the crankshaft timing gear or sprocket.
13506
34.INSTALL CHAIN SUB-ASSEMBLY (for Bank 2)
- NOTICE:
-
Do not allow any foreign matter to adhere or to enter into the component parts during installation.
- HINT:
-
Apply engine oil to all component parts of the chain sub-assembly.
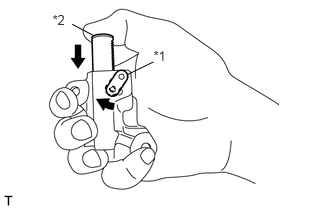
Move the link plate in the direction of the arrow in the illustration to press in the plunger.
| *1 | Link Plate |
| *2 | Plunger |
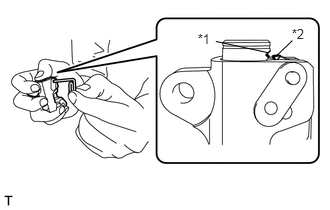
Insert an approximately 1 mm (0.0394 in.) diameter wire or the like into the chain tensioner assembly through the stopper pin hole, and hold the plunger.
| *1 | First notch of the plunger rack |
| *2 | Stopper Tooth |
- HINT:
-
If the stopper pin hole on the link plate and the stopper pin hole on the chain tensioner assembly are not aligned, check that the first notch of the plunger rack is engaged with the stopper tooth. If not engaged, retract the plunger a little so that the first notch of the plunger rack is engaged with the stopper tooth.
Temporarily install the crankshaft pulley spacer and crankshaft pulley.
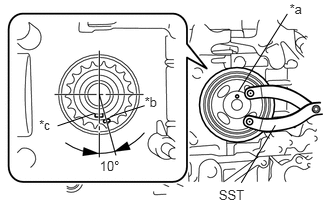
Using SST, set the crankshaft pulley pin hole at the position shown in the illustration.
- SST
- 09960-10010 (09962-01000, 09963-01000)
| *a | Crankshaft Pulley Pin Hole |
| *b | Alignment Mark |
| *c | Crankshaft Timing Gear key |
- NOTICE:
-
Make sure to perform this operation to prevent the valves and pistons from contacting each other.
- HINT:
-
At this time, the alignment mark on the crankshaft timing gear or sprocket and the crankshaft timing gear key are at the positions shown in the illustration.
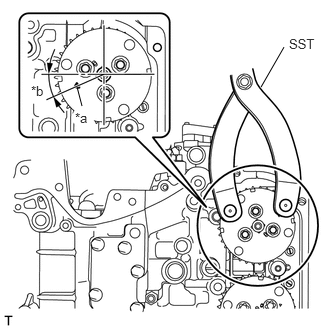
Using SST, turn the camshaft timing intake gear assembly LH and align the alignment mark as shown in the illustration.
- SST
- 09960-10010 (09962-01000, 09963-00700)
| *a | Alignment Mark |
| *b | 25°to 30° |
- NOTICE:
-
Do not turn the exhaust camshaft LH. If the exhaust camshaft LH is turned, valve heads may come into contact with each other, causing the valve stems to bend.
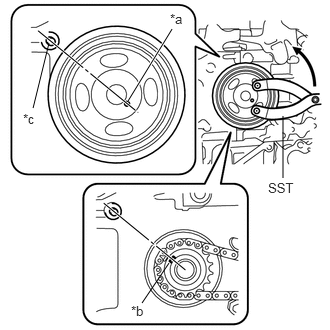
Using SST, turn the crankshaft about 200 degrees counterclockwise until the crankshaft pulley pin hole is aligned at the position shown in the illustration.
- SST
- 09960-10010 (09962-01000, 09963-01000)
| *a | Crankshaft Pulley Pin Hole |
| *b | Crankshaft Timing Gear key |
| *c | Cylinder Block Guide Pin |
- NOTICE:
-
Never turn the crankshaft clockwise because the valves may come into contact with the piston. Turning the crankshaft clockwise is only allowed when adjusting the key position precisely.
- HINT:
-
At this time, the crankshaft timing gear key is at the position shown in the illustration.
Remove the crankshaft pulley and crankshaft pulley spacer.
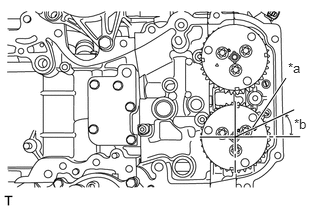
Align the alignment mark on the camshaft timing exhaust gear assembly LH as shown in the illustration.
| *a | Alignment Mark |
| *b | 25° to 30° |
- NOTICE:
-
To avoid damaging the valves, do not turn the camshaft timing exhaust gear assembly LH more than the zero-lift range (The range where camshaft timing exhaust gear assembly LH can be turned lightly by hand).
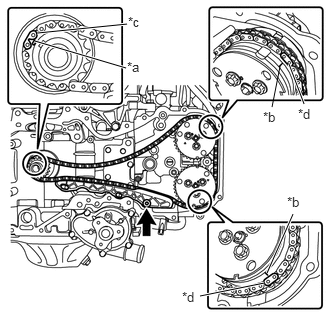
Install the chain sub-assembly in the following order.
| *a | Alignment Mark (Oval) |
| *b | Alignment Mark (Engraved Line) |
| *c | Mark plate (Grayish Blue) |
| *d | Mark plate (Pink) |
Align the mark plate (grayish blue) on the chain sub-assembly with the alignment mark (oval) on the crankshaft timing gear or sprocket.
Align the mark plate (pink) on the chain sub-assembly with the alignment mark (engraved line) on the camshaft timing exhaust gear assembly LH.
Align the mark plate (pink) on the chain sub-assembly with the alignment mark (engraved line) on the camshaft timing intake gear assembly LH.
Using a 5 mm hexagon socket wrench, install the No. 1 chain vibration damper with the bolt.
- Torque:
- 6.4 N*m (65 kgf*cm, 57 in.*lbf)
- HINT:
-
Apply engine oil to the bolt before install it.
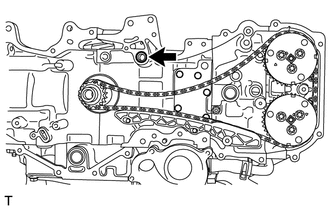
Install a new O-ring to the cylinder block (for bank 2).
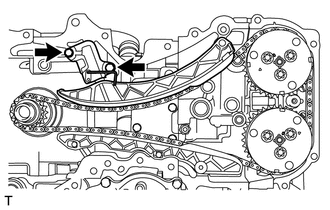
Install the chain tensioner slipper.
Install the No. 2 chain tensioner assembly with the 2 bolts.
- Torque:
- 6.4 N*m (65 kgf*cm, 57 in.*lbf)
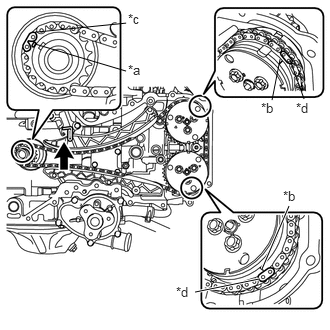
Check that the chain is correctly installed.
| *a | Alignment Mark (Oval) |
| *b | Alignment Mark (Engraved Line) |
| *c | Mark plate (Grayish Blue) |
| *d | Mark plate (Pink) |
The mark plate (grayish blue) on the chain sub-assembly is aligned with the alignment mark (oval) on the crankshaft timing gear or sprocket.
The mark plate (pink) on the chain sub-assembly is aligned with the alignment mark (engraved line) on the camshaft timing intake gear assembly LH.
The mark plate (pink) on the chain sub-assembly is aligned with the alignment mark (engraved line) on the camshaft timing exhaust gear assembly LH.
Pull out the wire or the like from the No. 2 chain tensioner assembly.
Temporarily install the crankshaft pulley spacer and crankshaft pulley.
Using SST, turn the crankshaft clockwise to make sure that there are no abnormal conditions.
- SST
- 09960-10010 (09962-01000, 09963-01000)
- NOTICE:
-
Be sure to perform this confirmation.
13506
35.INSTALL CHAIN SUB-ASSEMBLY (for Bank 1)
- NOTICE:
-
Do not allow any foreign matter to adhere or to enter into the component parts during installation.
- HINT:
-
Apply engine oil to all component parts of the chain sub-assembly.
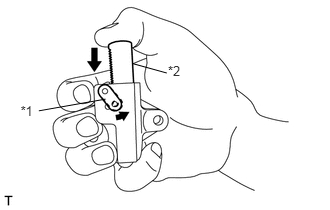
Move the link plate in the direction of the arrow in the illustration to press in the plunger.
| *1 | Link Plate |
| *2 | Plunger |
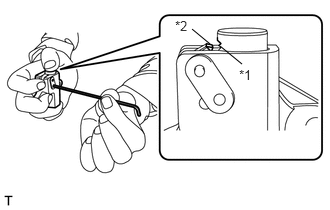
Insert a 2.5 mm (0.098 in.) diameter hexagon wrench into the No. 1 chain tensioner assembly through the stopper pin hole, and hold the plunger.
| *1 | First notch of the plunger rack |
| *2 | Stopper Tooth |
- HINT:
-
If the stopper pin hole on the link plate and the stopper pin hole on the chain tensioner assembly are not aligned, check that the first notch of the plunger rack is engaged with the stopper tooth. If not engaged, retract the plunger a little so that the first notch of the plunger rack is engaged with the stopper tooth.
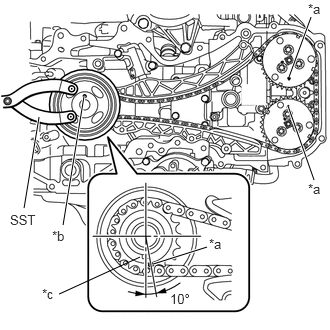
Using SST, turn the crankshaft pulley until the alignment marks on the camshaft timing intake gear assembly LH and the camshaft timing exhaust gear assembly LH, and the crankshaft pulley pin hole are aligned at the positions shown in the illustration.
- SST
- 09960-10010 (09962-01000, 09963-01000)
| *a | Alignment Mark |
| *b | Crankshaft Pulley Pin Hole |
| *c | Crankshaft Timing Gear Key |
- HINT:
-
At this time, the alignment mark on the crankshaft timing gear or sprocket and the crankshaft timing gear key are at the positions shown in the illustration.
Remove the crankshaft pulley and crankshaft pulley spacer.
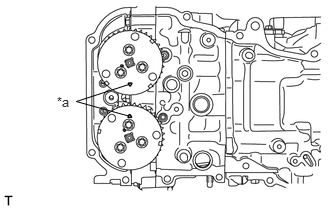
Align the alignment marks of the camshaft timing intake gear assembly RH and camshaft timing exhaust gear assembly RH as shown in the illustration.
| *a | Alignment Mark |
- NOTICE:
-
To avoid damaging the valves, do not turn the camshaft timing intake gear assembly RH and camshaft timing exhaust gear assembly RH more than the zero-lift range (The range where the camshafts can be turned lightly by hand).
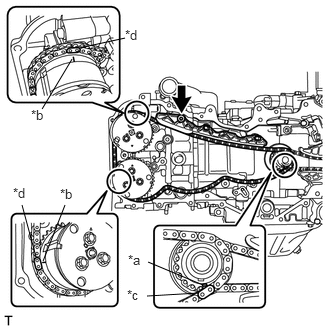
Install the chain sub-assembly in the following order.
| *a | Alignment Mark (Oval) |
| *b | Alignment Mark (Engraved Line) |
| *c | Mark plate (Grayish Blue) |
| *d | Mark plate (Pink) |
Align the mark plate (grayish blue) on the chain sub-assembly with the alignment mark (oval) on the crankshaft timing gear or sprocket.
Align the mark plate (pink) on the chain sub-assembly with the alignment mark (engraved line) on the camshaft timing intake gear assembly RH.
Align the mark plate (pink) on the chain sub-assembly with the alignment mark (engraved line) on the camshaft timing exhaust gear assembly RH.
Using a 5 mm hexagon socket wrench, install the No. 1 chain vibration damper with the bolt.
- Torque:
- 6.4 N*m (65 kgf*cm, 57 in.*lbf)
- HINT:
-
Apply engine oil to the bolt before install it.
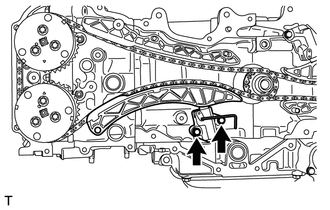
Install the chain tensioner slipper.
Install the No. 1 chain tensioner assembly with the 2 bolts.
- Torque:
- 6.4 N*m (65 kgf*cm, 57 in.*lbf)
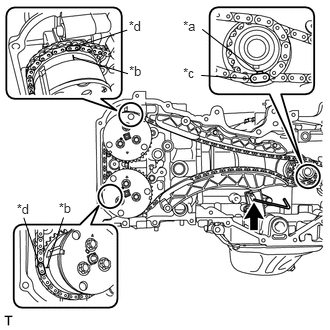
Check that the chain is correctly installed.
| *a | Alignment Mark (Oval) |
| *b | Alignment Mark (Engraved Line) |
| *c | Mark plate (Grayish Blue) |
| *d | Mark plate (Pink) |
The mark plate (grayish blue) on the chain sub-assembly is aligned with the alignment mark (oval) on the crankshaft timing gear or sprocket.
The mark plate (pink) on the chain sub-assembly is aligned with the alignment mark (engraved line) on the camshaft timing intake gear assembly RH.
The mark plate (pink) on the chain sub-assembly is aligned with the alignment mark (engraved line) on the camshaft timing exhaust gear assembly RH.
Pull out the hexagon wrench from the No. 1 chain tensioner assembly.
Temporarily install the crankshaft pulley spacer and crankshaft pulley.
Using SST, turn the crankshaft clockwise to make sure that there are no abnormal conditions.
- SST
- 09960-10010 (09962-01000, 09963-01000)
- NOTICE:
-
Be sure to perform this confirmation.
Remove the crankshaft pulley and crankshaft pulley spacer.
11302
36.INSTALL TIMING CHAIN OR BELT COVER SUB-ASSEMBLY
Apply a light layer of engine oil to 4 new O-rings and attach them to the engine.
Clean and degrease the contact surface.
If there are gaps at positions shown in the illustration, fill up with seal packing by using a sealer gun.
- Seal packing:
Three Bond 1217G, 1217H or equivalent
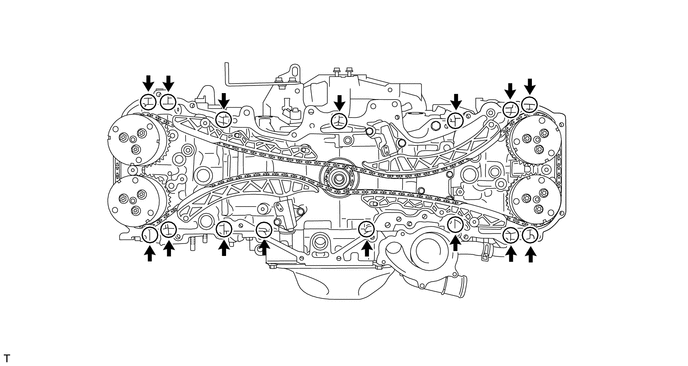
Using a sealer gun, apply seal packing in a continuous line as shown in the illustration.
- Seal packing:
Three Bond 1217G, 1217H or equivalent
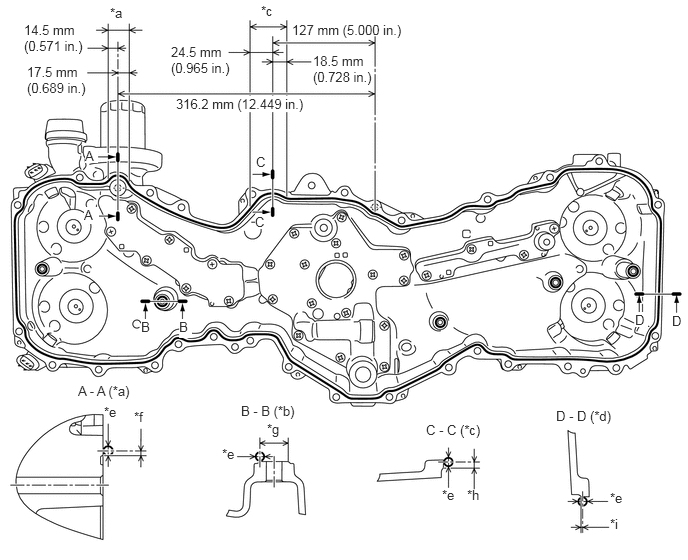
| *a | Area A | *b | Boss (5 locations) |
| *c | Area B | *d | Other than ranges A and B |
| *e | φ3.5 to 4.5 mm (0.138 to 0.177 in.) | *f | 2.0 mm (0.079 in.) |
| *g | φ12 mm (0.472 in.) | *h | 2.5 mm (0.098 in.) |
| *i | 0.5 mm (0.0197 in.) | - | - |
- NOTICE:
- ·
Clean and degrease the contact surface.
·Install the chain cover within 5 minutes of applying seal packing.
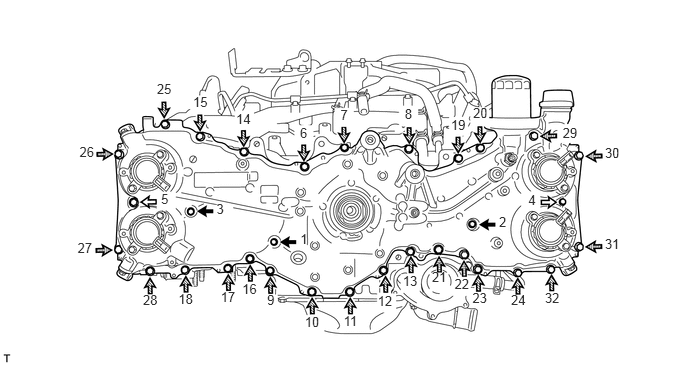
Temporarily install the timing chain or belt cover sub-assembly with the 32 bolts.
Securely tighten the 32 bolts in the order as shown in the illustration.
|
|
Bolt A |
|
Bolt B |

|
Bolt C | 
|
Bolt D |
- Torque:
- Bolt A and B : 10 N*m (102 kgf*cm, 7 ft.*lbf)
- Bolt C and D : 25 N*m (255 kgf*cm, 18 ft.*lbf)
- Bolt Length:
Item Length Item Length Bolt A 20 mm (0.787 in.) Bolt B 50 mm (1.969 in.) Bolt C 25 mm (0.984 in.) Bolt D 60 mm (2.362 in.)
11302A
37.INSTALL TIMING CHAIN COVER OIL SEAL
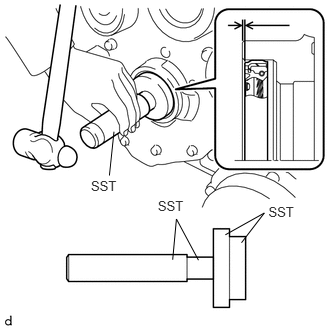
Degrease the area in which to press-fit the oil seal for the timing chain or belt cover sub-assembly.
Using SST and a hammer, tap in a new timing chain or belt cover oil seal until its surface is flush with the timing chain or belt cover sub-assembly edge.
- SST
- 09950-60010 (09952-06010, 09951-00490, 09951-00650)
09950-70010 (09951-07100)
- NOTICE:
- ·
Do not tap the oil seal at an angle.
·Do not deform the oil seal.
·Keep the lip free from foreign matter.
·Do not apply engine oil to the dust seal section.
·Do not apply engine oil, etc., to the oil seal or the timing chain or belt cover sub-assembly, because doing so could cause an engine oil leak.
- HINT:
-
Alternatively, the tapping depth of the timing chain cover oil seal can be 0 to -1.0 mm (0 to -0.0394 in.) from the timing chain cover end surface.
13471
38.INSTALL CRANKSHAFT PULLEY
Install the crankshaft pulley spacer.
Install a new O-ring to the crankshaft pulley spacer.
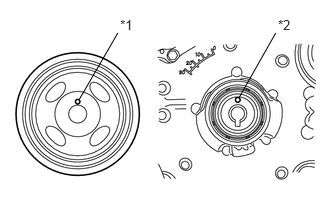
Install the crankshaft pulley while aligning the knock hole of the pulley with the knock pin on the crankshaft pulley spacer.
| *1 | Knock Hole |
| *2 | Knock Pin |
Apply engine oil to threads and seat sections of the crankshaft pulley set bolt.
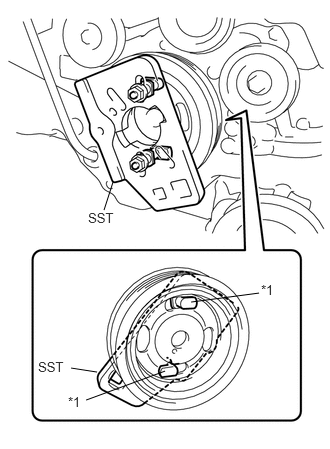
Install SST to the crankshaft pulley.
- SST
- 09213-80010 (90179-10016, 09213-08010, 09213-08110)
- HINT:
-
Position the projections on SST in the direction as shown in the illustration to prevent SST from separating from the crankshaft pulley.
| *1 | Claw |
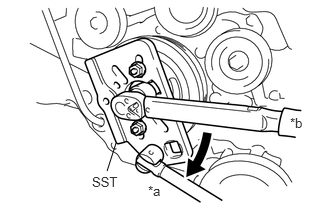
Using SST, hold the crankshaft pulley and tighten the crankshaft pulley set bolt.
- SST
- 09213-80010 (90179-10016, 09213-08010, 09213-08110)
- Torque:
- 20 N*m (204 kgf*cm, 15 ft.*lbf)
| *a | Hold |
| *b | Turn |
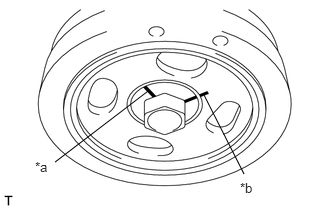
Using a marker, draw the reference line (A) on the crankshaft pulley set bolt and also the reference line (B) on the crankshaft pulley according to the line engraved around the crankshaft pulley set bolt head as shown in the illustration.
| *a | Reference Line A |
| *b | Reference Line B |
- HINT:
-
There are carved lines on the crankshaft pulley set bolt head every 90°.
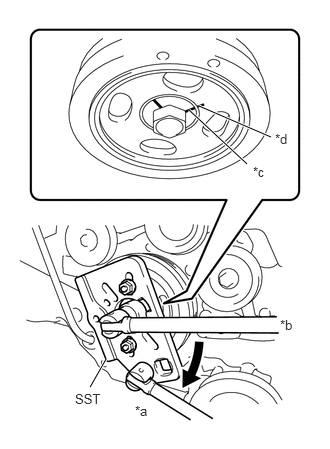
Using SST, hold the crankshaft pulley, and tighten the crankshaft pulley set bolt by 90° until the reference lines A and B are aligned.
- SST
- 09213-80010 (90179-10016, 09213-08010, 09213-08110)
| *a | Hold |
| *b | Turn |
| *c | Reference Line A |
| *d | Reference Line B |
16331A
39.INSTALL THERMOSTAT
Attach a new gasket to the thermostat.
16331
40.INSTALL WATER OUTLET
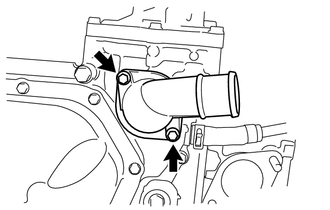
Install the thermostat and water outlet with the 2 bolts.
- Torque:
- 6.4 N*m (65 kgf*cm, 57 in.*lbf)
16100
41.INSTALL ENGINE WATER PUMP ASSEMBLY
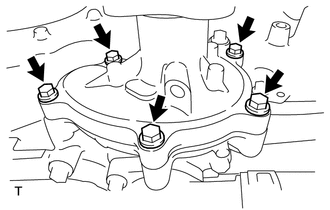
Install a new gasket and the water pump assembly with the 5 bolts.
- Torque:
- 6.4 N*m (65 kgf*cm, 57 in.*lbf)
16173
42.INSTALL WATER PUMP PULLEY
Temporarily install the water pump pulley with the 3 bolts.
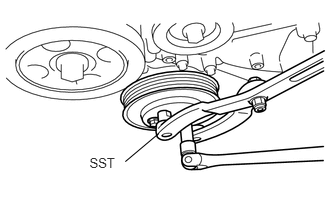
Using SST, hold the water pump pulley.
- SST
- 09960-10010 (09962-01000, 09963-00700)
Securely tighten the 3 bolts.
- Torque:
- 14 N*m (143 kgf*cm, 10 ft.*lbf)
16603
43.INSTALL NO. 1 IDLER PULLEY SUB-ASSEMBLY
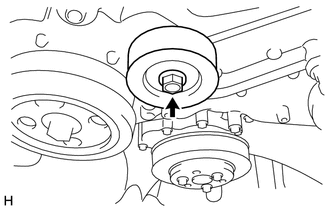
Install the idler pulley cover and No. 1 idler pulley sub-assembly with the bolt.
- Torque:
- 36 N*m (367 kgf*cm, 27 ft.*lbf)
16603
44.INSTALL NO. 1 IDLER PULLEY SUB-ASSEMBLY
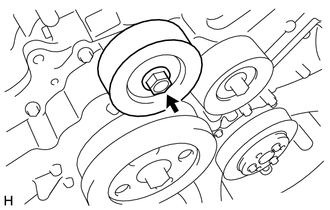
Install the idler pulley cover and No. 1 idler pulley sub-assembly with the bolt.
- Torque:
- 36 N*m (367 kgf*cm, 27 ft.*lbf)
12204
45.INSTALL PCV VALVE SUB-ASSEMBLY
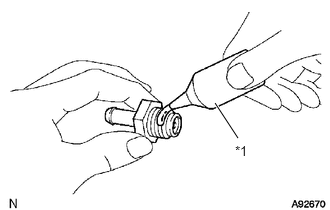
Apply adhesive to 2 or 3 threads of the PCV valve sub-assembly.
- Adhesive:
Toyota Genuine Adhesive 1324, Three Bond 1324 or equivalent
| *1 | Adhesive |
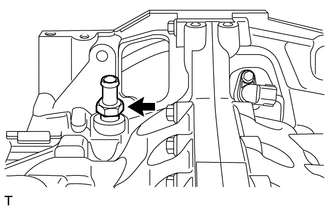
Using a 19 mm deep socket wrench, install the PCV valve sub-assembly.
- Torque:
- 23 N*m (235 kgf*cm, 17 ft.*lbf)
16322
46.INSTALL WATER INLET PIPE
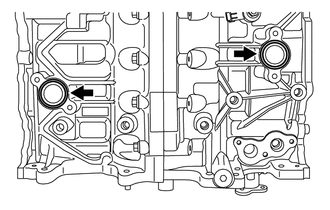
Attach 2 new O-rings to the cylinder block.
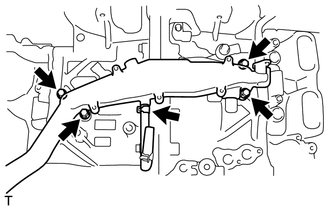
Install the water inlet pipe with the 4 bolts.
- Torque:
- 6.4 N*m (65 kgf*cm, 57 in.*lbf)
Connect the No. 3 water by-pass hose with the clamp.
11181
47.INSTALL REAR CYLINDER HEAD PLATE (for Manual Transmission)
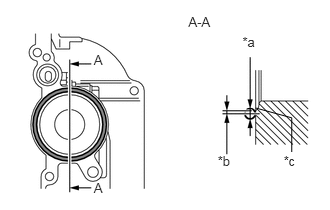
Using a sealer gun, apply seal packing in a continuous line as shown in the illustration.
- Seal packing:
Three Bond 1217G, 1217H or equivalent
| *a | φ2,0 to 4.0 mm (0.079 to 0.158 in.) |
| *b | Within 1.0 mm (0.0394 in.) |
| *c | Chamfer edge |
- NOTICE:
- ·
Clean and degrease the contact surface.
·Install the rear cylinder head plate within 5 minutes of applying seal packing.
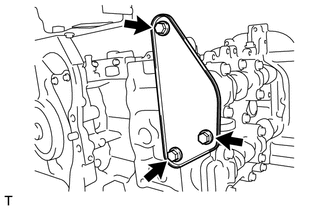
Install the rear cylinder head plate with the 3 bolts.
- Torque:
- 16 N*m (163 kgf*cm, 12 ft.*lbf)
29300
48.INSTALL VACUUM PUMP ASSEMBLY (for Automatic Transmission)
11401S
49.INSTALL PCV HOSE CONNECTOR
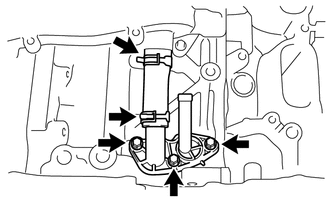
Connect the No. 2 water by-pass hose to the PCV hose connector and water inlet pipe with the clips.
Install the PCV hose connector with the 3 bolts.
- Torque:
- 6.4 N*m (65 kgf*cm, 57 in.*lbf)
83530
50.INSTALL ENGINE OIL PRESSURE SWITCH ASSEMBLY
Clean and degrease the threads of the engine oil pressure switch assembly.
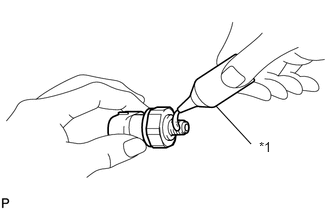
Apply adhesive 1324 to the threads of the engine oil pressure switch assembly.
- Adhesive:
Toyota Genuine Adhesive 1324, Three Bond 1324 or equivalent
| *1 | Adhesive 1324 |
- NOTICE:
-
Keep the oil hole free from adhesive.
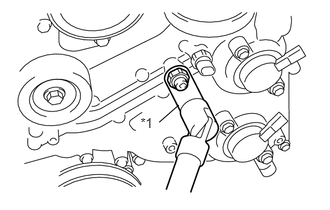
Using a 24 mm deep socket wrench, install the engine oil pressure switch assembly.
| *1 | 24 mm Deep Socket Wrench |
- Torque:
- 18 N*m (184 kgf*cm, 13 ft.*lbf)
- NOTICE:
-
Do not start the engine for at least 1 hour after installation.
51.INSTALL ENGINE OIL TEMPERATURE SENSOR
Attach a new gasket to the engine oil temperature sensor.
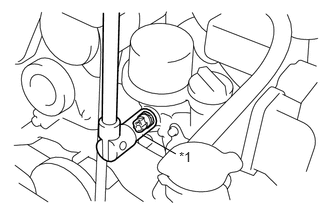
Using a 19 mm deep socket wrench, install the engine oil temperature sensor.
| *1 | 19 mm Deep Socket Wrench |
- Torque:
- 18 N*m (184 kgf*cm, 13 ft.*lbf)
15330
52.INSTALL CAMSHAFT TIMING OIL CONTROL VALVE
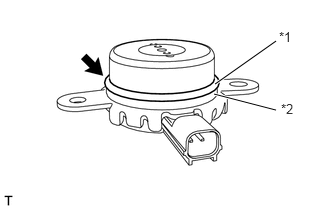
Install the back-up ring to the camshaft timing oil control valve (for exhaust side of bank 2).
| *1 | O-ring |
| *2 | Back-up ring |
Install a new O-ring to the camshaft timing oil control valve (for exhaust side of bank 2).
Apply a light coat of engine oil to the O-ring.
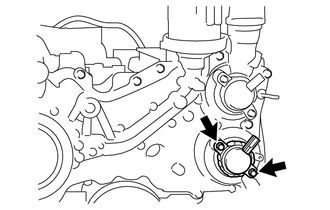
Install the camshaft timing oil control valve (for exhaust side of bank 2) with the 2 bolts.
- Torque:
- 6.4 N*m (65 kgf*cm, 57 in.*lbf)
Install the back-up ring to the camshaft timing oil control valve (for intake side of bank 2).
Install a new O-ring to the camshaft timing oil control valve (for intake side of bank 2).
Apply a light coat of engine oil to the O-ring.
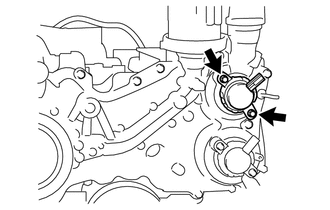
Install the camshaft timing oil control valve (for intake side of bank 2) with the 2 bolts.
- Torque:
- 6.4 N*m (65 kgf*cm, 57 in.*lbf)
Install the back-up ring to the camshaft timing oil control valve (for exhaust side of bank 1).
Install a new O-ring to the camshaft timing oil control valve (for exhaust side of bank 1).
Apply a light coat of engine oil to the O-ring.
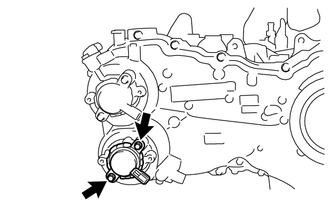
Install the camshaft timing oil control valve (for exhaust side of bank 1) with the 2 bolts.
- Torque:
- 6.4 N*m (65 kgf*cm, 57 in.*lbf)
Install the back-up ring to the camshaft timing oil control valve (for intake side of bank 1).
Install a new O-ring to the camshaft timing oil control valve (for intake side of bank 1).
Apply a light coat of engine oil to the O-ring.
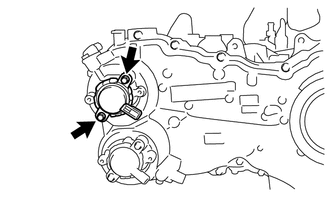
Install the camshaft timing oil control valve (for intake side of bank 1) with the 2 bolts.
- Torque:
- 6.4 N*m (65 kgf*cm, 57 in.*lbf)
11102A
53.INSTALL VVT SENSOR
Install a new O-ring to the VVT sensor (for exhaust side of bank 2).
Apply a light coat of engine oil to the O-ring.
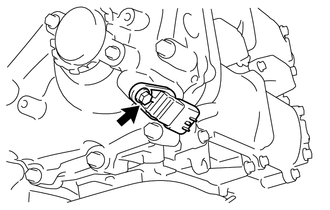
Install the VVT sensor (for exhaust side of bank 2) with the bolt.
- Torque:
- 6.4 N*m (65 kgf*cm, 57 in.*lbf)
Install a new O-ring to the VVT sensor (for intake side of bank 2).
Apply a light coat of engine oil to the O-ring.
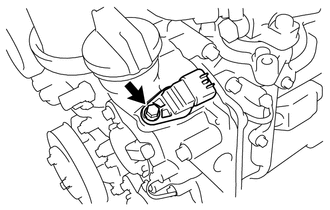
Install the VVT sensor (for intake side of bank 2) with the bolt.
- Torque:
- 6.4 N*m (65 kgf*cm, 57 in.*lbf)
Install a new O-ring to the VVT sensor (for exhaust side of bank 1).
Apply a light coat of engine oil to the O-ring.
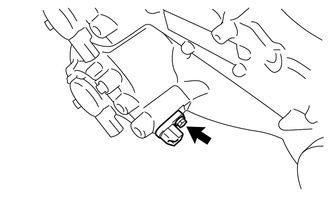
Install the VVT sensor (for exhaust side of bank 1) with the bolt.
- Torque:
- 6.4 N*m (65 kgf*cm, 57 in.*lbf)
Install a new O-ring to the VVT sensor (for intake side of bank 1).
Apply a light coat of engine oil to the O-ring.
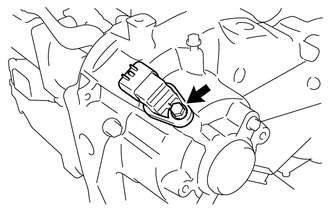
Install the VVT sensor (for intake side of bank 1) with the bolt.
- Torque:
- 6.4 N*m (65 kgf*cm, 57 in.*lbf)
11401G
54.INSTALL CRANK POSITION SENSOR
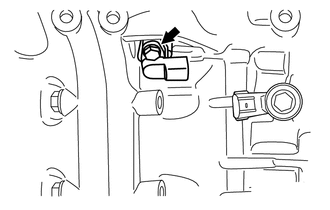
Install the crank position sensor with the bolt.
- Torque:
- 6.4 N*m (65 kgf*cm, 57 in.*lbf)
89615
55.INSTALL KNOCK CONTROL SENSOR
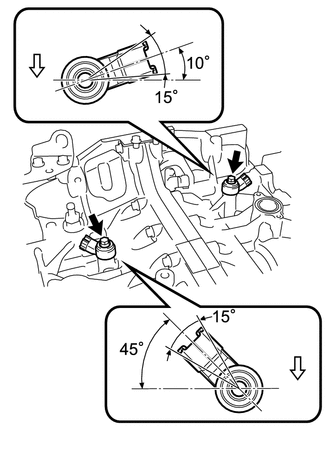
Install the 2 knock control sensors onto the cylinder block with the 2 bolts as shown in the illustration.
- Torque:
- 24 N*m (245 kgf*cm, 18 ft.*lbf)
|
|
Engine front |
89422
56.INSTALL E.F.I. WATER TEMPERATURE SENSOR
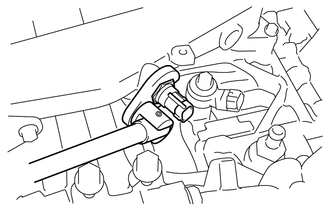
Using a 19 mm union nut wrench, install a new gasket and the E.F.I. water temperature sensor.
- Torque:
- 18 N*m (184 kgf*cm, 13 ft.*lbf)
- NOTICE:
-
Use the formula to calculate special torque values for situations where a union nut wrench is combined with a torque wrench (See page General>INTRODUCTION>REPAIR INSTRUCTION>PRECAUTION).
15600A
57.INSTALL OIL FILTER UNION
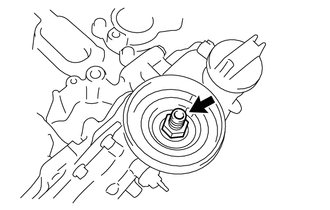
Install the oil filter union.
- Torque:
- 45 N*m (459 kgf*cm, 33 ft.*lbf)
15601
58.INSTALL OIL FILTER SUB-ASSEMBLY
Apply engine oil to the installation surface of the oil filter sub-assembly.
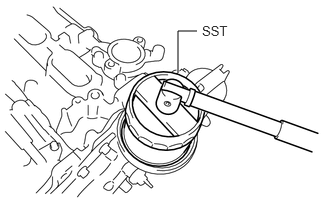
Using SST, install the oil filter sub-assembly.
- SST
- 09228-22020
- Torque:
- 14 N*m (143 kgf*cm, 10 ft.*lbf)
59.INSTALL OIL FILLER CAP
Install the oil filler cap.