Home › Vehicle Interior › LIGHTING (INT) › LIGHTING SYSTEM
RM2090E _58 Vehicle Interior _060698 LIGHTING (INT) _0297690 LIGHTING SYSTEM J

LIGHTING (INT)  LIGHTING SYSTEM  Ignition Key Cylinder Light Circuit  


DESCRIPTION

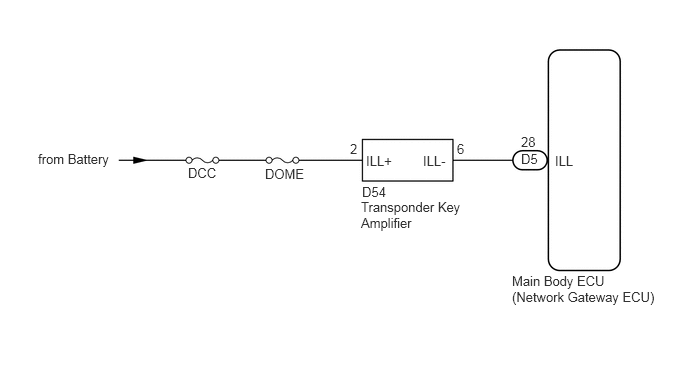
The main body ECU (network gateway ECU) controls the operation of the transponder key amplifier (ignition key cylinder light).

WIRING DIAGRAM
E249228E03
5.333,2.844 6.854,3.188 1.521,0.344 10 false Main Body ECU (Network Gateway ECU) 0.396,1.573 1.188,1.76 0.792,0.188 10 false from Battery 2.76,1.729 3.208,1.896 0.448,0.167 10 false DOME 1.958,1.719 2.26,1.896 0.302,0.177 10 false DCC 3.76,2.073 4.802,2.417 1.042,0.344 10 false Transponder Key Amplifier 5.427,1.573 5.635,1.74 0.208,0.167 10 false D5 5.781,1.594 6,1.76 0.219,0.167 10 false ILL 4.406,1.594 4.688,1.76 0.281,0.167 10 false ILL- 3.813,1.594 4.104,1.771 0.292,0.177 10 false ILL+ 5.427,1.396 5.594,1.552 0.167,0.156 10 false 28 3.771,1.917 4.052,2.073 0.281,0.156 10 false D54 3.646,1.469 3.75,1.646 0.104,0.177 10 false 2 4.76,1.469 4.885,1.635 0.125,0.167 10 false 6

CAUTION / NOTICE / HINT

NOTICE:

Inspect the fuses for circuits related to this system before performing the following inspection procedure.


PROCEDURE

1.PERFORM ACTIVE TEST USING GTS
a.

Connect the GTS to the DLC3.


b.

Turn the ignition switch to ON.


c.

Turn the GTS on.


d.

Enter the following menus: Body Electrical / Main Body / Active Test.


e.

Check that the light operate.

ON:

Ignition key cylinder light comes on


Main Body
Tester Display Test Part Control Range Diagnostic Note
Key Ring Light Ignition key cylinder light ON/OFF -


OK

PROCEED TO NEXT SUSPECTED AREA SHOWN IN PROBLEM SYMPTOMS TABLE

NG

2.INSPECT TRANSPONDER KEY AMPLIFIER
a.

Remove the transponder key amplifier (See page Vehicle Interior>LIGHTING (INT)>IGNITION KEY CYLINDER LIGHT>REMOVAL).


b.

Inspect the transponder key amplifier (See page Vehicle Interior>LIGHTING (INT)>IGNITION KEY CYLINDER LIGHT>INSPECTION).

OK:

Transponder key amplifier is normal.


OK

3.CHECK HARNESS AND CONNECTOR (TRANSPONDER KEY AMPLIFIER - BATTERY)

NG

REPLACE TRANSPONDER KEY AMPLIFIER

3.CHECK HARNESS AND CONNECTOR (TRANSPONDER KEY AMPLIFIER - BATTERY)
a.

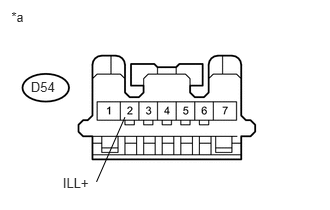
Disconnect the D54 transponder key amplifier connector.

b.
U147244E01
0.321,0.826 0.593,1.007 0.272,0.181 10 D54 0.118,0.091 0.274,0.273 0.156,0.181 10 *a 0.654,1.818 0.947,1.956 0.293,0.138 10 ILL+ 1.005,1.894 1.301,1.22 false

Measure the voltage according to the value(s) in the table below.

Standard Voltage:
Tester Connection Condition Specified Condition
D54-2 (ILL+) - Body ground Always 11 to 14 V


Text in Illustration
*a Front view of wire harness connector
(to transponder key amplifier)


OK

4.CHECK HARNESS AND CONNECTOR (TRANSPONDER KEY AMPLIFIER - MAIN BODY ECU (NETWORK GATEWAY ECU))

NG

REPAIR OR REPLACE HARNESS OR CONNECTOR

4.CHECK HARNESS AND CONNECTOR (TRANSPONDER KEY AMPLIFIER - MAIN BODY ECU (NETWORK GATEWAY ECU))
a.

Disconnect the D54 transponder key amplifier connector.


b.

Disconnect the D5 main body ECU (network gateway ECU) connector.


c.

Measure the resistance according to the value(s) in the table below.

Standard Resistance:
Tester Connection Condition Specified Condition
D54-6 (ILL-) - D5-28 (ILL) Always Below 1 Ω
D5-28 (ILL) - Body ground Always 10 kΩ or higher


OK

REPLACE MAIN BODY ECU (NETWORK GATEWAY ECU)

NG

REPAIR OR REPLACE HARNESS OR CONNECTOR