WINDOW / GLASS WINDSHIELD GLASS INSTALLATION
CAUTION / NOTICE / HINT
- HINT:
-
Use the same procedure for the LHD and RHD vehicle.
PROCEDURE

 56115A
1.INSTALL NO. 1 WINDSHIELD GLASS STOPPER
Apply primer (Sunstar #435-70) to the glass attachment surface of the No. 1 windshield glass stopper.
Apply primer (Sunstar #435-40) to the new No. 1 windshield glass stopper attachment surface of the windshield glass.
- NOTICE:
- ·
Do not apply too much primer.
·After applying the primer for the locate pin, and dry for at least 10 minute.
After drying the primer, apply adhesive (Sunstar # 560) to the No. 1 windshield glass stopper attachment surface.
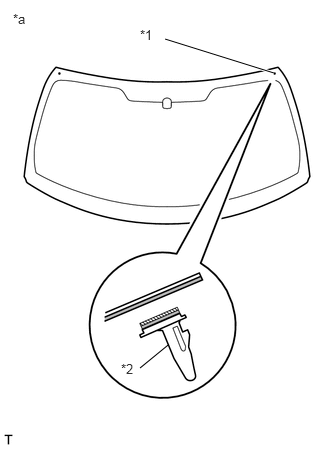
Install the No. 1 windshield glass stopper to the attachment holes.
| *1 | Attachment Holes |
| *2 | No. 1 Windshield Glass Stopper |
| *a | Back Side |

|
Primer |

|
Adhesive |
56116C
2.INSTALL NO. 2 WINDSHIELD GLASS STOPPER
- HINT:
-
Use the same procedure for both the No. 1 windshield glass stopper.
75533G
3.INSTALL WINDSHIELD OUTSIDE MOULDING
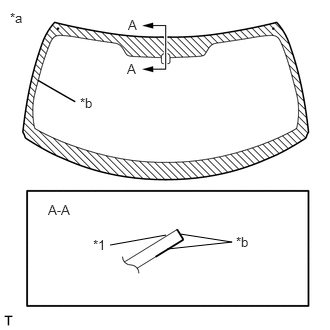
Using a brush, apply primer (Sunstar GP402) to the windshield outside moulding attachment surface of the windshield glass and the windshield glass outer ends.
| *a | Back Side |
| *b | Application Area |
- NOTICE:
-
Do not apply primer out of the ceramic areas.
After drying the primer, match the new windshield outside moulding to both edges of the windshield glass.
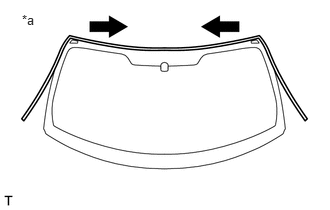
Using a roller, crimp the windshield outside moulding in the direction of the arrows, as shown in the illustration.
- Standard:
50 N/100 mm (5.1 kgf/100 mm, 11.2 lbf/100 mm)
| *a | Back Side |
- NOTICE:
-
Install the windshield outside moulding firmly so that it does not sag
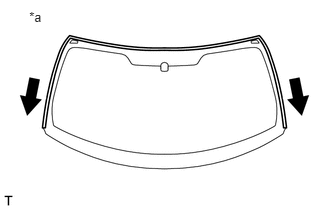
Using a roller, crimp the windshield outside moulding in the direction of the arrows, as shown in the illustration.
- Standard:
50 N/100 mm (5.1 kgf/100 mm, 11.2 lbf/100 mm)
| *a | Back Side |
- NOTICE:
-
Install the windshield outside moulding firmly so that it does not sag
56114
4.INSTALL UPPER WINDSHIELD GLASS SEAL
Remove the release paper from the upper windshield glass seal.
- HINT:
-
After removing the release paper, keep the exposed adhesive free from foreign matter.
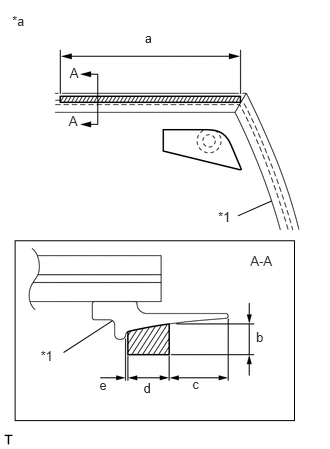
Install the upper windshield glass seal to the windshield outside moulding, as shown in the illustration.
- Standard Dimension:
Area Dimension a 165 mm (6.4961 in.) b 3.0 mm (0.1181 in.) c 5.7mm (0.2244 in.) d 5.0 mm (0.1969 in.) e 0 to 0.5 mm (0 to 0.0197 in.)
| *1 | Windshield Outside Moulding |
| *a | Back Side |
|
|
Upper Windshield Glass Seal |
56117A
5.INSTALL WINDOW GLASS ADHESIVE DAM
Install the new window glass adhesive dam onto the windshield glass, as shown in the illustration.
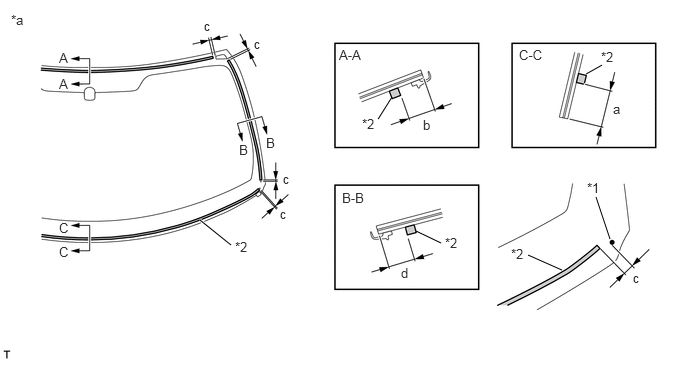
- Standard Dimension:
Area Dimension a 13.0 mm (0.5118 in.) b 15.3 mm (0.6024 in.) c 0 to 3.0mm (0 to 0.1181 in.) d 14.8 mm (0.5827 in.)
| *1 | Ceramic Notch | *2 | Window Glass Adhesive Dam |
| *a | Back Side | - | - |
- HINT:
-
Use the same procedure for both the RH and LH sides.
56119
6.INSTALL LOWER WINDSHIELD GLASS SEAL
Install the new lower windshield glass seal onto the windshield glass, as shown in the illustration.
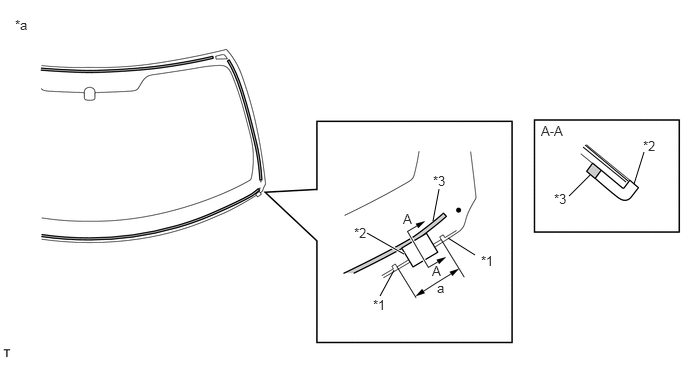
- Standard Dimension:
Area Dimension a 28.0 mm (1.1024 in.)
| *1 | Ceramic Notch | *2 | Lower Windshield Glass Seal |
| *3 | Window Glass Adhesive Dam | - | - |
| *a | Back Side | - | - |
- HINT:
-
Use the same procedure for both the RH and LH sides.
56111
7.INSTALL WINDSHIELD GLASS
Position the windshield glass.
Using suction cups, place the windshield glass in the correct position.
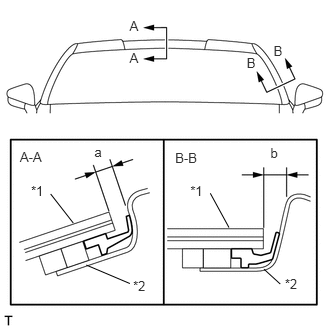
Check that the whole contact surface of the windshield rim is perfectly even.
- Standard Dimension:
Area Dimension a 4.0 mm (0.1575 in.) b 5.0 mm (0.1969 in.)
| *1 | Windshield Glass |
| *2 | Body |
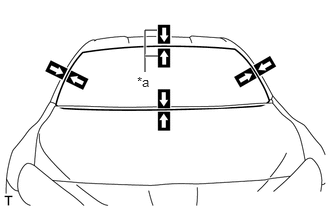
Align the matchmarks on the windshield glass and vehicle body.
| *a | Matchmark |
- NOTICE:
-
Check that the windshield glass stopper are attached to the vehicle body correctly.
Remove the windshield glass .
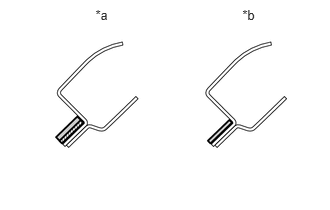
Using a brush, coat the installation surface on the vehicle body with Primer.
- Sunstar:
Enclosed with penguin seal #580 super.
- Yokohama:
M-300 or equivalent
| *a | NG |
| *b | OK |
|
|
Primer |
|
|
Adhesive |
- NOTICE:
- ·
Do not coat the adhesive with Primer.
·Do not apply too much primer.
- HINT:
-
If an area other than that specified is coated by accident, wipe off the primer with a clean piece of cloth before it dries.
Using a brush or sponge, coat the application area of adhesive with Primer.
- Sunstar:
Enclosed with penguin seal #580 super.
- Yokohama:
M-300 or equivalent
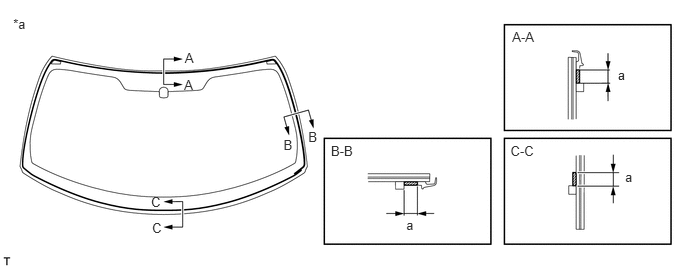
- Standard Dimension:
Area Dimension a 8.0 mm (0.315 in.)
| *a | Back Side | - | - |
|
|
Primer | - | - |
- NOTICE:
- ·
Do not apply too much primer.
·Allow the primer to dry for 3 minutes or more.
- HINT:
-
If an area other than that specified is coated by accident, wipe off the primer with a clean piece of cloth before it dries.
Apply adhesive to the glass.
- Adhesive:
Toyota Genuine Windshield Glass Adhesive or equivalent
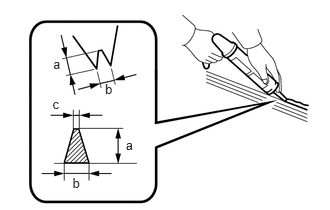
Cut off the tip of the cartridge nozzle, as shown in the illustration.
- Standard Dimension:
Area Dimension a 9.0 mm (0.354 in.) b 8.0 mm (0.315 in.)
Load the sealer gun with cartridge.
Apply adhesive to the windshield glass, as shown in the illustration.
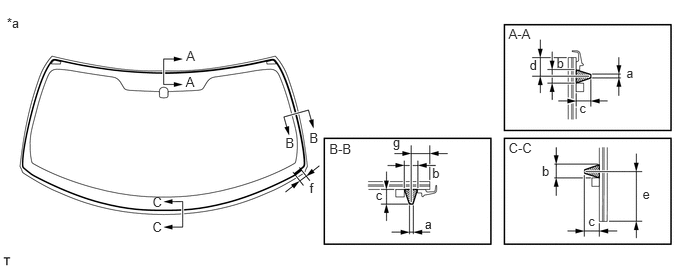
- Standard Dimension:
Area Dimension a 2.0 mm (0.0787 in.) b 8.0 mm (0.3150 in.) c 9.0 mm (0.3543 in.) d 11.3 mm (0.4449 in.) e 22.0 mm (0.8661 in.) f 30.0 mm (1.1811 in.) g 10.8 mm (0.4252 in.)
| *a | Back Side | - | - |
|
|
Adhesive | - | - |
- HINT:
-
Apply adhesive keep to the window glass adhesive dam.
Apply adhesive tape, etc. to the windshield glass and the body panel section, and use a pen to apply matching marks for use when installing (when using the new windshield glass).
| *a | Matchmark |
Using suction cups, position the windshield glass so that the matchmarks are aligned, and press it in gently along the rim.
- NOTICE:
- ·
Check that the windshield glass stopper are attached to the vehicle body correctly.
·Check the clearance between the vehicle body and windshield glass.
·After the primer on the body is dried (about 10 minutes), install the windshield glass.
Lightly press the front surface of the windshield glass to ensure that the windshield glass is securely fit to the vehicle body.
- HINT:
-
Press the glass with a force of 98 N (10 kgf, 22.0 lbf) or more.
Using a scraper, remove any excess or protruding adhesive.
- HINT:
-
Apply adhesive onto the windshield glass rim.
Hold the windshield glass using protective tape until the applied adhesive becomes hard.
- HINT:
-
Follow the instructions in the owner's manuals provided by each adhesive manufacturer regarding the minimum required drying time after applying adhesive, and the time required before driving.
8.INSPECT WATER LEAK
After the adhesive has hardened, apply water from the outside of the vehicle. Check that no water leaks into the cabin.
If water leaks into the cabin, allow the water to dry and add adhesive.
Remove the protective tape.
63310
9.INSTALL ROOF HEADLINING ASSEMBLY
55781
10.INSTALL COWL VENTILATOR LOUVER
53866J
11.INSTALL FRONT FENDER TO COWL SIDE SEAL RH
53867H
12.INSTALL FRONT FENDER TO COWL SIDE SEAL LH
- HINT:
-
Use the same procedure as for the RH side.
13.INSTALL WINDSHIELD WIPER ARM AND BLADE ASSEMBLY LH
14.INSTALL WINDSHIELD WIPER ARM AND BLADE ASSEMBLY RH
85192
15.INSTALL WINDSHIELD WIPER ARM COVER