WINDOW / GLASS QUARTER WINDOW GLASS REMOVAL
CAUTION / NOTICE / HINT
- HINT:
- ·
The the quarter window glass assembly can be reused. When installing the window, if any of the clips on the quarter window glass are broken, butyl tape can be used to support the glass until the applied adhesive hardens.
·When using butyl tape to temporarily secure the window, make sure that the butyl tape is not applied exactly at the original clip location. If the butyl tape is applied exactly at the clip location, it will cause the window to protrude
·Use the same procedure for both the RH and LH sides.
·The following procedure is for the LH side.
PROCEDURE

 71470S
1.REMOVE SEPARATE TYPE REAR SEAT CUSHION ASSEMBLY LH
73220
2.DISCONNECT FRONT SEAT OUTER BELT ASSEMBLY
67914
3.REMOVE FRONT DOOR SCUFF PLATE LH
62312B
4.DISCONNECT FRONT DOOR OPENING TRIM WEATHERSTRIP LH
- HINT:
-
Disconnect the front door opening trim weatherstrip LH to the extent that allows the removal of the luggage compartment trim cover LH.
67864F
5.REMOVE NO. 2 FRONT DOOR WEATHERSTRIP LH
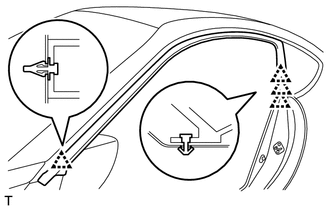
Disengage the 4 clips and remove the No. 2 front door weatherstrip LH.
75552
6.REMOVE ROOF DRIP SIDE FINISH MOULDING LH
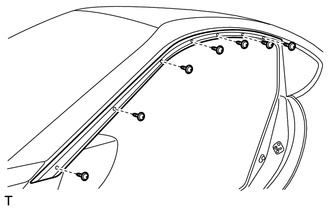
Remove the 7 screws and the roof drip side finish moulding LH.
- CAUTION:
-
Wear protective gloves. Sharp areas on the parts may injure your hands.
64722
7.DISCONNECT LUGGAGE COMPARTMENT INNER TRIM COVER LH
64715D
8.REMOVE LUGGAGE COMPARTMENT TRIM COVER LH
62606A
9.REMOVE QUARTER TRIM LID SUB-ASSEMBLY LH
62462A
10.REMOVE REAR WINDOW SIDE GARNISH LH
62639
11.REMOVE REAR QUARTER TRIM GARNISH FRONT LH
62412
12.REMOVE CENTER PILLAR GARNISH LH
62720A
13.REMOVE QUARTER WINDOW ASSEMBLY LH
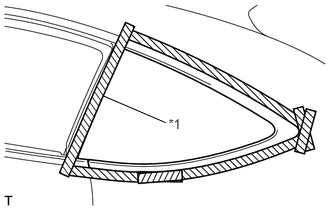
Apply protective tape to the outer surface of the vehicle body to prevent scratches.
| *1 | Protective Tape |
When reusing the quarter window assembly LH.
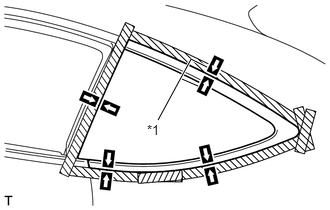
Place matchmarks on the quarter window assembly LH and vehicle body on the locations indicated in the illustration.
| *1 | Matchmark |
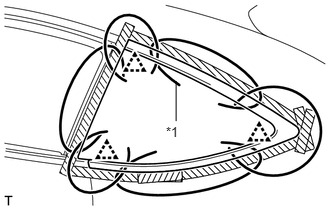
Pass a piano wire between the vehicle body and quarter window assembly LH from the interior, as shown in the illustration.
| *1 | Piano Wire |
- HINT:
-
Ensure not to interfere with the clips when passing the piano wire.
Tie both wire ends to wooden blocks or similar objects that can serve as handles.
- NOTICE:
-
When separating the quarter window assembly LH from the vehicle, be careful not to damage the paint or interior and exterior ornaments.
Cut off the adhesive by pulling the piano wire around the quarter window assembly LH.
- NOTICE:
-
Leave as much adhesive on the vehicle body as possible when cutting through the adhesive.
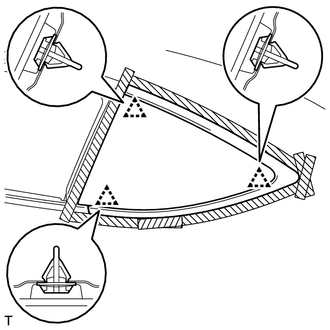
Disengage the 3 clips.
Using suction cups, remove the quarter window assembly LH.
- NOTICE:
-
Be careful not to drop the quarter window assemblyLH.
64814C
14.REMOVE QUARTER WINDOW GLASS ADHESIVE DAM
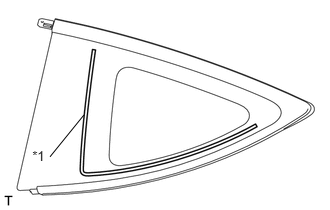
When reusing the quarter window assembly LH.
Using a scraper, remove the quarter window glass adhesive dam.
| *1 | Quarter Window Glass Adhesive Dam |
- NOTICE:
- ·
Be careful not to damage the quarter window assembly LH.
·Be sure to replace the quarter window glass adhesive dam with a new one.
15.CLEAN VEHICLE BODY
Clean and shape the contact surface of the vehicle body.
Using a knife, cut away any rough adhesive on the contact surface of the vehicle body to ensure the appropriate surface shape.
- NOTICE:
-
Be careful not to damage the vehicle body.
- HINT:
-
Leave as much adhesive on the vehicle body as possible.
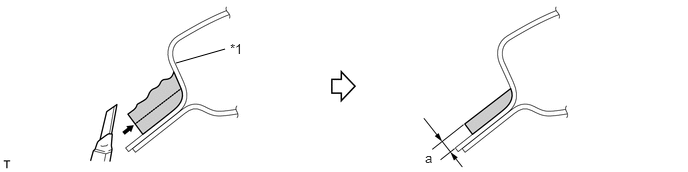
| *1 | Body | - | - |

|
Adhesive | - | - |
- Standard Dimension:
Area Dimension a 2.0 mm (0.0787 in.)
Clean the contact surface of the vehicle body with a piece of cloth saturated with cleaner.
- HINT:
-
Even if all the adhesive has been removed, clean the vehicle body.