3SZ-VE ENGINE MECHANICAL CAMSHAFT INSTALLATION
PROCEDURE

 13511
1.INSTALL CAMSHAFT
- NOTICE:
-
In order to prevent interference of the valve with the piston when installing the camshaft, turn the crankshaft clockwise by approximately 90° from the TDC/compression of the No. 1 cylinder.
Apply engine oil to the camshaft, cylinder head journal, and top of the valve lifter.
Set the camshafts so the cam lobes of the No. 3 and No. 4 cylinders on the intake side (the camshaft) push the valve lifters, and the cam lobes of the No. 2 and No. 4 cylinders on the exhaust side (the camshaft No. 2) push the valve lifters.
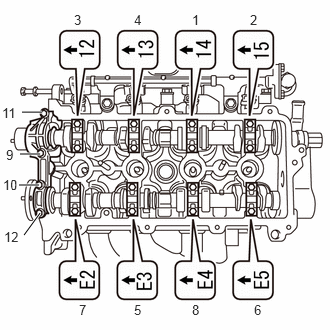
Check the front marks and numbers on the No. 1 and No. 2 bearing caps and check the sequence is as shown in the illustration. Then tighten the bolts uniformly in several steps in the sequence shown in the illustration.
- Torque:
- 13 N*m (133 kgf*cm, 10 ft.*lbf)
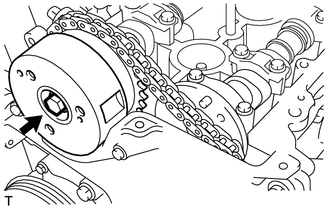
Temporarily install the camshaft timing sprocket assembly with the bolt.
Temporarily install the camshaft timing gear or sprocket with one bolt.
Install the chain so the matchmarks of the camshaft timing sprockets and the paint marks, which were marked before removing the chain, are aligned.
- HINT:
-
First, install the chain onto either of the camshafts. Turn the camshaft to the right and left using the hexagonal lobe of the camshaft so the matchmarks of the sprockets and the paint marks of the chain are aligned.
Remove the 2.5 mm (0.098 in.) diameter hexagon wrench from the tensioner.
- HINT:
-
Using the hexagonal lobe of the camshaft, slightly turn the camshaft to the left, then remove the 2.5 mm (0.098 in.) diameter hexagon wrench with the chain loose on the tensioner side.
While holding the hexagonal lobe of the camshaft, tighten the bolt to the specified torque.
- Torque:
- 47 N*m (479 kgf*cm, 35 ft.*lbf)
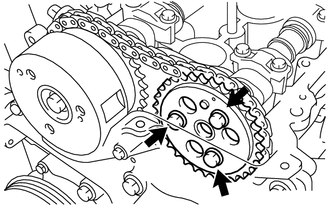
Turn the crankshaft pulley clockwise and install the remaining 2 bolts to the camshaft timing gear or sprocket. Then tighten all 3 bolts to the specified torque.
- Torque:
- 8.0 N*m (82 kgf*cm, 71 in.*lbf)
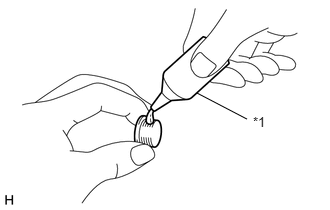
| *1 | Adhesive |
Apply adhesive to 2 or 3 threads of the plug.
- Adhesive:
Toyota Genuine Adhesive 1324, Three Bond 1324 or equivalent
Using a 10 mm socket hexagon wrench, install the plug.
- Torque:
- 17 N*m (173 kgf*cm, 13 ft.*lbf)
- NOTICE:
- ·
Install the plug within 3 minutes after applying adhesive.
·Do not start the engine within 1 hour after installation.
11304
2.INSTALL NO. 2 TIMING CHAIN OR BELT COVER
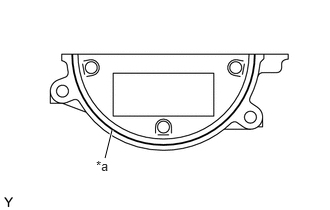
| *a | Seal Packing |
Apply seal packing as shown in the illustration.
- Seal packing:
Toyota Genuine Seal Packing Black, Three Bond 1207B or equivalent
Install the No. 2 timing chain or belt cover with the 2 bolts.
- Torque:
- 8.5 N*m (87 kgf*cm, 75 in.*lbf)
- NOTICE:
- ·
Remove any oil from the contact surface.
·Install the No. 2 timing chain or belt cover within 3 minutes of applying the seal packing.
·Do not start the engine for at least 2 hours after the installation.
3.INSPECT VALVE CLEARANCE
4.ADJUST VALVE CLEARANCE
11201
5.INSTALL CYLINDER HEAD COVER SUB-ASSEMBLY
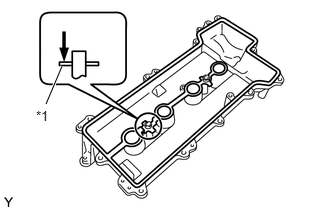
| *1 | Gasket |
Set a cylinder head cover gasket to the gasket groove of the cylinder head cover sub-assembly, then insert a gasket into the boss on the center of the cylinder head cover sub-assembly.
- NOTICE:
-
Securely insert the gasket until it comes into contact with the rib.
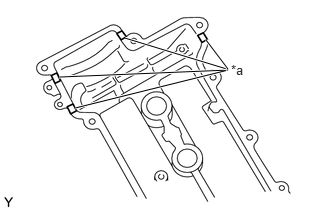
| *a | Seal Packing |
Apply seal packing as shown in the illustration.
- Seal packing:
Toyota Genuine Seal Packing Black, Three Bond 1207B or equivalent
- HINT:
-
The seal packing should have a width of 5 mm (0.197 in.) and a height of 2 mm (0.079 in.).
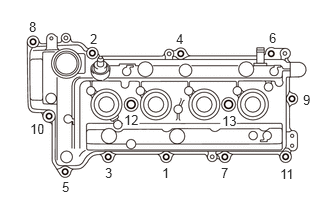
Install the cylinder head cover sub-assembly with the 11 bolts and 2 nuts.
Tighten the bolts and nuts in several steps in the sequence shown in the illustration.
- Torque:
- 12 N*m (122 kgf*cm, 9 ft.*lbf)
for bolt
- 7.5 N*m (76 kgf*cm, 66 in.*lbf)
for nut
- 9.0 N*m (92 kgf*cm, 80 in.*lbf)
6.INSTALL ENGINE WIRE
16507
7.CONNECT RADIATOR PIPE SUB-ASSEMBLY
22268
8.INSTALL NO. 2 THROTTLE BODY BRACKET
12262
9.CONNECT NO. 2 VENTILATION HOSE
12261
10.CONNECT VENTILATION HOSE
19500
11.INSTALL IGNITION COIL ASSEMBLY
17700
12.INSTALL AIR CLEANER ASSEMBLY
17881
13.INSTALL NO. 1 AIR CLEANER HOSE
14.INSPECT FOR ENGINE OIL LEAK
51443
15.INSTALL REAR ENGINE UNDER COVER (for Full Cover Type)
51441
16.INSTALL ENGINE UNDER COVER (for Full Cover Type)
51441D
17.INSTALL ENGINE UNDER COVER (for Half Cover Type)