A4R AUTOMATIC TRANSMISSION / TRANSAXLE VALVE BODY ASSEMBLY INSTALLATION
PROCEDURE

 35824
1.INSTALL BRAKE CYLINDER SEAL
Coat a new brake cylinder seal with Toyota Genuine ATF Type T-IV, and install it into the transmission case.
35410
2.INSTALL TRANSMISSION VALVE BODY ASSEMBLY
- NOTICE:
- ·
Clean the bolts with compressed air before installation.
·Make sure not to drop the manual valve.
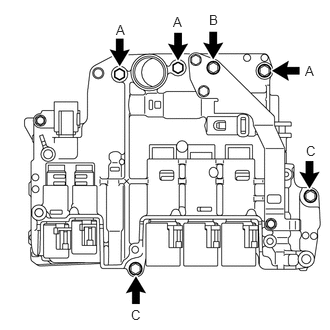
Temporarily install the transmission valve body assembly with the 6 bolts.
- Bolt length:
35 mm (1.38 in.) for bolt A
45 mm (1.77 in.) for bolt B
16 mm (0.63 in.) for bolt C
Tighten the 6 bolts to the specified torque.
- Torque:
- 10 N*m (102 kgf*cm, 7 ft.*lbf)
Install the ATF temperature sensor with the bolt.
- Torque:
- 6.0 N*m (61 kgf*cm, 53 in.*lbf)
Connect the 6 connectors.
35409D
3.INSTALL MANUAL DETENT SPRING SUB-ASSEMBLY
Install the manual detent spring sub-assembly with the bolt.
- Torque:
- 10 N*m (102 kgf*cm, 7 ft.*lbf)
35303
4.INSTALL OIL STRAINER SUB-ASSEMBLY
Coat a new O-ring with Toyota Genuine ATF Type T-IV, and install it to the oil strainer sub-assembly.
Engage the 3 claws to install the oil strainer sub-assembly onto the transmission valve body assembly.
- NOTICE:
-
The oil strainer sub-assembly has 3 claws. Be careful not to break or bend them during installation.
33449B
5.INSTALL TRANSMISSION MAGNET
Clean the threads of the bolts and a new automatic transmission oil pan sub-assembly with a non-residue solvent.
Install the transmission magnet in the automatic transmission oil pan sub-assembly.
35106
6.INSTALL AUTOMATIC TRANSMISSION OIL PAN SUB-ASSEMBLY
Clean the installation surface.
Install a new oil pan gasket to the automatic transmission oil pan sub-assembly.
Install the automatic transmission oil pan sub-assembly with the 18 bolts.
- Torque:
- 8.4 N*m (86 kgf*cm, 74 in.*lbf)
- HINT:
-
Tighten the bolts in diagonal order.
35103
7.INSTALL TRANSMISSION OIL LEVEL DIPSTICK SUB-ASSEMBLY
51202D
8.INSTALL FRONT LOWER SUSPENSION CROSSMEMBER SUB-ASSEMBLY
9.ADD AUTOMATIC TRANSMISSION FLUID
10.INSPECT AUTOMATIC TRANSMISSION FLUID LEVEL
11.INSPECT FOR FLUID LEAK
51443
12.INSTALL NO. 2 ENGINE UNDER COVER (w/ No. 2 Engine Under Cover)
13.INSPECT AND ADJUST FRONT WHEEL ALIGNMENT
14.RESET MEMORY