2ZR-FXE FUEL FUEL SYSTEM ON-VEHICLE INSPECTION
PROCEDURE

 1.CHECK FUEL PUMP OPERATION AND INSPECT FOR FUEL LEAK
Check fuel pump operation.
Connect the GTS to the DLC3.
Turn the power switch on (IG) and turn the GTS on.
- NOTICE:
-
Do not start the engine.
Enter the following menus: Powertrain / Engine / Active Test / Activate the Circuit Relay.
- Powertrain > Engine > Active Test
-
Tester Display Activate the Circuit Relay - 50004 372 38
Check for pressure in the fuel tube sub-assembly from the fuel line. Check that sounds of fuel flowing from the fuel tank assembly can be heard. If no sound can be heard, check the fuel pump, ECM and wiring connectors.
Inspect for fuel leaks.
Check that there are no fuel leaks from the fuel system after doing any maintenance or repairs. If there is a fuel leak, repair or replace parts as necessary.
Turn the power switch off.
Disconnect the GTS from the DLC3.
2.CHECK FUEL PRESSURE
Discharge the fuel system pressure.
Click hereEngine / Hybrid System>2ZR-FXE (FUEL)>FUEL SYSTEM>PRECAUTION
Remove the front wiper motor and link assembly.
Click hereVehicle Exterior>WIPER / WASHER>FRONT WIPER MOTOR>REMOVAL
Remove the No. 1 heater air duct splash shield seal.
Click hereSuspension>FRONT SUSPENSION>FRONT SHOCK ABSORBER>REMOVAL
Remove the water guard plate LH.
Click hereSuspension>FRONT SUSPENSION>FRONT SHOCK ABSORBER>REMOVAL
Remove the cowl body mounting reinforcement LH.
Click hereSuspension>FRONT SUSPENSION>FRONT SHOCK ABSORBER>REMOVAL
Remove the cowl body mounting reinforcement RH.
Click hereSuspension>FRONT SUSPENSION>FRONT SHOCK ABSORBER>REMOVAL
Remove the outer cowl top panel sub-assembly.
for LHD:
Click hereSuspension>FRONT SUSPENSION>FRONT SHOCK ABSORBER>REMOVAL
for RHD:
Click hereSuspension>FRONT SUSPENSION>FRONT SHOCK ABSORBER>REMOVAL
Measure the auxiliary battery voltage.
- Standard Voltage:
11 to 14 V
Disconnect the cable from the negative (-) auxiliary battery terminal.
Click hereGeneral>MAINTENANCE>2ZR-FXE AUXILIARY BATTERY>REMOVAL
- NOTICE:
-
When disconnecting the cable, some systems need to be initialized after the cable is reconnected.
-
Click hereGeneral>INTRODUCTION>REPAIR INSTRUCTION>INITIALIZATION
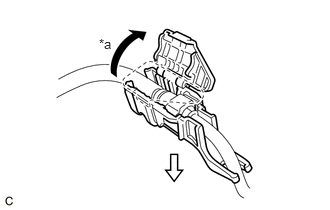
| *a | Open |

|
Pull |
Open the cover of the fuel pipe clamp and remove the fuel pipe clamp from the fuel tube connector.
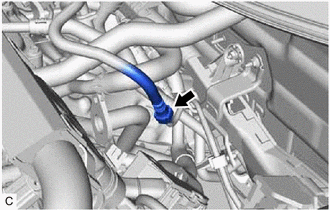
Disconnect the fuel tube sub-assembly from the fuel pipe.
Click hereEngine / Hybrid System>2ZR-FXE (FUEL)>FUEL SYSTEM>PRECAUTION
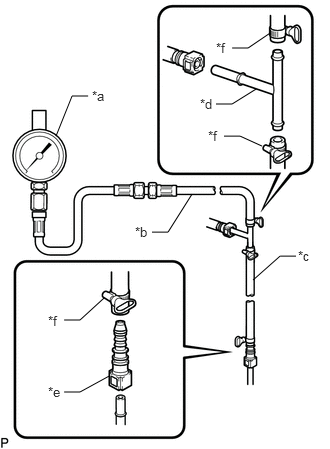
| *a | SST (Pressure Gauge) |
| *b | SST (Hose Joint) |
| *c | SST (Hose) |
| *d | SST (T-joint) |
| *e | SST (Fuel Tube Connector) |
| *f | SST (Hose Band) |
Install SST (EFI fuel pressure gauge) as shown in the illustration.
- SST
- 09268-00010 (09268-00020, 09268-00030)
09268-45101 (09268-41260, 09268-41280, 09268-41700, 95336-08070)
Wipe up any spilled fuel.
Connect the cable to the negative (-) auxiliary battery terminal.
Click hereGeneral>MAINTENANCE>2ZR-FXE AUXILIARY BATTERY>INSTALLATION
- NOTICE:
-
When disconnecting the cable, some systems need to be initialized after the cable is reconnected.
-
Click hereGeneral>INTRODUCTION>REPAIR INSTRUCTION>INITIALIZATION
Connect the GTS to the DLC3.
Turn the power switch on (IG) and turn the GTS on.
- NOTICE:
-
Do not start the engine.
Enter the following menus: Powertrain / Engine / Active Test / Activate the Circuit Relay.
- Powertrain > Engine > Active Test
-
Tester Display Activate the Circuit Relay - 50004 372 38
Measure the fuel pressure.
- Standard Fuel Pressure:
304 to 343 kPa (3.1 to 3.5 kgf/cm2, 44 to 50 psi)
If the fuel pressure is more than the standard, replace the fuel pressure regulator assembly.
If the fuel pressure is less than the standard, check the fuel hoses and their connections, fuel pump, fuel filter and fuel pressure regulator assembly.
Disconnect the GTS from the DLC3.
Put the engine in inspection mode (maintenance mode).
Click hereGeneral>INTRODUCTION>REPAIR INSTRUCTION>INSPECTION MODE PROCEDURE
Start the engine.
Measure the fuel pressure at idle.
- Standard Fuel Pressure:
304 to 343 kPa (3.1 to 3.5 kgf/cm2, 44 to 50 psi)
- HINT:
-
Refer to Standard Idle Speed.
-
Click hereEngine / Hybrid System>2ZR-FXE (ENGINE MECHANICAL)>ENGINE>ON-VEHICLE INSPECTION
Stop the engine.
Check that the fuel pressure remains as specified for 5 minutes.
- Standard Fuel Pressure:
147 kPa (1.5 kgf/cm2, 21 psi) or more
If the result is not as specified, check the fuel pump, fuel pressure regulator assembly and/or fuel injector assemblies.
After checking the fuel pressure, disconnect the cable from the negative (-) auxiliary battery terminal and carefully remove SST to prevent fuel from spraying.
Click hereGeneral>MAINTENANCE>2ZR-FXE AUXILIARY BATTERY>REMOVAL
- NOTICE:
-
When disconnecting the cable, some systems need to be initialized after the cable is reconnected.
-
Click hereGeneral>INTRODUCTION>REPAIR INSTRUCTION>INITIALIZATION
Connect the fuel tube sub-assembly to the fuel pipe.
Click hereEngine / Hybrid System>2ZR-FXE (FUEL)>FUEL SYSTEM>PRECAUTION
Install the fuel pipe clamp to the fuel tube connector and close the cover of the fuel pipe clamp.
Inspect for fuel leaks.
Click hereEngine / Hybrid System>2ZR-FXE (FUEL)>FUEL SYSTEM>ON-VEHICLE INSPECTION
Install the outer cowl top panel sub-assembly.
for LHD:
Click hereSuspension>FRONT SUSPENSION>FRONT SHOCK ABSORBER>INSTALLATION
for RHD:
Click hereSuspension>FRONT SUSPENSION>FRONT SHOCK ABSORBER>INSTALLATION
Install the cowl body mounting reinforcement LH.
Click hereSuspension>FRONT SUSPENSION>FRONT SHOCK ABSORBER>INSTALLATION
Install the cowl body mounting reinforcement RH.
Click hereSuspension>FRONT SUSPENSION>FRONT SHOCK ABSORBER>INSTALLATION
Install the water guard plate LH.
Click hereSuspension>FRONT SUSPENSION>FRONT SHOCK ABSORBER>INSTALLATION
Install the No. 1 heater air duct splash shield seal.
Click hereSuspension>FRONT SUSPENSION>FRONT SHOCK ABSORBER>INSTALLATION
Install the front wiper motor and link assembly.
Click hereVehicle Exterior>WIPER / WASHER>FRONT WIPER MOTOR>INSTALLATION