SEAT BELT REAR SEAT OUTER BELT ASSEMBLY INSTALLATION
CAUTION / NOTICE / HINT
- HINT:
- ·
Use the same procedure for RHD and LHD vehicles.
·The procedure listed below is for LHD vehicles.
·Use the same procedure for the RH side and LH side.
·The procedure listed below is for the LH side.
PROCEDURE

 73370
1.INSPECT REAR SEAT 3 POINT TYPE OUTER BELT ASSEMBLY
73370
2.INSTALL REAR SEAT 3 POINT TYPE OUTER BELT ASSEMBLY LH (for LH Side)
w/o Pretensioner and Force Limiter:
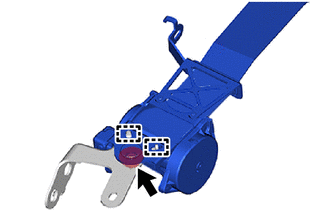
Engage the guides to install the rear seat 3 point type outer belt assembly LH to the outer belt anchor bracket sub-assembly LH.
Temporarily install the nut.
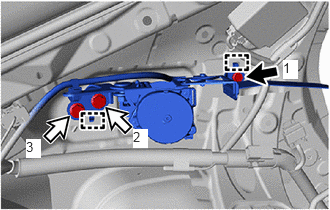

|
Bolt (A) |

|
Bolt (B) |
Engage the guides to temporarily install the rear seat 3 point type outer belt assembly LH with bracket.
Temporarily install the 3 bolts.
Tighten the 3 bolts in the order shown in the illustration.
- Torque:
- Bolt (A) : 12.5 N*m (127 kgf*cm, 9 ft.*lbf)
- Bolt (B) : 42 N*m (428 kgf*cm, 31 ft.*lbf)
Tighten the nut.
- Torque:
- 42 N*m (428 kgf*cm, 31 ft.*lbf)
Check that the ELR locks.
- NOTICE:
-
This check should be performed with the rear seat 3 point type outer belt assembly LH installed to the vehicle.
With the rear 3 point type seat outer belt assembly LH installed to the vehicle, check that the belt locks when it is pulled out quickly.
w/ Pretensioner and Force Limiter:
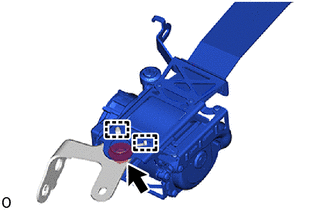
Engage the guides to install the rear seat 3 point type outer belt assembly LH to the outer belt anchor bracket sub-assembly LH.
Temporarily install the nut.
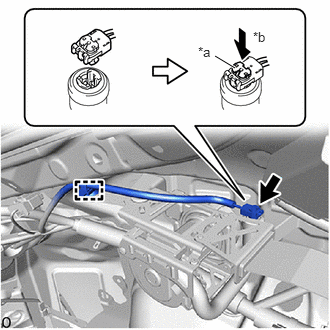
| *a | Locking Button |
| *b | Lock |
Connect the pretensioner connector and lock the locking button as shown in the illustration.
- NOTICE:
-
Securely lock the locking button.
Engage the clamp.
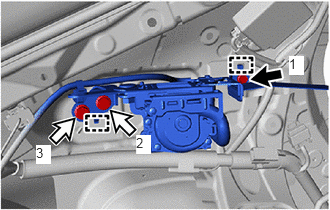
|
|
Bolt (A) |
|
|
Bolt (B) |
Engage the guides to temporarily install the rear seat 3 point type outer belt assembly LH with bracket.
Temporarily install the 3 bolts.
Tighten the 3 bolts in the order shown in the illustration.
- Torque:
- Bolt (A) : 12.5 N*m (127 kgf*cm, 9 ft.*lbf)
- Bolt (B) : 42 N*m (428 kgf*cm, 31 ft.*lbf)
Tighten the nut.
- Torque:
- 42 N*m (428 kgf*cm, 31 ft.*lbf)
Check that the ELR locks.
- NOTICE:
-
This check should be performed with the rear seat 3 point type outer belt assembly LH installed to the vehicle.
With the rear seat 3 point type outer belt assembly LH installed to the vehicle, check that the belt locks when it is pulled out quickly.
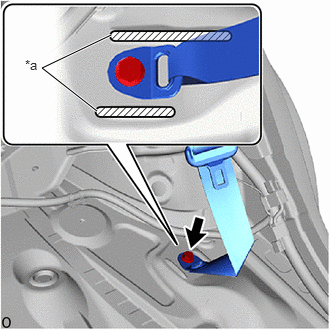
| *a | Protruding Part |
Connect the floor anchor of the rear seat 3 point type outer belt assembly LH with the bolt.
- Torque:
- 42 N*m (428 kgf*cm, 31 ft.*lbf)
- NOTICE:
-
Do not allow the anchor part of the rear seat 3 point type outer belt assembly LH to overlap the protruding parts of the floor panel.
73360
3.INSTALL REAR SEAT 3 POINT TYPE OUTER BELT ASSEMBLY RH (for RH Side)
w/o Pretensioner and Force Limiter:
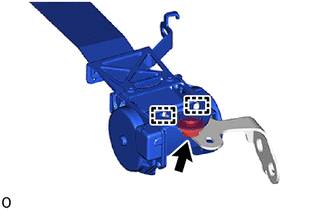
Engage the guides to install the rear seat 3 point type outer belt assembly RH to the outer belt anchor bracket sub-assembly RH.
Temporarily install the nut.
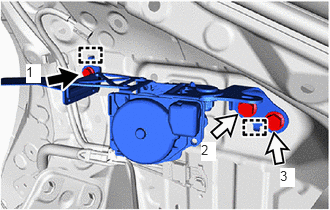
|
|
Bolt (A) |
|
|
Bolt (B) |
Engage the guides to temporarily install the rear seat 3 point type outer belt assembly RH with bracket.
Temporarily install the 3 bolts.
Tighten the 3 bolts in the order shown in the illustration.
- Torque:
- Bolt (A) : 12.5 N*m (127 kgf*cm, 9 ft.*lbf)
- Bolt (B) : 42 N*m (428 kgf*cm, 31 ft.*lbf)
Tighten the nut.
- Torque:
- 42 N*m (428 kgf*cm, 31 ft.*lbf)
Check that the ELR locks.
- NOTICE:
-
This check should be performed with the rear seat 3 point type outer belt assembly RH installed to the vehicle.
With the rear seat 3 point type outer belt assembly RH installed to the vehicle, check that the belt locks when it is pulled out quickly.
w/ Pretensioner and Force Limiter:
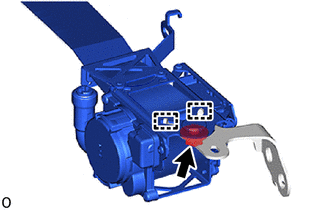
Engage the guides to install the rear seat 3 point type outer belt assembly RH to the outer belt anchor bracket sub-assembly RH.
Temporarily install the nut.
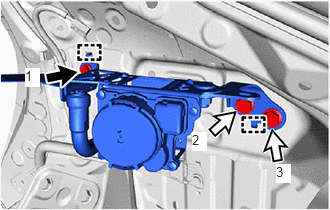
|
|
Bolt (A) |
|
|
Bolt (B) |
Engage the guides to temporarily install the rear seat 3 point type outer belt assembly RH with bracket.
Temporarily install the 3 bolts.
Tighten the 3 bolts in the order shown in the illustration.
- Torque:
- Bolt (A) : 12.5 N*m (127 kgf*cm, 9 ft.*lbf)
- Bolt (B) : 42 N*m (428 kgf*cm, 31 ft.*lbf)
Tighten the nut.
- Torque:
- 42 N*m (428 kgf*cm, 31 ft.*lbf)
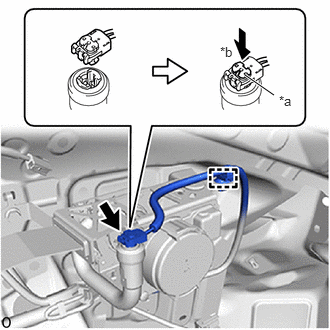
| *a | Locking Button |
| *b | Lock |
Connect the pretensioner connector and lock the locking button as shown in the illustration.
- NOTICE:
-
Securely lock the locking button.
Engage the clamp.
Check that the ELR locks.
- NOTICE:
-
This check should be performed with the rear seat 3 point type outer belt assembly RH installed to the vehicle.
With the rear seat 3 point type outer belt assembly RH installed to the vehicle, check that the belt locks when it is pulled out quickly.
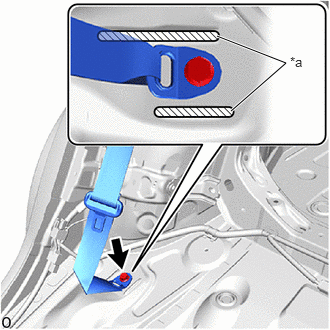
| *a | Protruding Part |
Connect the floor anchor of the rear seat 3 point type outer belt assembly RH with the bolt.
- Torque:
- 42 N*m (428 kgf*cm, 31 ft.*lbf)
- NOTICE:
-
Do not allow the anchor part of the rear seat 3 point type outer belt assembly RH to overlap the protruding parts of the floor panel.
62480A
4.INSTALL ROOF SIDE INNER GARNISH ASSEMBLY
64740C
5.INSTALL DECK TRIM SIDE PANEL ASSEMBLY
64715C
6.INSTALL DECK TRIM SIDE COVER (w/ Cover)
81330
7.INSTALL NO. 1 LUGGAGE COMPARTMENT LIGHT ASSEMBLY (w/ Luggage Compartment Room Light)
64716D
8.INSTALL DECK TRIM REAR COVER
62552F
9.INSTALL REAR SEAT SIDE GARNISH
76974F
10.INSTALL REAR UNDER SIDE COVER
71304C
11.INSTALL REAR SEATBACK HINGE SUB-ASSEMBLY
62332A
12.INSTALL REAR DOOR OPENING TRIM WEATHERSTRIP
67918A
13.INSTALL REAR DOOR SCUFF PLATE
64997
14.INSTALL DECK FLOOR BOX LH (w/ Deck Floor Box)
64995
15.INSTALL DECK FLOOR BOX RH (w/ Deck Floor Box)
64777J
16.INSTALL SPARE WHEEL CUSHION (w/ Deck Board)
58410B
17.INSTALL DECK BOARD ASSEMBLY (w/ Deck Board)
64910J
18.INSTALL TONNEAU COVER ASSEMBLY (w/ Tonneau Cover)
64330D
19.INSTALL PACKAGE TRAY TRIM PANEL ASSEMBLY (w/ Package Tray Trim)
20.INSTALL REAR SEAT ASSEMBLY
21.CONNECT CABLE TO NEGATIVE AUXILIARY BATTERY TERMINAL (w/ Pretensioner and Force Limiter)
Click hereGeneral>MAINTENANCE>2ZR-FXE AUXILIARY BATTERY>INSTALLATION
- NOTICE:
-
When disconnecting the cable, some systems need to be initialized after the cable is reconnected.
-
Click hereGeneral>INTRODUCTION>REPAIR INSTRUCTION>INITIALIZATION
22. PERFORM DIAGNOSTIC SYSTEM CHECK
23.INSPECT SRS WARNING LIGHT