2ZR-FXE HYBRID / BATTERY CONTROL FUSE BOX(for LITHIUM-ION BATTERY) INSTALLATION
PROCEDURE

 G92Z2
1.INSTALL HYBRID BATTERY TERMINAL BLOCK
- CAUTION:
-
Be sure to wear insulated gloves and protective goggles.
Engage the claw to install the hybrid battery terminal block to the HV battery.
Connect the hybrid battery terminal block connector.
- NOTICE:
-
Make sure that the connector is connected securely.
G92Z0
2.INSTALL HV BATTERY JUNCTION BLOCK ASSEMBLY WITH NO. 2 HYBRID BATTERY SHIELD SUB-ASSEMBLY
- CAUTION:
-
Be sure to wear insulated gloves and protective goggles.
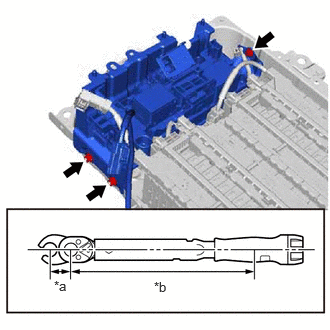
| *a | 10 mm Union Nut Wrench Fulcrum Length |
| *b | Torque Wrench Fulcrum Length |
Install the HV battery junction block assembly and No. 2 hybrid battery shield sub-assembly to the HV battery with the 2 nuts.
- Torque:
- 7.5 N*m (76 kgf*cm, 66 in.*lbf)
- NOTICE:
-
If the HV battery junction block assembly has been struck or dropped, replace it with a new one.
Using a 10 mm union nut wrench, fully tighten the bolt.
- Torque:
- Specified tightening torque : 7.5 N*m (76 kgf*cm, 66 in.*lbf)
- HINT:
- ·
Calculate the torque wrench reading when changing the fulcrum length of the torque wrench.
Click hereGeneral>INTRODUCTION>REPAIR INSTRUCTION>PRECAUTION
·When using 10 mm union nut wrench (fulcrum length of 22 mm (0.866 in.)) + torque wrench (fulcrum length of 162 mm (6.38 in.)):
6.6 N*m (67 kgf*cm, 58 in.*lbf)
Connect the 2 HV battery junction block assembly connectors.
- NOTICE:
-
Make sure that the connectors are connected securely.
Connect the hybrid battery terminal block connector.
- NOTICE:
-
Make sure that the connector is connected securely.
Connect the HV battery junction block assembly connector.
- NOTICE:
-
Make sure that the connector is connected securely.
Engage the 2 claws to close the wiring harness protector.
G920L
3.INSTALL UPPER NO. 1 HYBRID BATTERY COVER SUB-ASSEMBLY
G92PF
4.INSTALL NO. 4 HV BATTERY PROTECTOR
82161
5.CONNECT FLOOR WIRE
821H1
6.CONNECT HV FLOOR UNDER WIRE
G92N4A
7.INSTALL NO. 1 HV BATTERY COVER PANEL RH
71033
8.INSTALL REAR SEAT CUSHION LEG SUB-ASSEMBLY
76971G
9.INSTALL REAR UNDER COVER
76974F
10.INSTALL REAR UNDER SIDE COVER LH
67918A
11.INSTALL REAR DOOR SCUFF PLATE LH
76973F
12.INSTALL REAR UNDER SIDE COVER RH
- HINT:
-
Use the same procedure as for the LH side.
67917A
13.INSTALL REAR DOOR SCUFF PLATE RH
- HINT:
-
Use the same procedure as for the LH side.
72693
14.INSTALL REAR SEAT CUSHION LOCK HOOK
15.INSTALL BENCH TYPE REAR SEAT CUSHION ASSEMBLY
G3834
16.INSTALL SERVICE PLUG GRIP
17. PERFORM HIGH VOLTAGE FUSE ACCUMULATED LOAD HISTORY RESET