POWER DISTRIBUTION MAIN BODY ECU(for RHD) REMOVAL
CAUTION / NOTICE / HINT
The necessary procedures (adjustment, calibration, initialization, or registration) that must be performed after parts are removed and installed, or replaced during the main body ECU (multiplex network body ECU) removal/installation are shown below.
| Replaced Part or Performed Procedure | Necessary Procedure | Effect/Inoperative Function when Necessary Procedure not Performed | Link |
|---|---|---|---|
| Disconnect cable from negative (-) auxiliary battery terminal | Memorize steering angle neutral point | Panoramic view monitor system | ( ) |
| Main body ECU (multiplex network body ECU) | Perform code registration (Immobiliser system) | ·
Entry and start system ·
Wireless door lock control system ·
Hybrid control system cannot be started ·
Steering lock system |
See Service Bulletin for the registration method. (w/ Entry and Start System) |
- HINT:
-
When the cable is disconnected / reconnected to the auxiliary battery terminal, systems temporarily stop operating. However, each system has a function that completes learning the first time the system is used.
- ·
Learning completes when vehicle is driven
Effect/Inoperative Function When Necessary Procedures are not Performed Necessary Procedures Link *1: When performing learning using the GTS
Click here(
)
Lane tracing assist system Drive the vehicle straight ahead at 35 km/h (22 mph) or more for 5 second or more. ( )
Pre-collision system Simple intelligent parking assist system*1 Parking support brake system*1 Toyota parking assist-sensor system*1
·Learning completes when vehicle is operated normally
Effect/Inoperative Function When Necessary Procedures are not Performed Necessary Procedures Link Power door lock control system
·Back door opener
Perform door unlock operation with door control switch or electrical key transmitter sub-assembly switch. ( )
Air conditioning system After the ignition switch is turned to ON, the servo motor standard position is recognized. -
PROCEDURE

 1. PRECAUTION
- NOTICE:
-
After turning the power switch off, waiting time may be required before disconnecting the cable from the negative (-) auxiliary battery terminal.
-
Click hereGeneral>INTRODUCTION>REPAIR INSTRUCTION>PRECAUTION
2.DISCONNECT CABLE FROM NEGATIVE AUXILIARY BATTERY TERMINAL
for 2ZR-FXE:
Click hereGeneral>MAINTENANCE>2ZR-FXE AUXILIARY BATTERY>REMOVAL
for M20A-FXS:
Click hereGeneral>MAINTENANCE>M20A-FXS AUXILIARY BATTERY>REMOVAL
55433B
3.REMOVE NO. 2 INSTRUMENT PANEL LOWER FINISH PANEL
82878
4.REMOVE ECU INTEGRATION BOX LH
82730
5.REMOVE INSTRUMENT PANEL JUNCTION BLOCK ASSEMBLY WITH MAIN BODY ECU
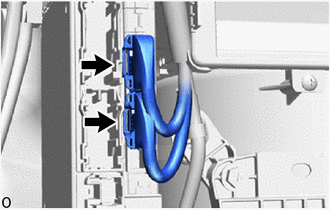
Disconnect the 2 connectors.
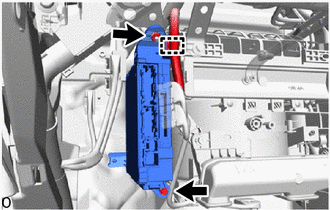
Disengage the clamp.
Remove the bolt and nut.
Pull out the instrument panel junction block assembly with main body ECU.
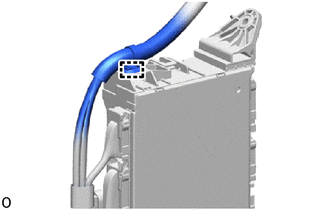
Disengage the clamp.
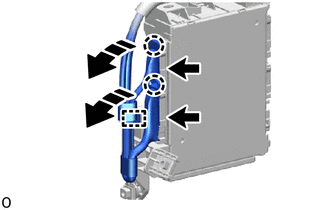

|
Remove in this Direction |
Disengage the clamp.
Disengage the claws and pull down the lock levers to disconnect the 2 connectors as shown in the illustration.
Remove the instrument panel junction block assembly with main body ECU.
89221
6.REMOVE MAIN BODY ECU (MULTIPLEX NETWORK BODY ECU)
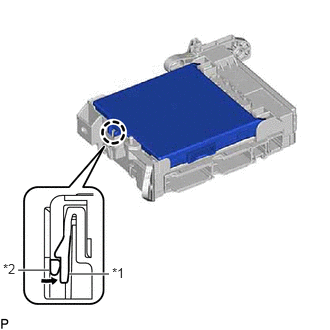
| *1 | Instrument Panel Junction Block Assembly |
| *2 | Main Body ECU (Multiplex Network Body ECU) |

|
Push in this Direction |
Press the claw of the instrument panel junction block assembly as shown in the illustration to release the lock.
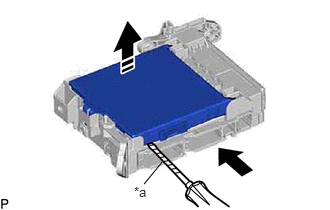
| *a | Protective Tape |
|
|
Insert in this Direction |
|
|
Remove in this Direction |
With the instrument panel junction block assembly lock released, insert a screwdriver with its tip wrapped in protective tape horizontally between the main body ECU (multiplex network body ECU) and the instrument panel junction block assembly.
- NOTICE:
- ·
Use a screwdriver with a diameter between 5.0 mm (0.197 in.) and 6.3 mm (0.248 in.) and a length of approximately 90 mm (3.54 in.).
·Do not insert the screwdriver under the connector socket of the main body ECU (multiplex network body ECU).
Using the screwdriver, carefully raise the main body ECU (multiplex network body ECU) to the position where the connector becomes disconnected.
- NOTICE:
-
Do not twist the screwdriver to raise the main body ECU (multiplex network body ECU).
|
|
Remove in this Direction (1) |

|
Remove in this Direction (2) |
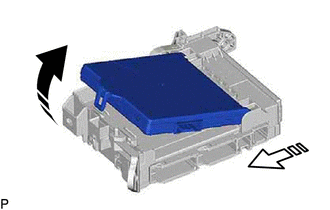
Raise the main body ECU (multiplex network body ECU) as shown by the arrow (1), and then pull it out as shown by the arrow (2) in the illustration.
- NOTICE:
-
Do not touch the main body ECU (multiplex network body ECU) connector.