AUDIO / VIDEO RADIO RECEIVER(for Radio and Display Type) INSTALLATION
CAUTION / NOTICE / HINT
- HINT:
- ·
Use the same procedure for RHD and LHD vehicles.
·The procedure listed below is for LHD vehicles.
PROCEDURE

 86212C
1.INSTALL NO. 2 RADIO RECEIVER BRACKET
Install the No. 2 radio receiver bracket with the 2 screws to the radio and display receiver assembly.
86211J
2.INSTALL NO. 1 RADIO RECEIVER BRACKET
Install the No. 1 radio receiver bracket with the 2 screws to the radio and display receiver assembly.
55405B
3.INSTALL INSTRUMENT CLUSTER FINISH CENTER PANEL SUB-ASSEMBLY
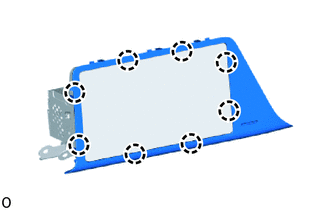
Engage the claws to install the instrument cluster finish center panel sub-assembly.
86140A
4.INSTALL RADIO AND DISPLAY RECEIVER ASSEMBLY WITH BRACKET
Connect each connector.
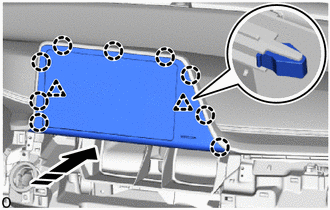

|
Install in this Direction |
Engage the clips and claws to install the radio and display receiver assembly with bracket as shown in the illustration.
Install the 4 screws.
55670A
5.INSTALL INSTRUMENT PANEL CENTER REGISTER ASSEMBLY
55406B
6.INSTALL INSTRUMENT CLUSTER FINISH LOWER CENTER PANEL SUB-ASSEMBLY
55470
7.INSTALL INSTRUMENT CLUSTER FINISH PANEL GARNISH ASSEMBLY
8.CONNECT CABLE TO NEGATIVE AUXILIARY BATTERY TERMINAL
for M20A-FXS:
Click hereGeneral>MAINTENANCE>M20A-FXS AUXILIARY BATTERY>INSTALLATION
for 2ZR-FXE:
Click hereGeneral>MAINTENANCE>2ZR-FXE AUXILIARY BATTERY>INSTALLATION
9.INSTALL INITIALIZATION AFTER RECONNECTING BATTERY TERMINAL
Click hereGeneral>SETUP>WHEN DISCONNECTING OR RECONNECTING BATTERY TERMINAL>WORK PROCEDURE
- HINT:
-
When disconnecting and reconnecting the battery, there is an automatic learning function that completes learning when the respective system is used.
-
Click hereGeneral>SETUP>WHEN DISCONNECTING OR RECONNECTING BATTERY TERMINAL>AUTOMATIC LEARNING CHART