INTERIOR PANELS / TRIM ROOF HEADLINING REMOVAL
CAUTION / NOTICE / HINT
The necessary procedures (adjustment, calibration, initialization or registration) that must be performed after parts are removed and installed, or replaced during roof headlining removal/installation are shown below.
| Replacement Part or Procedure | Necessary Procedure | Effect/Inoperative when not Performed | Link |
|---|---|---|---|
| Disconnect cable from negative auxiliary battery terminal | Memorize steering angle neutral point | Panoramic view monitor system | ( ) |
- CAUTION:
-
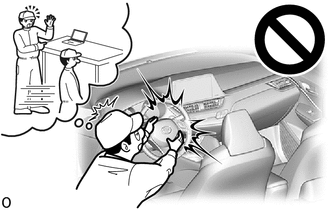
-
Some of these service operations affect the SRS airbag system. Read the precautionary notices concerning the SRS airbag system before servicing.
-
Click hereVehicle Interior>SUPPLEMENTAL RESTRAINT SYSTEMS>AIRBAG SYSTEM>PRECAUTION
- NOTICE:
-
After the power switch off, the radio receiver assembly records various types of memory and settings. As a result, after turning the ignition switch off, be sure to wait for the time specified in the following table before disconnecting the cable from the negative (-) auxiliary battery terminal.
- HINT:
- ·
When the cable is disconnected / reconnected to the battery terminal, systems temporarily stop operating. However, each system has a function that completes learning the first time the system is used.
-Learning completes when vehicle is driven
Effect/Inoperative Function When Necessary Procedures are not Performed Necessary Procedures Link *1: When performing learning using the GTS.
Click here(
)
Lane tracing assist system Drive the vehicle straight ahead at 35 km/h (22 mph) or more for 5 second or more. ( )
Pre-collision system Simple intelligent parking assist system*1 Parking support brake system*1
-Learning completes when vehicle is driven
Effect/Inoperative Function When Necessary Procedures are not Performed Necessary Procedures Link Power door lock control system
·Back door opener
Perform door unlock operation with door control switch or electrical key transmitter sub-assembly switch. ( )
Air conditioning system After the ignition switch is turned to ON, the servo motor standard position is recognized. -
·Use the same procedure for RHD and LHD vehicles.
·The following procedure is for LHD vehicles.
PROCEDURE

 1.REMOVE FRONT SEAT ASSEMBLY LH (for Manual Seat)
2.REMOVE FRONT SEAT ASSEMBLY LH (for Power Seat)
3.REMOVE FRONT SEAT ASSEMBLY RH
- HINT:
-
Use the same procedure as for the LH side.
4.REMOVE REAR SEAT ASSEMBLY
64330D
5.REMOVE PACKAGE TRAY TRIM PANEL ASSEMBLY (w/ Package Tray Trim)
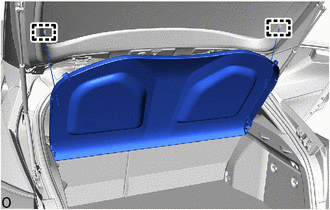
Disengage the hooks.
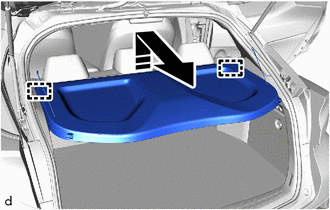

|
Remove in this Direction |
Disengage the guides to remove the package tray trim panel assembly as shown in the illustration.
64910J
6.REMOVE TONNEAU COVER ASSEMBLY (w/ Tonneau Cover)
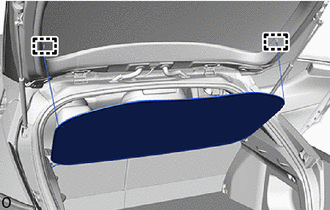
Disengage the hooks.
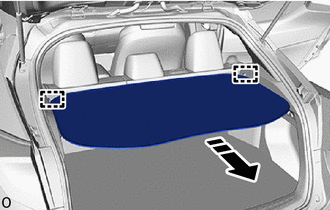
|
|
Remove in this Direction |
Disengage the guides to remove the tonneau cover assembly as shown in the illustration.
58410B
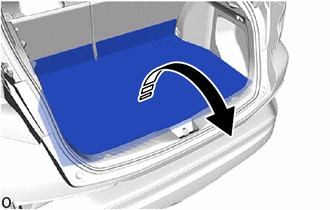
7.REMOVE DECK BOARD ASSEMBLY
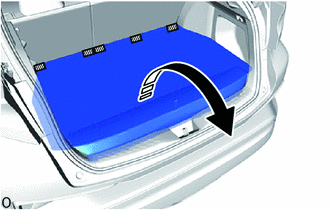

|
Hook and Loop Fastener |
|
|
Remove in this Direction |
for Type A:
Disengage the hook and loop fastener.
Remove the deck board assembly as shown in the illustration.
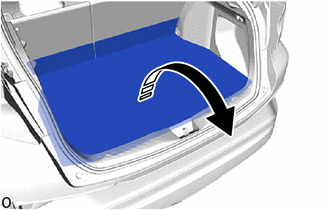
|
|
Remove in this Direction |
for Type B:
Remove the deck board assembly as shown in the illustration.
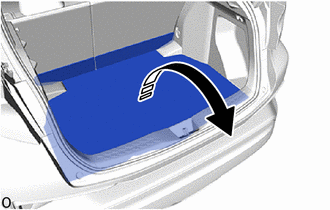
|
|
Remove in this Direction |
for Type C:
Remove the deck board assembly as shown in the illustration.
|
|
Remove in this Direction |
for Type D:
Remove the deck board assembly as shown in the illustration.
64777J
8.REMOVE SPARE WHEEL CUSHION (for 2ZR-FXE)
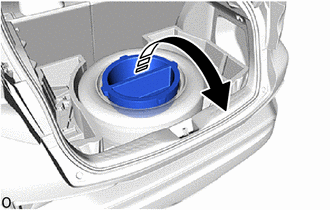
|
|
Remove in this Direction |
for Type A:
Remove the spare wheel cushion as shown in the illustration.
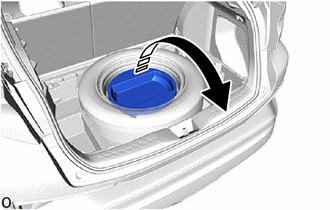
|
|
Remove in this Direction |
for Type B:
Remove the spare wheel cushion as shown in the illustration.
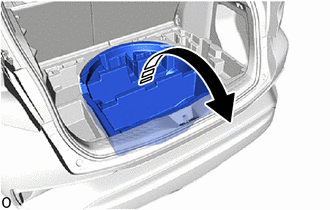
|
|
Remove in this Direction |
for Type C:
Remove the spare wheel cushion as shown in the illustration.
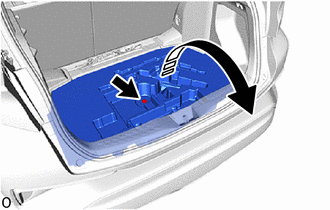
|
|
Remove in this Direction |
for Type D:
Remove the clip.
Remove the spare wheel cushion as shown in the illustration.
64997
9.REMOVE DECK FLOOR BOX LH (w/ Deck Floor Box)
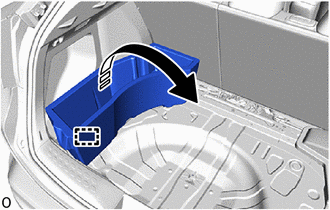
|
|
Remove in this Direction |
for Type A:
Disengage the guide to remove the deck floor box LH as shown in the illustration.
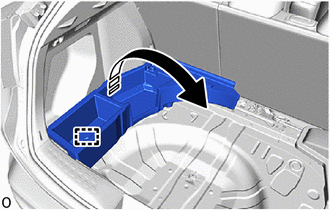
|
|
Remove in this Direction |
for Type B:
Disengage the guide to remove the deck floor box LH as shown in the illustration.
64995
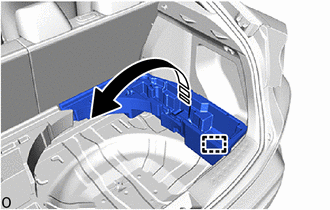
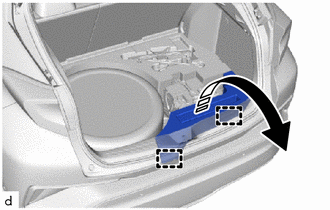
10.REMOVE DECK FLOOR BOX RH (w/ Deck Floor Box)
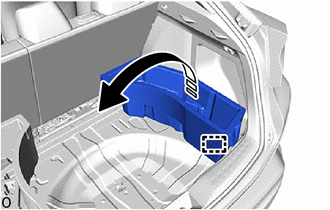
|
|
Remove in this Direction |
for Type A:
Disengage the guide to remove the deck floor box RH as shown in the illustration.
|
|
Remove in this Direction |
for Type B:
Disengage the guide to remove the deck floor box RH as shown in the illustration.
|
|
Remove in this Direction |
for Type C:
Disengage the guides to remove the deck floor box RH as shown in the illustration.
64429B
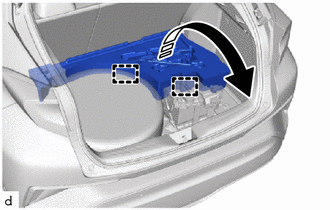
11.REMOVE LUGGAGE ROOM BOX (for M20A-FXS with Spare Tire)
|
|
Remove in this Direction |
Disengage the guides to remove the luggage room box as shown in the illustration.
12.REMOVE SPARE TIRE (for M20A-FXS with Spare Tire)
58440
13.REMOVE BATTERY SERVICE HOLE COVER ASSEMBLY (for M20A-FXS without Spare Tire)
64991
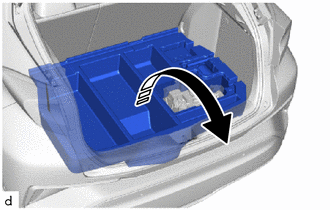
14.REMOVE DECK FLOOR FRONT BOX (for M20A-FXS without Spare Tire)
|
|
Remove in this Direction |
Remove the deck floor front box as shown in the illustration.
67914
15.REMOVE FRONT DOOR SCUFF PLATE LH
67913
16.REMOVE FRONT DOOR SCUFF PLATE RH
- HINT:
-
Use the same procedure as for the LH side.
62112
17.REMOVE COWL SIDE TRIM BOARD LH
62111C
18.REMOVE COWL SIDE TRIM BOARD RH
- HINT:
-
Use the same procedure as for the LH side.
62312B
19.REMOVE FRONT DOOR OPENING TRIM WEATHERSTRIP LH
62311B
20.REMOVE FRONT DOOR OPENING TRIM WEATHERSTRIP RH
- HINT:
-
Use the same procedure as for the LH side.
62212
21.REMOVE FRONT PILLAR GARNISH LH
62211
22.REMOVE FRONT PILLAR GARNISH RH
- HINT:
-
Use the same procedure as for the LH side.
67918A
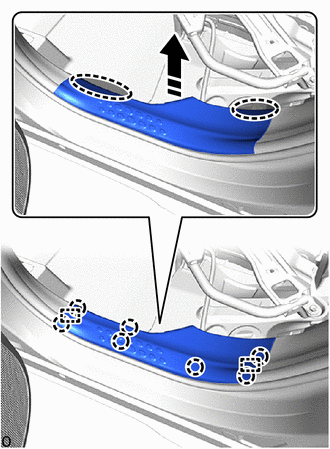
23.REMOVE REAR DOOR SCUFF PLATE LH

|
Place Hands Here |
|
|
Remove in this Direction |
Disengage the claws and guides to remove the rear door scuff plate LH as shown in the illustration.
67917A
24.REMOVE REAR DOOR SCUFF PLATE RH
- HINT:
-
Use the same procedure as for the LH side.
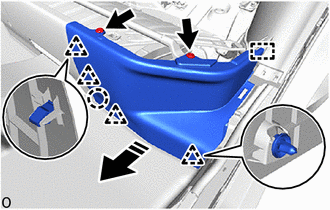
76974F
25.REMOVE REAR UNDER SIDE COVER LH
|
|
Remove in this Direction |
Remove the 2 clips.
Disengage the clips, claw and guide to remove the rear under side cover LH as shown in the illustration.
76973F
26.REMOVE REAR UNDER SIDE COVER RH
- HINT:
-
Use the same procedure as for the LH side.
62332A
27.REMOVE REAR DOOR OPENING TRIM WEATHERSTRIP LH
62331A
28.REMOVE REAR DOOR OPENING TRIM WEATHERSTRIP RH
- HINT:
-
Use the same procedure as for the LH side.
71304C
29.REMOVE REAR SEATBACK HINGE SUB-ASSEMBLY LH
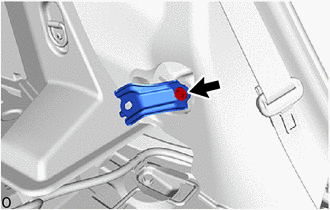
Loosen the bolt to remove the rear seatback hinge sub-assembly LH.
71303C
30.REMOVE REAR SEATBACK HINGE SUB-ASSEMBLY RH
- HINT:
-
Use the same procedure as for the LH side.
62552F
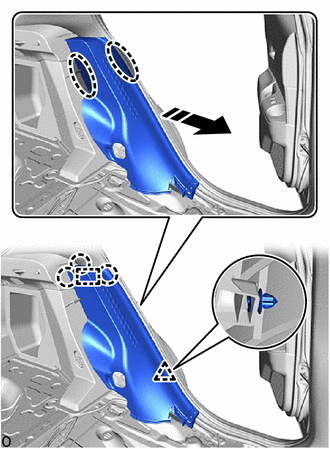
31.REMOVE REAR SEAT SIDE GARNISH LH
|
|
Place Hands Here |
|
|
Remove in this Direction |
Disengage the clip, claws and guide to remove the rear seat side garnish LH as shown in the illustration.
62551F
32.REMOVE REAR SEAT SIDE GARNISH RH
- HINT:
-
Use the same procedure as for the LH side.
73233
33.REMOVE LAP BELT OUTER ANCHOR COVER
73220
34.DISCONNECT FRONT SEAT OUTER BELT ASSEMBLY LH
73210
35.DISCONNECT FRONT SEAT OUTER BELT ASSEMBLY RH
- HINT:
-
Use the same procedure as for the LH side.
62414A
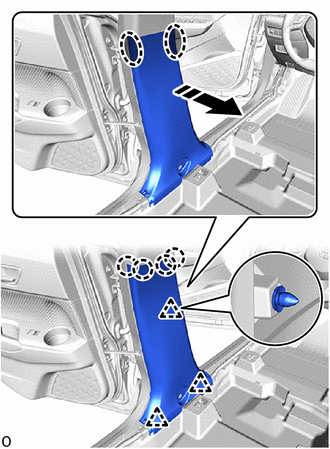
36.REMOVE CENTER PILLAR LOWER GARNISH LH
|
|
Place Hands Here |
|
|
Remove in this Direction |
Disengage the clips and claws to remove the center pillar lower garnish LH as shown in the illustration.
62413A
37.REMOVE CENTER PILLAR LOWER GARNISH RH
- HINT:
-
Use the same procedure as for the LH side.
62420A
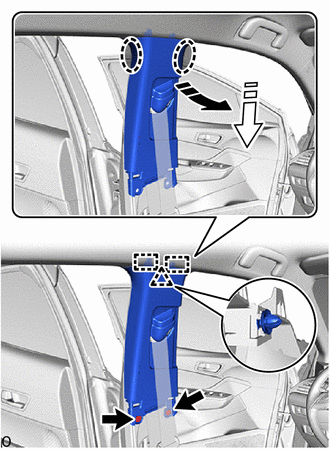
38.REMOVE CENTER PILLAR GARNISH ASSEMBLY LH
|
|
Place Hands Here |
|
|
Remove in this Direction (1) |

|
Remove in this Direction (2) |
Remove the 2 clips.
Disengage the clip and guides to remove the center pillar garnish assembly LH as shown in the illustration.
When reusing the center pillar garnish assembly LH:
Remove the clip from the center pillar garnish assembly LH.
62410A
39.REMOVE CENTER PILLAR GARNISH ASSEMBLY RH
- HINT:
-
Use the same procedure as for the LH side.
64716D
40.REMOVE DECK TRIM REAR COVER
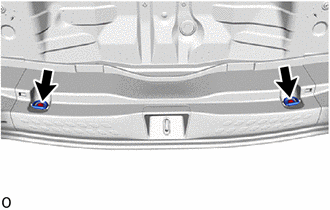
w/ Hook:
Remove the 2 bolts and 2 luggage hold belt strikers.
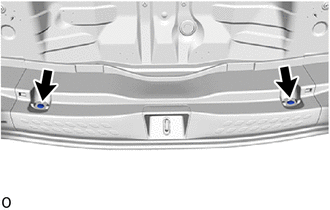
w/o Hook:
Remove the 2 clips.
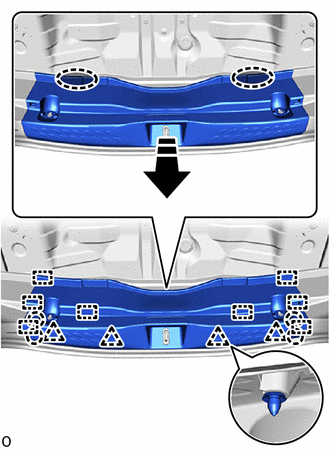
|
|
Place Hands Here |
|
|
Remove in this Direction |
Disengage the clips, claws and guides to remove the deck trim rear cover as shown in the illustration.
81330
41.REMOVE NO. 1 LUGGAGE COMPARTMENT LIGHT ASSEMBLY
64715C
42.REMOVE DECK TRIM SIDE COVER LH (w/ Cover)
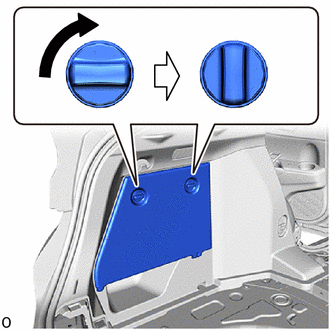
Turn the cover knob as shown in the illustration and unlock it.
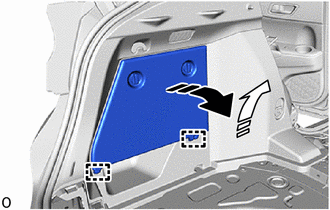
|
|
Remove in this Direction (1) |
|
|
Remove in this Direction (2) |
Disengage the guides to remove the deck trim side cover LH as shown in the illustration.
64714C
43.REMOVE DECK TRIM SIDE COVER RH (w/ Cover)
- HINT:
-
Use the same procedure as for the LH side.
64740C
44.REMOVE DECK TRIM SIDE PANEL ASSEMBLY LH
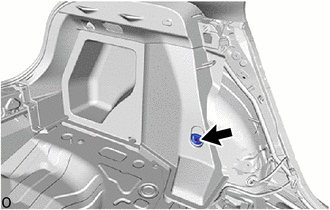
w/ Hook:
Remove the bolt and luggage hold belt striker.
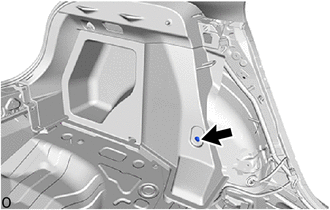
w/o Hook:
Remove the clip.
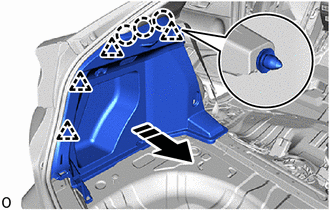
|
|
Remove in this Direction |
Disengage the clips and claws to remove the deck trim side panel assembly LH as shown in the illustration.
Disconnect the rear seat 3 point type outer belt assembly LH.
64730B
45.REMOVE DECK TRIM SIDE PANEL ASSEMBLY RH
- HINT:
-
Use the same procedure as for the LH side.
62480A
46.REMOVE ROOF SIDE INNER GARNISH ASSEMBLY LH
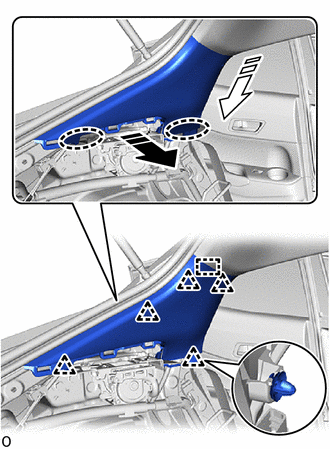
|
|
Place Hands Here |
|
|
Remove in this Direction (1) |
|
|
Remove in this Direction (2) |
Disengage the clips and guide to remove the roof side inner garnish assembly LH as shown in the illustration.
When reusing the roof side inner garnish assembly LH:
Remove the 5 clips from the roof side inner garnish assembly LH.
62470A
47.REMOVE ROOF SIDE INNER GARNISH ASSEMBLY RH
- HINT:
-
Use the same procedure as for the LH side.
89943
48.REMOVE RAIN SENSOR COVER (w/ Rain Sensor)
86466E
49.REMOVE NO. 2 FORWARD RECOGNITION COVER (w/ Lane Departure Alert System)
86466D
50.REMOVE NO. 1 FORWARD RECOGNITION COVER (w/ Lane Departure Alert System)
87834
51.REMOVE INNER REAR VIEW MIRROR STAY HOLDER COVER (w/ Cover)
81340
52.REMOVE VANITY LIGHT ASSEMBLY (w/ Vanity Light)
81260A
53.REMOVE MAP LIGHT ASSEMBLY (for TMMT Made)
81260A
54.REMOVE MAP LIGHT ASSEMBLY (for TMC Made)
81240
55.REMOVE NO. 1 ROOM LIGHT ASSEMBLY
89732A
56.REMOVE THEFT WARNING ULTRASONIC SENSOR (w/ Intrusion Sensor)
57.REMOVE COMMUNICATION TELEMATICS BOX ASSEMBLY (w/ Telematics Transceiver)
74325
58.REMOVE VISOR BRACKET COVER
- HINT:
-
Use the same procedures for the opposite side.
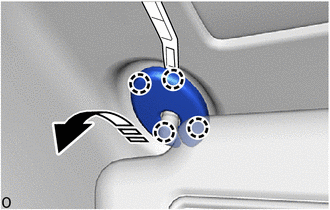
|
|
Remove in this Direction |
Using a molding remover A, disengage the claws to remove the visor bracket cover as shown in the illustration.
74320
59.REMOVE VISOR ASSEMBLY LH (w/ Vanity Light)
74310
60.REMOVE VISOR ASSEMBLY RH (w/ Vanity Light)
- HINT:
-
Use the same procedure as for the LH side.
74320
61.REMOVE VISOR ASSEMBLY LH (w/o Vanity Light)
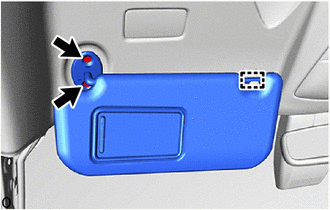
Using a T10H "TORX" driver, remove the 2 screws.
Disengage the guide to remove the visor assembly LH.
74310
62.REMOVE VISOR ASSEMBLY RH (w/o Vanity Light)
- HINT:
-
Use the same procedure as for the LH side.
74348
63.REMOVE VISOR HOLDER
- HINT:
-
Use the same procedures for the opposite side.
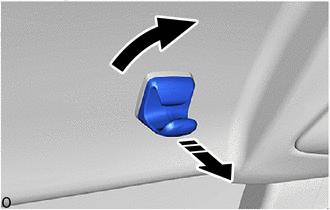

|
Turn in this Direction |
|
|
Remove in this Direction |
Turn the visor holder clockwise approximately 45° and pull it out as shown in the illustration.
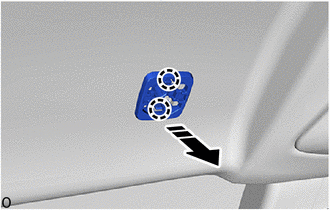
|
|
Remove in this Direction |
Disengage the claws to remove the base as shown in the illustration.
74612
64.REMOVE ASSIST GRIP COVER
- HINT:
-
Use the same procedures for the opposite side.
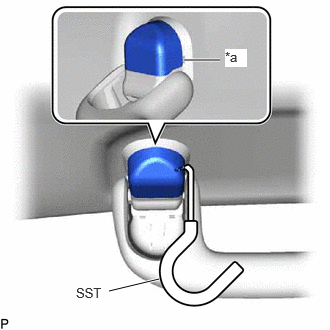
| *a | Cutout |
Insert SST into the cutout of the assist grip cover as shown in the illustration.
- SST
- 09813-00010
- NOTICE:
-
To prevent the assist grip assembly from being damaged, make sure to insert SST straight into the cutout.
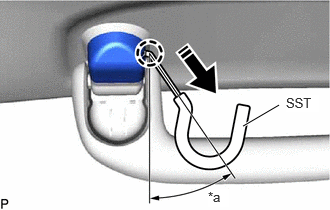
| *a | 30 to 45° |
|
|
Remove in this Direction |
Pull SST as shown in the illustration to disengage the claw.
- NOTICE:
-
To prevent the assist grip assembly from being damaged, make sure to only pull SST as shown in the illustration.
Remove the assist grip cover.
74610A
65.REMOVE ASSIST GRIP SUB-ASSEMBLY
- HINT:
-
Use the same procedures for the opposite side.
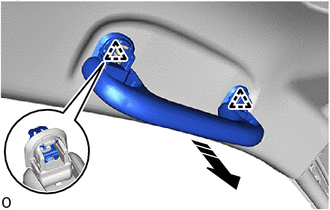
|
|
Remove in this Direction |
Disengage the clips to remove the assist grip sub-assembly as shown in the illustration.
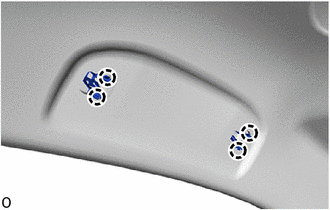
Remove the 2 clips from the vehicle body.
63311C
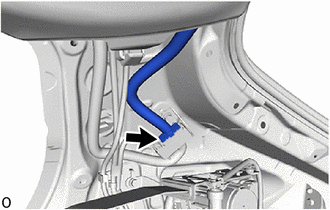
66.REMOVE ROOF HEADLINING
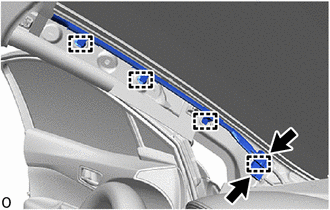
for Front Pillar LH Side:
Disconnect each connector.
Using a clip remover, disengage the wire harness clamps.
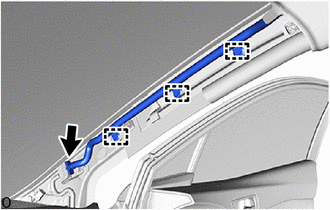
for Front Pillar RH Side:
Disconnect the connector.
Using a clip remover, disengage the wire harness clamps.
for Rear Pillar RH Side:
Disconnect the connector.
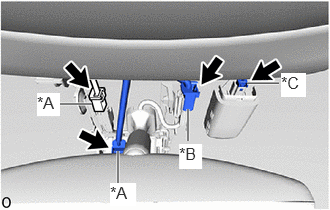
| *A | w/ Lane Departure Alert System |
| *B | w/ EC Mirror |
| *C | w/ Rain Sensor |
for Windshield Glass Side:
Disconnect each connector.
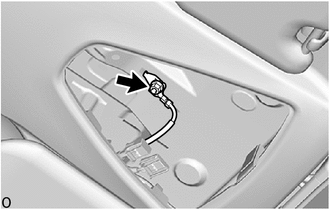
w/ Lane Departure Alert System:
Remove the nut to disconnect the ground wire.
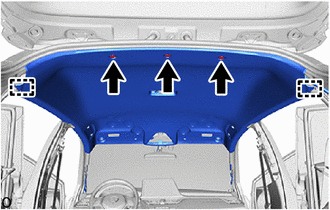
Using a clip remover, remove the 3 clips.
Disengage the guides to remove the roof headlining.
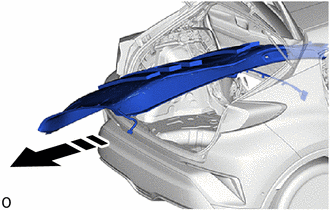
|
|
Remove in this Direction |
Turn the roof headlining diagonally and bend slightly to remove it from the back door.
- NOTICE:
- ·
Make sure that wrinkles do not form in the roof headlining during removal.
·Make sure that the roof headlining does not get caught on anything as it may become bent or damaged.
·Do not damage the roof headlining or vehicle interior.