8NR-FTS ENGINE CONTROL SFI SYSTEM Turbocharger Noise
DESCRIPTION
- HINT:
-
Turbocharger noise is classified into two types. These are whistling sound and chattering sound. During troubleshooting, first determine the type of noise.
| Type of Abnormal Noise | Outline of Abnormal Noise | Major Trouble Area |
|---|---|---|
| Whistling sound (airflow sound) | The whistling sound volume and pitch are proportional to the turbocharger or engine speed. The abnormal noise level becomes clear when the engine speed is increased. | ·
Turbocharger (example: unstable shaft) ·
Transmission gears ·
Leak in intake system ·
Damaged intake system |
| Chattering sound (metallic sound) | The chattering sound pitch is lower than the whistling sound pitch. Has a comparatively constant pitch that is independent of the engine speed and vehicle speed. | Turbocharger
|
Faults and Symptoms of Gasoline Engine Components
| Main fault | ·
Unstable turbocharger turbine shaft (interference, seizing, poor balance, etc.) ·
Poor installation or defective operation of the waste gate valve. ·
Poor installation or defective operation of the air by-pass valve assembly. |
| Symptom | ·
High-pitched whistling sound
·
Metallic sound due to looseness |
| Main fault | Leak |
| Symptom | Abnormal noise during intake leak |
| Symptom | Gear noise
|
PROCEDURE
Confirm with the customer the condition when noise occurred.
- HINT:
-
To clearly understand the conditions in which the noise occurred, the items in the table below are useful.
| Item | Note |
|---|---|
| Engine speed | Engine speed range |
| Vehicle speed | Vehicle speed range |
| Transaxle gear | Which gear? |
| Accelerator pedal position | During acceleration or deceleration? |
| Temperature | ·
Ambient temperature ·
Engine temperature (cold, warmed up, etc.) |
| Road conditions | ·
City or highway driving ·
Uphill or downhill |
| Noise level | ·
Did the noise occur suddenly, or build gradually? ·
Has the noise gradually been getting louder? |
| Other symptoms | ·
Lack of power ·
High fuel consumption, etc. |
| Noise recognition | What made the customer determine that the sound was a malfunction? |
- Result:
Proceed to NEXT
NEXT
Connect the GTS to the DLC3.
Start the engine.
Turn the GTS on.
Enter the following menus: Powertrain / Engine / Trouble Codes.
- Powertrain > Engine > Trouble Codes
- 50001 372
Check DTCs.
- Result:
Result Proceed to DTCs are not output A DTCs are output B
- HINT:
- ·
Check whether DTCs related to the turbo pressure sensor or atmospheric pressure sensor are output.
·If a DTC related to the turbo pressure sensor or atmospheric pressure sensor is output, defective actuator control related to the turbocharger may be the cause of the noise.
A
B
Check whether the noise described by the customer occurs.
- HINT:
-
If an abnormal noise is heard, check whether it matches the noise described by the customer.
If an abnormal noise is confirmed, determine which system emits it.
- Result:
Result Proceed to Noise occurs (ticking or rattling (metallic sound) during idling) A Noise occurs (squealing (metallic sound) when driving) B Noise occurs (hissing (airflow sound) when driving) C Noise occurs (squeaking or chuffing (airflow sound) during deceleration) D Noise occurs (whistling or foghorn-like (airflow sound) during acceleration) E Noise occurs (whistling (airflow sound) during deceleration) F The noise described by the customer could not be confirmed. G
A
B
C
D
E
F
G
Check the installation condition of the E-ring on the link connection of the waste gate valve actuator and turbine housing.
Check the actuator rod for the waste gate valve actuator.
- HINT:
- ·
Actuator rod wear may cause looseness leading to a chattering sound (metallic sound).
·Compare with another vehicle of the same model which is not malfunctioning to see if there is any difference in the operation sound.
- Result:
Result Proceed to No actuator rod malfunction A Actuator rod malfunction B
A
B
Check for damage to the compressor impeller.
Check for interference between the compressor impeller and the compressor housing.
- Result:
Result Proceed to No damage or interference A Damage or interference exists B
A
B
Check that the turbine shaft rotates smoothly, without catching.
Click hereEngine / Hybrid System>8NR-FTS (INTAKE / EXHAUST)>TURBOCHARGER>INSPECTION
Check for loose turbine mounting nuts and for axial play in the turbine shaft.
Click hereEngine / Hybrid System>8NR-FTS (INTAKE / EXHAUST)>TURBOCHARGER>INSPECTION
- HINT:
-
If the turbine shaft catches or there is no play, seal failure due to seizure or improper operation due to accumulation of deposits is suspected.
- Result:
Result Proceed to No turbine shaft malfunction A Turbine shaft malfunction B
A
B
Check for damage to the compressor impeller.
Check for interference between the compressor impeller and the compressor housing.
- Result:
Result Proceed to No damage or interference A Damage or interference exists B
A
B
Inspect the air by-pass valve assembly.
Click hereEngine / Hybrid System>8NR-FTS (INTAKE / EXHAUST)>TURBOCHARGER>INSPECTION
- HINT:
- ·
The abnormal noise may be caused by defective operation of the air by-pass valve assembly.
·If the previous checks find no malfunction, replace the turbocharger sub-assembly and determine if the noise improved.
- Result:
Proceed to OK NG
OK
NG
Replace the turbocharger sub-assembly.
Click hereEngine / Hybrid System>8NR-FTS (INTAKE / EXHAUST)>TURBOCHARGER>REMOVAL
- Result:
Proceed to NEXT
NEXT
Check that the abnormal noise has disappeared.
- Result:
Proceed to NEXT
NEXT
Check for oil leaks and large carbon deposits around the connecting surfaces of the turbocharger sub-assembly.
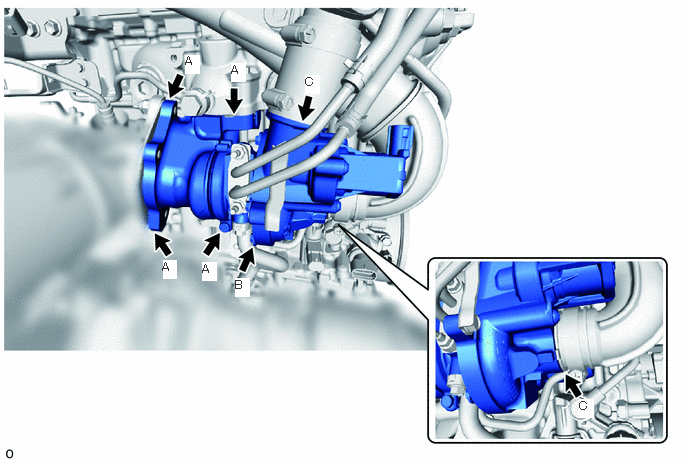
- HINT:
-
If oil leaks or a large amount of carbon deposits exist, air leaks from the respective sealing surfaces may be causing the noise.
- Result:
Result Proceed to An oil leak or large amount of carbon deposits does not exist. A A large amount of carbon deposits exist around the turbine housing, flange or gaskets in any of the areas (A) shown in the illustration. B Oil is leaking from between the sealing surfaces of the seal plate and compressor housing or bearing housing in the area (B) shown in the illustration. C Oil is leaking from the compressor housing in any of the areas (C) shown in the illustration. D
A
B
C
D
Replace the turbocharger sub-assembly.
Click hereEngine / Hybrid System>8NR-FTS (INTAKE / EXHAUST)>TURBOCHARGER>REMOVAL
- HINT:
-
As the waste gate valve actuator or air by-pass valve is malfunctioning, it is necessary to replace the turbocharger sub-assembly.
- Result:
Proceed to NEXT
NEXT
Check that the abnormal noise has disappeared.
- Result:
Proceed to NEXT
NEXT
Check for deformation or cracks in the mounting surfaces on the exhaust manifold converter sub-assembly and the turbine housing.
- HINT:
-
Deformation or cracks on a mounting surface may allow exhaust gas to leak from the damaged position.
- Standard:
No deformation or cracks on a mounting surface
- Result:
Result Proceed to No problem with the mounting surface A Deformation or cracks on the exhaust manifold converter sub-assembly mounting surface B Deformation or cracks on the turbine housing mounting surface C
A
B
C
Replace the exhaust gasket.
- Result:
Proceed to NEXT
NEXT
Check that the abnormal noise has disappeared.
- Result:
Proceed to NEXT
NEXT
Inspect the air by-pass valve assembly.
Click hereEngine / Hybrid System>8NR-FTS (INTAKE / EXHAUST)>TURBOCHARGER>INSPECTION
- HINT:
-
The abnormal noise may be caused by defective operation of the air by-pass valve assembly.
- Result:
Proceed to OK NG
OK
NG
Connect the GTS to the DLC3.
Turn the ignition switch to ON.
Enter the following menus: Powertrain / Engine / Data List / All Data / Atmospheric Pressure.
- Powertrain > Engine > Data List
-
Tester Display Atmospheric Pressure - 50003 372 229
Using the table, read the normal atmospheric pressure value for the applicable altitude and temperature.
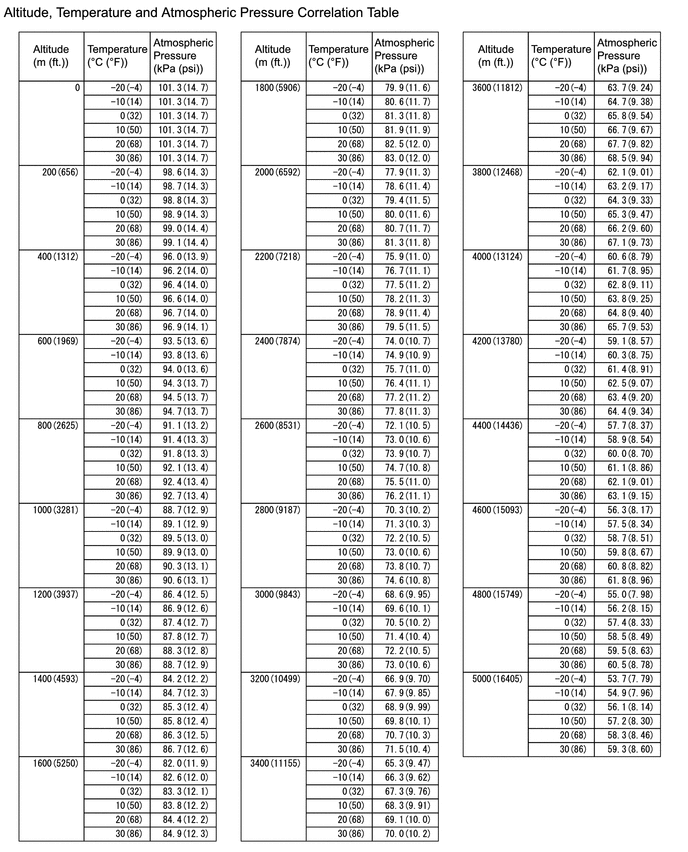
- HINT:
- ·
Standard atmospheric pressure is approximately 101 kPa(abs) (15 psi(abs)).
·For every 100 m (328 ft.) increase in altitude, atmospheric pressure drops by approximately 1 kPa (0.15 psi). This varies by weather.
Compare the Atmospheric pressure value in the Data List with the normal atmospheric value from the table.
- Result:
Result Proceed to Other than the following A Difference between Atmospheric Pressure in the Data List and normal atmospheric pressure value is 10 kPa (1.45 psi) or more. B
A
B
On-vehicle inspect the No. 1 turbo pressure sensor.
- Result:
Proceed to OK NG
OK
NG
Replace the turbocharger sub-assembly.
Click hereEngine / Hybrid System>8NR-FTS (INTAKE / EXHAUST)>TURBOCHARGER>REMOVAL
- HINT:
-
As the turbine shaft play is not appropriate or the compressor impeller is malfunctioning, it is necessary to replace the turbocharger sub-assembly.
- Result:
Proceed to NEXT
NEXT
Check that the abnormal noise has disappeared.
- Result:
Proceed to NEXT
NEXT
Check if gear noise is the source of the abnormal noise (not noise from the turbocharger).
- Result:
Proceed to NEXT
NEXT
Explain to the customer that the sound described by the customer is not a malfunction.
- HINT:
-
To convince the customer, it is helpful to drive the customer in a different vehicle.
- Result:
Proceed to NEXT
NEXT