8NR-FTS ENGINE CONTROL ECM REMOVAL
CAUTION / NOTICE / HINT
The necessary procedures (adjustment, calibration, initialization, or registration) that must be performed after parts are removed, installed, or replaced during the ECM removal/installation are shown below.
| Replacement Part or Procedure | Necessary Procedure | Effect/Inoperative when not Performed | Link |
|---|---|---|---|
|
*1: When performing learning using the GTS. Click here( *2: w/ Stop and start system |
|||
| Disconnect cable from negative battery terminal | Memorize steering angle neutral point | Lane departure alert system (w/ Steering Control) | ( ) |
| Simple intelligent parking assist system*1 | |||
| Toyota parking assist-sensor system (w/ Simple Intelligent Parking Assist System)*1 | |||
| Pre-collision syatem | |||
| Initialize back door lock | Power door lock control system | ()
|
|
| Drive the vehicle until stop and start control is permitted (approximately 5 to 60 minutes)*2 | Stop and start system | ()
|
|
| Replacement of ECM | Perform Vehicle Identification Number (VIN) or frame number registration | ·
MIL illuminates ·
DTC P0630 is stored |
()
|
| HEAVY KNOCK HISTORY | ·
SAVE HISTORY ·
WRITE HISTORY |
()
|
|
| ECU Communication ID Registration (Immobiliser system) | Engine start function | See Service Bulletin for the registration method. | |
| Perform code registration (Immobiliser system) | ·
Wireless door lock control system ·
Smart entry and start system ·
Engine start function ·
Steering lock system |
See Service Bulletin for the registration method. (w/ Entry and Start System) | |
| Engine starting | See Service Bulletin for the registration method. (w/o Entry and Start System) | ||
1.
Reset Memory 2.
Deceleration Sensor 0 Point Calibration 3.
CVT Oil Pressure Calibration |
Deterioration of fuel efficiency | for K313()
for K313F( )
|
|
PROCEDURE

 1. PRECAUTION
- NOTICE:
- ·
After turning the ignition switch off, waiting time may be required before disconnecting the cable from the negative (-) battery terminal. Therefore, make sure to read the disconnecting the cable from the negative (-) battery terminal notices before proceeding with work.
Click hereGeneral>INTRODUCTION>REPAIR INSTRUCTION>PRECAUTION
·If the ECM has been struck or dropped, replace it.
·Perform the Vehicle Identification Number (VIN) registration when replacing the ECM.
Click hereEngine / Hybrid System>8NR-FTS (ENGINE CONTROL)>SFI SYSTEM>REGISTRATION
·When replacing the ECM, use the GTS to save "Heavy Knock History" and then upload it to the new ECM.
Click hereEngine / Hybrid System>8NR-FTS (ENGINE CONTROL)>SFI SYSTEM>REGISTRATION
2.DISCONNECT CABLE FROM NEGATIVE BATTERY TERMINAL
Click hereGeneral>MAINTENANCE>8NR-FTS BATTERY>REMOVAL
- NOTICE:
-
When disconnecting the cable, some systems need to be initialized after the cable is reconnected.
-
Click hereGeneral>INTRODUCTION>REPAIR INSTRUCTION>INITIALIZATION
53141F
3.REMOVE RADIATOR COVER
17751
4.REMOVE NO. 1 AIR CLEANER INLET
17705
5.REMOVE AIR CLEANER CAP SUB-ASSEMBLY
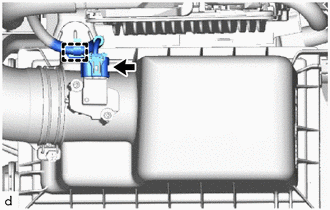
Disconnect the mass air flow meter connector.
Disengage the clamp from the air cleaner cap sub-assembly.
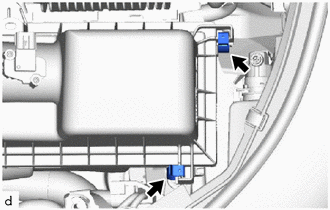
Disengage the 2 air cleaner cap sub-assembly clamps.
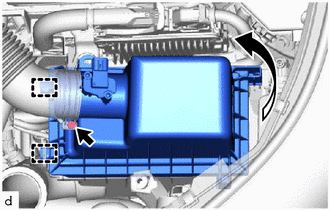
Disengage the 2 guides to separate the air cleaner cap sub-assembly from the air cleaner case sub-assembly.
Loosen the hose clamp and remove the air cleaner cap sub-assembly from the air cleaner hose.
17701
6.REMOVE AIR CLEANER CASE SUB-ASSEMBLY
89661
7.REMOVE ECM
- HINT:
-
When replacing the ECM, use the GTS to save "Heavy Knock History" and then upload it to the new ECM.
-
Click hereEngine / Hybrid System>8NR-FTS (ENGINE CONTROL)>SFI SYSTEM>REGISTRATION
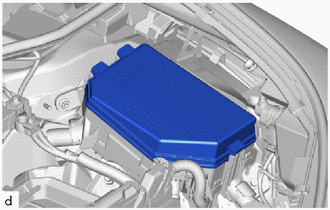
Remove the No. 1 relay block cover from the No. 1 engine room relay block.
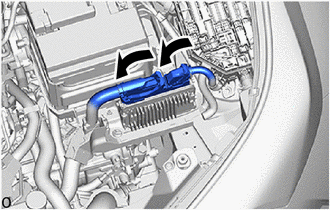
Raise the 2 levers while pushing the locks on the levers, and disconnect the 2 ECM connectors.
- NOTICE:
-
After disconnecting the ECM connectors, make sure that dirt, water or other foreign matter does not contact the connecting parts of the ECM connectors.
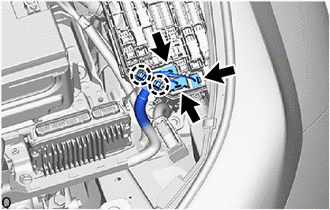
Disconnect the 3 connectors from the No. 1 engine room relay block.
Disengage the 2 claws to separate the engine wire from the No. 1 engine room relay block.
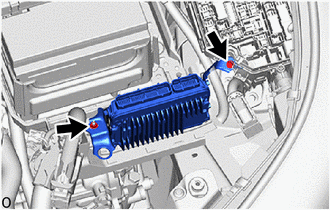
Remove the bolt, nut and ECM.
- NOTICE:
-
If the ECM has been struck or dropped, replace it.
89667E
8.REMOVE NO. 1 ECM BRACKET
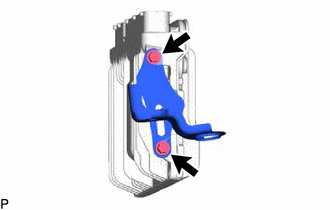
Remove the 2 screws and No. 1 ECM bracket from the ECM.
89668
9.REMOVE NO. 2 ECM BRACKET
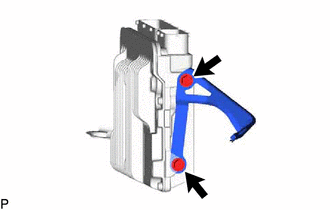
Remove the 2 screws and No. 2 ECM bracket from the ECM.