PARKING BRAKE ELECTRIC PARKING BRAKE SYSTEM Electric Parking Brake AUTO Indicator Light Circuit
DESCRIPTION
Pulling the electric parking brake switch to the lock side for 5 seconds or more changes the AUTO function (shift-linked function) to ON, and an AUTO Mode ON message is displayed on the multi-information display in the combination meter. (for CVT)
Pressing the electric parking brake switch to the release side for 5 seconds or more changes the AUTO function (shift-linked function) to OFF, and an AUTO Mode OFF message is displayed on the multi-information display in the combination meter.(for CVT)
Pulling the electric parking brake switch to the lock side for 5 seconds or more changes the AUTO function (ignition switch-linked function) to ON, and the EPB-Auto OFF indicator light in the combination meter turns off. (for Manual Transaxle)
Pressing the electric parking brake switch to the release side for 5 seconds or more changes the AUTO function (ignition switch-linked function) to OFF, and the EPB-Auto OFF indicator light in the combination meter illuminates. (for Manual Transaxle)
WIRING DIAGRAM
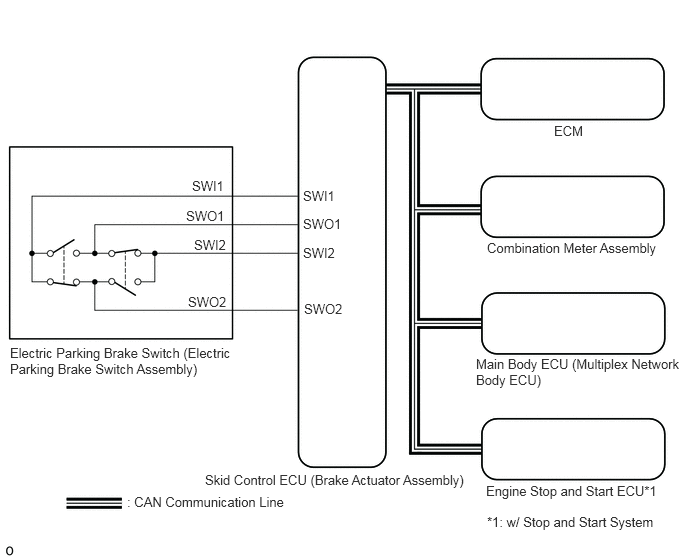
CAUTION / NOTICE / HINT
- NOTICE:
- ·
Inspect the fuses for circuits related to this system before performing the following inspection procedure.
·The electric parking brake may still operate up to 20 seconds after the ignition switch is turned off. Before disconnecting connectors or fuses, turn the ignition switch off and wait 20 seconds or more.
·When replacing the skid control ECU (brake actuator assembly), operate the electric parking brake switch (electric parking brake switch assembly), as the parking brake indicator light (red) blinks when the ignition switch is first turned to ON.
PROCEDURE
Check if CAN communication system DTCs are output.
Click herePower Source / Network>NETWORKING>CAN COMMUNICATION SYSTEM>DIAGNOSIS SYSTEM
- Result:
Result Proceed to DTCs are not output A DTCs are output B
A
B
Click herePower Source / Network>NETWORKING>CAN COMMUNICATION SYSTEM>HOW TO PROCEED WITH TROUBLESHOOTING
Turn the ignition switch off.
Connect the GTS to the DLC3.
Turn the ignition switch to ON and the GTS on.
Enter the following menus: Chassis / Electric Parking Brake / Data List.
Check the values by referring to the table below.
- Chassis > ABS/VSC/TRC/EPB > Data List
-
Tester Display Measurement Item Range Normal Condition Diagnostic Note Auto Mode AUTO mode permission display OFF or ON OFF: Manual mode
ON: AUTO mode-
- Chassis > ABS/VSC/TRC/EPB > Data List
-
Tester Display Auto Mode - 50003 105 465
When switching the mode, check that the Data List display turns on and off.
- Result:
Result Proceed to AUTO indicator light does not illuminate and turn off according to turning Active Test on and off A AUTO indicator light illuminates and turns off according to turning Active Test on and off B
A
B
Check for DTCs.
Click hereBrake>PARKING BRAKE>ELECTRIC PARKING BRAKE SYSTEM>DTC CHECK / CLEAR
- Chassis > ABS/VSC/TRC/EPB > Trouble Codes
- 50001 105
- Result:
Result Proceed to DTC is not output A DTC is output B
A
B
Inspect the electric parking brake switch (electric parking brake switch assembly).
Click hereBrake>PARKING BRAKE>ELECTRIC PARKING BRAKE SWITCH>INSPECTION
- Result:
Proceed to OK NG
OK
NG
Disconnect the F67 electric parking brake switch (electric parking brake switch assembly) connector.
Disconnect the A42 skid control ECU (brake actuator assembly) connector.
Measure the resistance according to the value(s) in the table below.
- Standard Resistance:
Tester Connection Condition Specified Condition A42-31 (SWI1) - F67-6 (SWI1) Always Below 5 Ω A42-32 (SWO1) - F67-5 (SWO1) Always Below 5 Ω A42-15 (SWI2) - F67-4 (SWI2) Always Below 5 Ω A42-16 (SWO2) - F67-3 (SWO2) Always Below 5 Ω A42-31 (SWI1) or F67-6 (SWI1) - Body ground Always 10 kΩ or higher A42-32 (SWO1) or F67-5 (SWO1) - Body ground Always 10 kΩ or higher A42-15 (SWI2) or F67-4 (SWI2) - Body ground Always 10 kΩ or higher A42-16 (SWO2) or F67-3 (SWO2) - Body ground Always 10 kΩ or higher
- Result:
Proceed to OK NG
OK
NG
Turn the ignition switch off.
Connect the GTS to the DLC3.
Turn the ignition switch to ON.
Turn the GTS on.
Enter the following menus: Chassis / Electric Parking Brake / Data List.
Read the Data List according to the display on the GTS.
Click hereBrake>PARKING BRAKE>ELECTRIC PARKING BRAKE SYSTEM>DATA LIST / ACTIVE TEST
- Chassis > ABS/VSC/TRC/EPB > Active Test
-
Tester Display Measurement Item Control Range Diagnostic Note Auto Mode AUTO mode ON or OFF ·Vehicle stopped
·Ignition switch ON
- Chassis > ABS/VSC/TRC/EPB > Active Test
-
Tester Display Auto Mode - 50004 105 111
Select the Data List on the GTS.
- Chassis > ABS/VSC/TRC/EPB > Data List
-
Tester Display Measurement Item Range Normal Condition Diagnostic Note Auto Mode AUTO mode permission display ON or OFF ON: AUTO mode
OFF: Manual mode-
- Chassis > ABS/VSC/TRC/EPB > Data List
-
Tester Display Auto Mode - 50003 105 465
Perform the Auto Mode Active Test, and check that the Data List display changes.
- Result:
Result Proceed to Check the operating condition of the "Auto Mode" when operating it using the GTS. (for LHD) A Check the operating condition of the "Auto Mode" when operating it using the GTS. (for RHD) B "Auto Mode" in the Data List turns ON/OFF using the Active Test. C
A
B
C
Perform the Active Test of the combination meter assembly using the GTS. (for CVT)
Click hereVehicle Interior>METER / GAUGE / DISPLAY>METER / GAUGE SYSTEM>DATA LIST / ACTIVE TEST
- Body Electrical > Combination Meter > Active Test
-
Tester Display Meter Display 1 - 50004 122 7
Perform the Active Test of the combination meter assembly using the GTS. (for Manual Transaxle)
Click hereVehicle Interior>METER / GAUGE / DISPLAY>METER / GAUGE SYSTEM>DATA LIST / ACTIVE TEST
- Body Electrical > Combination Meter > Active Test
-
Tester Display EPB Auto OFF Indicator
Check the multi-information display the combination meter assembly turn ON or OFF in accordance with the GTS operation. (for CVT)
- OK:
The message in the multi-information display appears and disappears in accordance with the Active Test operation.
Check that the Auto off indicator light on the combination meter assembly turns ON or OFF in accordance with the GTS operation. (for Manual Transaxle)
- OK:
The indicator light turns on and off in accordance with the Active Test operation.
- Result:
Result Proceed to OK (for LHD) A OK (for RHD) B NG C
A
B
C
Click hereVehicle Interior>METER / GAUGE / DISPLAY>METER / GAUGE SYSTEM>HOW TO PROCEED WITH TROUBLESHOOTING