8NR-FTS ENGINE CONTROL CAMSHAFT OIL CONTROL SOLENOID INSTALLATION
PROCEDURE

 15370
1.INSTALL CAMSHAFT TIMING OIL CONTROL SOLENOID ASSEMBLY (for Exhaust Side)
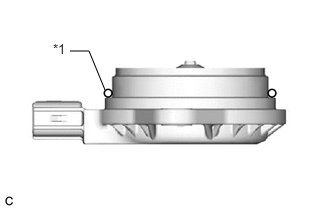
| *1 | O-ring |
Apply engine oil to a new O-ring and install it to the camshaft timing oil control solenoid assembly as shown in the illustration.
- NOTICE:
-
Do not damage the O-ring.
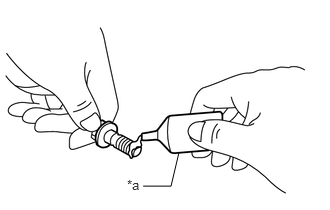
| *a | Adhesive |
Apply adhesive to 2 or 3 threads of 2 new bolts.
- Adhesive:
Toyota Genuine Adhesive 1324, Three Bond 1324 or equivalent
Install the camshaft timing oil control solenoid assembly to the timing chain cover assembly with the 2 bolts.
- Torque:
- 10 N*m (102 kgf*cm, 7 ft.*lbf)
- NOTICE:
- ·
If the camshaft timing oil control solenoid assembly has been struck or dropped, replace it.
·Make sure that the O-ring is not cracked or moved out of place when installing the camshaft timing oil control solenoid assembly.
Connect the camshaft timing oil control solenoid assembly connector.
Engage the clamp to install the wire harness clamp bracket to the engine wire.
Install the engine wire to the cylinder head cover sub-assembly with the bolt.
- Torque:
- 10 N*m (102 kgf*cm, 7 ft.*lbf)
15370
2.INSTALL CAMSHAFT TIMING OIL CONTROL SOLENOID ASSEMBLY (for Intake Side)
| *1 | O-ring |
Apply engine oil to a new O-ring and install it to the camshaft timing oil control solenoid assembly as shown in the illustration.
- NOTICE:
-
Do not damage the O-ring.
| *a | Adhesive |
Apply adhesive to 2 or 3 threads of 2 new bolts.
- Adhesive:
Toyota Genuine Adhesive 1324, Three Bond 1324 or equivalent
Install the camshaft timing oil control solenoid assembly to the timing chain cover assembly with the 2 bolts.
- Torque:
- 10 N*m (102 kgf*cm, 7 ft.*lbf)
- NOTICE:
- ·
If the camshaft timing oil control solenoid assembly has been struck or dropped, replace it.
·Make sure that the O-ring is not cracked or moved out of place when installing the camshaft timing oil control solenoid assembly.
Connect the camshaft timing oil control solenoid assembly connector.
12305
3.INSTALL ENGINE MOUNTING INSULATOR SUB-ASSEMBLY RH (w/ Air Conditioning System)
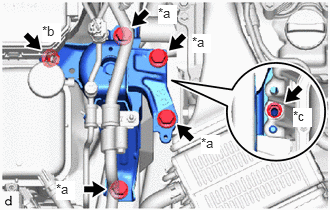
| *a | Bolt |
| *b | Nut A |
| *c | Nut B |
Install the engine mounting insulator sub-assembly RH to the vehicle and engine mounting bracket RH with the 4 bolts and 2 nuts.
- Torque:
- Bolt : 72 N*m (734 kgf*cm, 53 ft.*lbf)
- Nut A : 72 N*m (734 kgf*cm, 53 ft.*lbf)
- Nut B : 41 N*m (418 kgf*cm, 30 ft.*lbf)
Install the air conditioner tube and accessory assembly to the engine mounting insulator sub-assembly RH with the bolt.
- Torque:
- 9.8 N*m (100 kgf*cm, 87 in.*lbf)
Install the air conditioner tube and accessory assembly to the vehicle with the nut.
- Torque:
- for DENSO Made : 9.8 N*m (100 kgf*cm, 87 in.*lbf)
- for VALEO Made : 5.4 N*m (55 kgf*cm, 48 in.*lbf)
Install the No. 2 earth wire from the engine mounting insulator sub-assembly RH with the bolt.
- Torque:
- 10.5 N*m (107 kgf*cm, 8 ft.*lbf)
12305
4.INSTALL ENGINE MOUNTING INSULATOR SUB-ASSEMBLY RH (w/o Air Conditioning System)
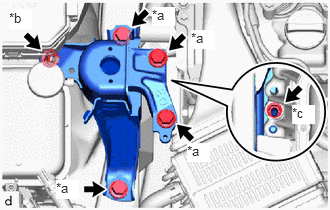
| *a | Bolt |
| *b | Nut A |
| *c | Nut B |
Install the engine mounting insulator sub-assembly RH to the vehicle and engine mounting bracket RH with the 4 bolts and 2 nuts.
- Torque:
- Bolt : 72 N*m (734 kgf*cm, 53 ft.*lbf)
- Nut A : 72 N*m (734 kgf*cm, 53 ft.*lbf)
- Nut B : 41 N*m (418 kgf*cm, 30 ft.*lbf)
Install the No. 2 earth wire from the engine mounting insulator sub-assembly RH with the bolt.
- Torque:
- 10.5 N*m (107 kgf*cm, 8 ft.*lbf)
5.REMOVE ENGINE SUPPORT BRIDGE
6.REMOVE ENGINE HANGER
55701J
7.INSTALL OUTER COWL TOP PANEL SUB-ASSEMBLY (for LHD)
55701J
8.INSTALL OUTER COWL TOP PANEL SUB-ASSEMBLY (for RHD)
55735C
9.INSTALL COWL BODY MOUNTING REINFORCEMENT RH
55736D
10.INSTALL COWL BODY MOUNTING REINFORCEMENT LH
55735A
11.INSTALL WATER GUARD PLATE LH
55737B
12.INSTALL NO. 1 HEATER AIR DUCT SPLASH SHIELD SEAL
13.INSTALL WINDSHIELD WIPER MOTOR AND LINK
14.INSPECT FOR ENGINE OIL LEAK
51443C
15.INSTALL REAR ENGINE UNDER COVER RH
51441
16.INSTALL NO. 1 ENGINE UNDER COVER
17.INSTALL FRONT WHEEL RH