8NR-FTS ENGINE MECHANICAL ENGINE ASSEMBLY INSTALLATION
CAUTION / NOTICE / HINT
- CAUTION:
-
The engine assembly with transaxle is very heavy. Be sure to follow the procedure described in the repair manual, or the engine lifter may suddenly drop.
- HINT:
-
Perform "Inspection After Repair" after replacing the engine assembly.
-
Click hereEngine / Hybrid System>8NR-FTS (ENGINE CONTROL)>SFI SYSTEM>INITIALIZATION
PROCEDURE

 1.INSTALL ENGINE HANGERS
2.REMOVE ENGINE ASSEMBLY FROM ENGINE STAND
Remove the engine assembly from the engine stand.
16603
3.INSTALL NO. 1 IDLER PULLEY SUB-ASSEMBLY (w/o Air Conditioning System)
Using an E8 "TORX" socket wrench, install the 2 stud bolts.
- Torque:
- 9.8 N*m (100 kgf*cm, 87 in.*lbf)
Install the No. 1 idler pulley sub-assembly.
Install the bolt and 2 nuts.
- Torque:
- 25 N*m (255 kgf*cm, 18 ft.*lbf)
4.INSTALL NO. 1 IDLER PULLEY (w/o Air Conditioning System)
- HINT:
-
Perform this procedure only when replacement of the No. 1 idler pulley is necessary.
Install the No. 1 idler pulley and 2 idler pulley cover plate to the idler pulley bracket with the bolt.
- Torque:
- 60 N*m (612 kgf*cm, 44 ft.*lbf)
88310
5.INSTALL COMPRESSOR WITH PULLEY ASSEMBLY (w/ Air Conditioning System)
27020
6.INSTALL GENERATOR ASSEMBLY
for DENSO Made:
Click herePower Source / Network>8NR-FTS (BATTERY / CHARGING)>GENERATOR (for DENSO Made)>INSTALLATION
for VALEO Made:
Click herePower Source / Network>8NR-FTS (BATTERY / CHARGING)>GENERATOR (for VALEO Made)>INSTALLATION
16620
7.INSTALL V-RIBBED BELT TENSIONER ASSEMBLY
Install the V-ribbed belt tensioner assembly to the timing chain cover assembly with the 2 bolts.
- Torque:
- 21 N*m (214 kgf*cm, 15 ft.*lbf)
16361A
8.INSTALL FAN AND GENERATOR V BELT
32101B
9.INSTALL DRIVE PLATE AND RING GEAR SUB-ASSEMBLY (for CVT)
13405
10.INSTALL FLYWHEEL SUB-ASSEMBLY (for Manual Transaxle)
31250
11.INSTALL CLUTCH DISC ASSEMBLY (for Manual Transaxle)
w/o Stop and Start System:
Click hereDrivetrain>CLUTCH>CLUTCH UNIT (for EC6A)>INSTALLATION
w/ Stop and Start System:
Click hereDrivetrain>CLUTCH>CLUTCH UNIT (for EC69)>INSTALLATION
12.INSTALL ENGINE ASSEMBLY (for CVT)
13.INSTALL ENGINE ASSEMBLY (for Manual Transaxle)
w/o Stop and Start System:
w/ Stop and Start System:
82121
14.INSTALL ENGINE WIRE
Connect all the connectors and clamps, and install the engine wire to the engine assembly with transaxle.
11363A
15.INSTALL FLYWHEEL HOUSING SIDE COVER
Install the flywheel housing side cover to the cylinder block sub-assembly.
28100
16.INSTALL STARTER ASSEMBLY
for Denso Made with Stop and Start System:
for Denso Made without Stop and Start System:
for Valeo Made Cold Area Specification Vehicles:
for Valeo Made except Cold Area Specification Vehicles:
17.INSTALL WATER HOSE (for CVT)
Install the water hose to the engine assembly with transaxle and slide the 5 clips to secure it.
Engage the 3 clamps to the engine assembly with transaxle.
18.INSTALL WATER HOSE (for Manual Transaxle)
Install the water hose to the engine assembly with transaxle and slide the 3 clips to secure it.
Engage the 3 clamps to the engine assembly with transaxle.
12305
19.INSTALL ENGINE MOUNTING INSULATOR SUB-ASSEMBLY RH (w/ Air Conditioning System)
- HINT:
-
Perform this procedure only when replacement of the engine mounting insulator sub-assembly RH is necessary.
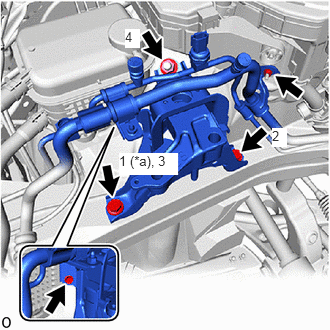
| *a | Temporarily Tighten |
Temporarily install the engine mounting insulator sub-assembly RH to the vehicle.
Install the 2 bolts and nut in the order shown in the illustration.
- Torque:
- 72 N*m (734 kgf*cm, 53 ft.*lbf)
for DENSO Made:
Connect the air conditioner tube and accessory to the engine mounting insulator sub-assembly RH with the bolt and nut.
- Torque:
- 9.8 N*m (100 kgf*cm, 87 in.*lbf)
for VALEO Made:
Connect the air conditioner tube and accessory to the engine mounting insulator sub-assembly RH with the bolt and nut.
- Torque:
- Bolt : 9.8 N*m (100 kgf*cm, 87 in.*lbf)
- Nut : 5.4 N*m (55 kgf*cm, 48 in.*lbf)
Install the No. 2 earth wire to the engine mounting insulator sub-assembly RH and vehicle with the 2 bolts.
- Torque:
- 10.5 N*m (107 kgf*cm, 8 ft.*lbf)
12305
20.INSTALL ENGINE MOUNTING INSULATOR SUB-ASSEMBLY RH (w/o Air Conditioning System)
- HINT:
-
Perform this procedure only when replacement of the engine mounting insulator sub-assembly RH is necessary.
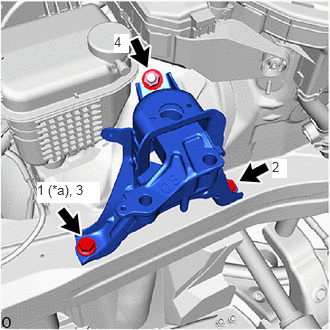
| *a | Temporarily Tighten |
Temporarily install the engine mounting insulator sub-assembly RH to the vehicle.
Install the 2 bolts and nut in the order shown in the illustration.
- Torque:
- 72 N*m (734 kgf*cm, 53 ft.*lbf)
Install the No. 2 earth wire to the engine mounting insulator sub-assembly RH and vehicle with the 2 bolts.
- Torque:
- 10.5 N*m (107 kgf*cm, 8 ft.*lbf)
12372A
21.INSTALL ENGINE MOUNTING INSULATOR LH
- HINT:
-
Perform this procedure only when replacement of the engine mounting insulator LH is necessary.
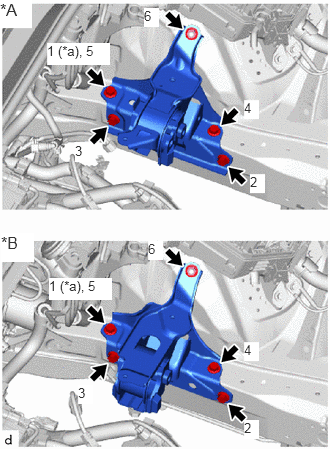
| *A | for CVT |
| *B | for Manual Transaxle |
| *a | Temporarily Tighten |
Temporarily install the engine mounting insulator LH to the vehicle.
Install the 4 bolts and nut in the order shown in the illustration.
- Torque:
- 42 N*m (428 kgf*cm, 31 ft.*lbf)
22.REMOVE ENGINE HANGERS
23.INSTALL WIRE HARNESS CLAMP BRACKET
Install the wire harness clamp bracket to the cylinder head sub-assembly with the bolt.
- Torque:
- 39 N*m (398 kgf*cm, 29 ft.*lbf)
Install the engine wire to the wire harness clamp bracket with the nut.
- Torque:
- 10 N*m (102 kgf*cm, 7 ft.*lbf)
Engage the 3 clamps.
24.INSTALL ENGINE ASSEMBLY WITH TRANSAXLE
Using height adjustment attachments and plate lift attachments to keep the engine assembly with transaxle and front suspension crossmember sub-assembly level, set an engine lifter underneath the engine assembly with transaxle and front suspension crossmember sub-assembly.
- NOTICE:
- ·
Using height adjustment attachments and plate lift attachments, keep the engine assembly with transaxle horizontal.
·Do not perform any procedures while the engine assembly is suspended because doing so may cause the engine assembly to drop, resulting in injury. However, the engine assembly needs to be suspended when it is installed to or removed from an engine stand.
·To prevent the oil pan sub-assembly from deforming, do not place any attachments under the oil pan sub-assembly of the engine assembly with transaxle.
Operate the engine lifter and install the engine assembly with transaxle to the vehicle.
- CAUTION:
-
Do not raise the engine assembly with transaxle more than necessary. If the engine is raised excessively, the vehicle may also be lifted up.
- NOTICE:
- ·
Make sure that the engine assembly with transaxle is clear of all wiring and hoses.
·While raising the engine assembly with transaxle into the vehicle, do not allow it to contact the vehicle.
Connect the front suspension crossmember sub-assembly to the vehicle with the 6 bolts.
- Torque:
- 141 N*m (1438 kgf*cm, 104 ft.*lbf)
Install the engine mounting insulator LH to the engine mounting bracket LH with the bolt and nut.
- Torque:
- 44 N*m (449 kgf*cm, 32 ft.*lbf)
- NOTICE:
-
While holding the nut in place, tighten the bolt.
Install the engine mounting insulator sub-assembly RH to the engine mounting bracket RH with the 2 bolts and nut.
- Torque:
- Bolt : 72 N*m (734 kgf*cm, 53 ft.*lbf)
- Nut : 41 N*m (418 kgf*cm, 30 ft.*lbf)
51108A
25.INSTALL REAR SIDE RAIL REINFORCEMENT SUB-ASSEMBLY LH
51107A
26.INSTALL REAR SIDE RAIL REINFORCEMENT SUB-ASSEMBLY RH
- HINT:
-
Use the same procedure as for the LH side.
32101G
27.INSTALL DRIVE PLATE AND TORQUE CONVERTER ASSEMBLY SETTING BOLT (for CVT)
11361J
28.INSTALL FLYWHEEL HOUSING UNDER COVER (for CVT)
31481A
29.CONNECT NO. 1 CLUTCH HOSE (for Manual Transaxle)
Connect the No. 1 clutch hose to the clutch flexible hose bracket with a new clip.
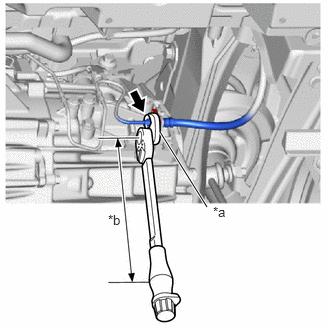
| *a | 10 mm Union Nut Wrench |
| *b | Torque Wrench Fulcrum Length |
Using a 10 mm union nut wrench, connect the bleeder clutch release tube to the No. 1 clutch hose.
- Torque:
- Specified tightening torque : 15.2 N*m (155 kgf*cm, 11 ft.*lbf)
- HINT:
- ·
Calculate the torque wrench reading when changing the fulcrum length of the torque wrench.
Click hereGeneral>INTRODUCTION>REPAIR INSTRUCTION>PRECAUTION
·When using a 10 mm union nut wrench (fulcrum length of 22 mm (0.866 in.)) + torque wrench (fulcrum length of 162 mm (6.38 in.)): 13.4 N*m (137 kgf*cm, 10 ft.*lbf)
30.INSTALL FRONT DRIVE SHAFT ASSEMBLY
for TMC Made:
Click hereDrivetrain>DRIVE SHAFT / PROPELLER SHAFT>FRONT DRIVE SHAFT ASSEMBLY (for TMC Made)>INSTALLATION
for TMMT Made:
Click hereDrivetrain>DRIVE SHAFT / PROPELLER SHAFT>FRONT DRIVE SHAFT ASSEMBLY (for TMMT Made)>INSTALLATION
37100
31.INSTALL PROPELLER WITH CENTER BEARING SHAFT ASSEMBLY (for AWD)
17410
32.INSTALL FRONT EXHAUST PIPE ASSEMBLY (TWC: Rear Catalyst) (for 2WD)
17410
33.INSTALL FRONT EXHAUST PIPE ASSEMBLY (for AWD)
17420K
34.INSTALL NO. 2 CENTER EXHAUST PIPE ASSEMBLY (TWC: Rear Catalyst) (for AWD)
57533B
35.INSTALL FRONT FLOOR CENTER BRACE (for 2WD)
57533B
36.INSTALL FRONT FLOOR CENTER BRACE (for AWD)
58166
37.INSTALL FRONT FLOOR COVER LH (w/ Cover)
58165B
38.INSTALL FRONT FLOOR COVER RH (w/ Cover)
- HINT:
-
Use the same procedure as for the LH side.
45025D
39.CONNECT NO. 1 STEERING COLUMN HOLE COVER SUB-ASSEMBLY
45260
40.CONNECT NO. 2 STEERING INTERMEDIATE SHAFT ASSEMBLY
45259A
41.INSTALL COLUMN HOLE COVER SILENCER SHEET
88704
42.CONNECT SUCTION HOSE SUB-ASSEMBLY (w/ Air Conditioning System)
88703
43.CONNECT DISCHARGE HOSE SUB-ASSEMBLY (w/ Air Conditioning System)
23901
44.CONNECT FUEL TUBE SUB-ASSEMBLY
87245
45.CONNECT INLET HEATER WATER HOSE
87246
46.CONNECT OUTLET HEATER WATER HOSE
23829A
47.CONNECT FUEL VAPOR FEED HOSE
Connect the fuel vapor feed hose to the fuel vapor feed pipe and slide the clip to secure it.
44750
48.CONNECT UNION TO CONNECTOR TUBE HOSE
33820B
49.CONNECT TRANSMISSION CONTROL CABLE ASSEMBLY (for CVT)
33820B
50.CONNECT TRANSMISSION CONTROL CABLE ASSEMBLY (for Manual Transaxle)
w/o Stop and Start System:
w/ Stop and Start System:
16554C
51.CONNECT NO. 4 INTERCOOLER COOLING WATER HOSE
16551C
52.CONNECT NO. 1 INTERCOOLER COOLING WATER HOSE
16572D
53.CONNECT NO. 2 RADIATOR HOSE
Connect the No. 2 radiator hose to the water inlet with thermostat sub-assembly and slide the clip to secure it.
16571C
54.CONNECT NO. 1 RADIATOR HOSE
Connect the No. 1 radiator hose to the water outlet and slide the clip to secure it.
74404A
55.INSTALL BATTERY CLAMP SUB-ASSEMBLY
Install the battery clamp sub-assembly to the vehicle with the 3 bolts.
- Torque:
- 15.4 N*m (157 kgf*cm, 11 ft.*lbf)
Engage the clamp to connect the engine wire to the battery clamp sub-assembly.
56.CONNECT WIRE HARNESS
Connect the engine wire to the transaxle assembly with the bolt.
- Torque:
- 8.5 N*m (87 kgf*cm, 75 in.*lbf)
Connect the engine wire to the positive (+) battery terminal with the 3 nuts.
- Torque:
- 7.6 N*m (77 kgf*cm, 67 in.*lbf)
Connect the engine wire to the battery clamp sub-assembly with the bolt and nut.
- Torque:
- 7.0 N*m (71 kgf*cm, 62 in.*lbf)
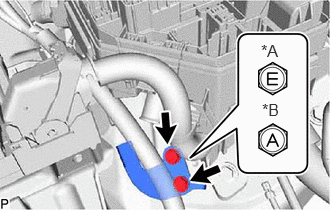
| *A | for Type A |
| *B | for Type B |
Connect the engine wire to the vehicle with the 2 bolts.
- Torque:
- for Type A : 8.5 N*m (87 kgf*cm, 75 in.*lbf)
- for Type B : 10.5 N*m (107 kgf*cm, 8 ft.*lbf)
89661
57.INSTALL ECM
17701
58.INSTALL AIR CLEANER CASE SUB-ASSEMBLY
Install the air cleaner case sub-assembly to the vehicle with the 2 bolts.
- Torque:
- 4.0 N*m (41 kgf*cm, 35 in.*lbf)
Install the air cleaner filter element sub-assembly to the air cleaner case sub-assembly.
17705
59.INSTALL AIR CLEANER CAP WITH AIR CLEANER HOSE
Connect the air cleaner cap with air cleaner hose and tighten the hose clamp.
- Torque:
- 2.0 N*m (20 kgf*cm, 18 in.*lbf)
Engage the 2 guides to install the air cleaner cap sub-assembly to the air cleaner case sub-assembly.
Engage the 2 air cleaner cap sub-assembly clamps to install the air cleaner cap sub-assembly.
Engage the clamp to the air cleaner cap sub-assembly.
Connect the mass air flow meter connector.
17751
60.INSTALL NO. 1 AIR CLEANER INLET
53141F
61.INSTALL RADIATOR COVER
55701J
62.INSTALL OUTER COWL TOP PANEL SUB-ASSEMBLY (for LHD)
55701J
63.INSTALL OUTER COWL TOP PANEL SUB-ASSEMBLY (for RHD)
55735C
64.INSTALL COWL BODY MOUNTING REINFORCEMENT RH
55736D
65.INSTALL COWL BODY MOUNTING REINFORCEMENT LH
55735A
66.INSTALL WATER GUARD PLATE LH
55737B
67.INSTALL NO. 1 HEATER AIR DUCT SPLASH SHIELD SEAL
68.INSTALL WINDSHIELD WIPER MOTOR AND LINK
28800
69.INSTALL BATTERY
70.CONNECT CABLE TO NEGATIVE BATTERY TERMINAL
Click hereGeneral>MAINTENANCE>8NR-FTS BATTERY>INSTALLATION
- NOTICE:
-
When disconnecting the cable, some systems need to be initialized after the cable is reconnected.
-
Click hereGeneral>INTRODUCTION>REPAIR INSTRUCTION>INITIALIZATION
71.BLEED CLUTCH LINE (for Manual Transaxle)
w/o Stop and Start System:
Click hereDrivetrain>CLUTCH>CLUTCH SYSTEM (for EC6A)>BLEEDING
w/ Stop and Start System:
Click hereDrivetrain>CLUTCH>CLUTCH SYSTEM (for EC69)>BLEEDING
72.ADD ENGINE OIL
73.ADD ENGINE COOLANT
74.ADD COOLANT (for Intercooler)
75.ADD MANUAL TRANSAXLE OIL (for Manual Transaxle)
w/o Stop and Start System:
Click hereGeneral>MAINTENANCE>EC6A MANUAL TRANSAXLE OIL>REPLACEMENT
w/ Stop and Start System:
Click hereGeneral>MAINTENANCE>EC69 MANUAL TRANSAXLE OIL>REPLACEMENT
76.ADD CONTINUOUSLY VARIABLE TRANSAXLE FLUID (for CVT)
77.ADD TRANSFER OIL (for AWD)
78.CHARGE AIR CONDITIONING SYSTEM WITH REFRIGERANT (w/ Air Conditioning System)
for HFC-134a (R134a):
Click hereVehicle Interior>HEATING / AIR CONDITIONING>REFRIGERANT(for HFC-134a(R134a))>REPLACEMENT
for HFO-1234yf (R1234yf):
Click hereVehicle Interior>HEATING / AIR CONDITIONING>REFRIGERANT(for HFO-1234yf(R1234yf))>REPLACEMENT
79. WARM UP ENGINE (w/ Air Conditioning System)
Keep the A/C switch on for at least 2 minutes to warm up the compressor.
- NOTICE:
-
To prevent damage to the compressor, be sure to warm up the compressor when turning the air conditioning on after removing and installing any air conditioning system lines (including the compressor).
80.INSPECT TRANSAXLE OIL (for Manual Transaxle)
w/o Stop and Start System:
Click hereDrivetrain>EC6A (MANUAL TRANSMISSION / TRANSAXLE)>MANUAL TRANSAXLE OIL>ON-VEHICLE INSPECTION
w/ Stop and Start System:
Click hereDrivetrain>EC69 (MANUAL TRANSMISSION / TRANSAXLE)>MANUAL TRANSAXLE OIL>ON-VEHICLE INSPECTION
81.ADJUST SHIFT LEVER POSITION (for Manual Transaxle)
w/o Stop and Start System:
Click hereDrivetrain>EC6A (MANUAL TRANSMISSION / TRANSAXLE)>TRANSMISSION CONTROL CABLE>ADJUSTMENT
w/ Stop and Start System:
Click hereDrivetrain>EC69 (MANUAL TRANSMISSION / TRANSAXLE)>TRANSMISSION CONTROL CABLE>ADJUSTMENT
82.INSPECT SHIFT LEVER POSITION (for CVT)
for 2WD:
Click hereDrivetrain>K313 (MULTIDRIVE / CVT)>SHIFT LEVER>ON-VEHICLE INSPECTION
for AWD:
Click hereDrivetrain>K313F (MULTIDRIVE / CVT)>SHIFT LEVER>ON-VEHICLE INSPECTION
83.ADJUST SHIFT LEVER POSITION (for CVT)
for 2WD:
Click hereDrivetrain>K313 (MULTIDRIVE / CVT)>TRANSMISSION CONTROL CABLE>ADJUSTMENT
for AWD:
Click hereDrivetrain>K313F (MULTIDRIVE / CVT)>TRANSMISSION CONTROL CABLE>ADJUSTMENT
84.INSPECT FOR ENGINE OIL LEAK
85.INSPECT FOR COOLANT LEAK
86.INSPECT FOR COOLANT LEAK (for Intercooler)
87.INSPECT FOR CONTINUOUSLY VARIABLE TRANSAXLE FLUID LEAK (for CVT)
88.INSPECT MANUAL TRANSAXLE OIL LEAK (for Manual Transaxle)
89.INSPECT FOR REFRIGERANT LEAK (w/ Air Conditioning System)
for HFC-134a (R134a):
Click hereVehicle Interior>HEATING / AIR CONDITIONING>REFRIGERANT(for HFC-134a(R134a))>REPLACEMENT
for HFO-1234yf (R1234yf):
Click hereVehicle Interior>HEATING / AIR CONDITIONING>REFRIGERANT(for HFO-1234yf(R1234yf))>REPLACEMENT
90.INSPECT FOR FUEL LEAK
91.INSPECT FOR EXHAUST GAS LEAK
92.CHECK ENGINE OIL LEVEL
93.INSPECT ENGINE COOLANT LEVEL IN RESERVOIR
51444A
94.INSTALL REAR ENGINE UNDER COVER LH
Install the rear engine under cover LH to the vehicle with the 6 clips.
51443C
95.INSTALL REAR ENGINE UNDER COVER RH
Install the rear engine under cover RH to the vehicle with the 6 clips.
51441
96.INSTALL NO. 1 ENGINE UNDER COVER
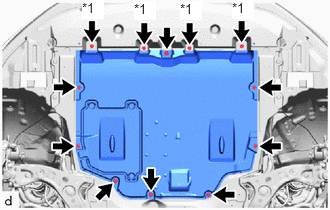
| *1 | Bolt |
Install the No. 1 engine under cover to the vehicle with the 4 bolts, 4 screws and 4 clips.
- Torque:
- Bolt : 7.5 N*m (76 kgf*cm, 66 in.*lbf)
97.INSTALL FRONT WHEELS
98. ALIGN FRONT WHEELS FACING STRAIGHT AHEAD
99.INSPECT AND ADJUST FRONT WHEEL ALIGNMENT
100.PERFORM INITIALIZATION
101.INSPECT IGNITION TIMING
102.INSPECT ENGINE IDLE SPEED
103.INSPECT CO/HC
104.CHECK SPEED SENSOR SIGNAL