HEATING / AIR CONDITIONING AIR CONDITIONING SYSTEM(for Manual Air Conditioning System) B1441 Air Mix Damper Control Servo Motor Circuit (Passenger Side)
DESCRIPTION
According to signals from the air conditioning amplifier assembly that are based on user operation or air conditioning system control, the No. 1 air conditioning radiator damper servo sub-assembly (upper air mix) actuates the servo motor.
The cold air that has passed through the evaporator and the warm air that has passed through the heater core are regulated to provide output air at the selected temperature.
| DTC No. | Detection Item | DTC Detection Condition | Trouble Area | Memory |
|---|---|---|---|---|
| B1441 | Air Mix Damper Control Servo Motor Circuit (Passenger Side) | Any of the following conditions is met:
·
No. 1 air conditioning radiator damper servo sub assembly (upper air mix) drive terminal is open circuit ·
No. 1 air conditioning radiator damper servo sub assembly (upper air mix) drive terminal is short circuit |
·
No. 1 air conditioning radiator damper servo sub-assembly (upper air mix) ·
Air conditioning harness assembly (heater radiator unit sub-assembly) ·
Air conditioning amplifier assembly |
Memorized
(30 seconds or more)* |
*: The air conditioning amplifier assembly stores this DTC if the malfunction has occurred for the period of time indicated in the brackets.
| Vehicle Condition | |||
|---|---|---|---|
| Pattern 1 | Pattern 2 | ||
| Diagnosis Condition | Ignition switch ON | ○ | ○ |
| Malfunction Status | No. 1 air conditioning radiator damper servo sub-assembly (upper air mix) drive terminal is open circuit | ○ | - |
| No. 1 air conditioning radiator damper servo sub-assembly (upper air mix) drive terminal is short circuit | - | ○ | |
| Detection Time | 30 seconds or more | 30 seconds or more | |
| Number of Trips | 1 trip | 1 trip | |
- HINT:
-
DTC will be output when conditions for either of the patterns in the table above are met.
WIRING DIAGRAM
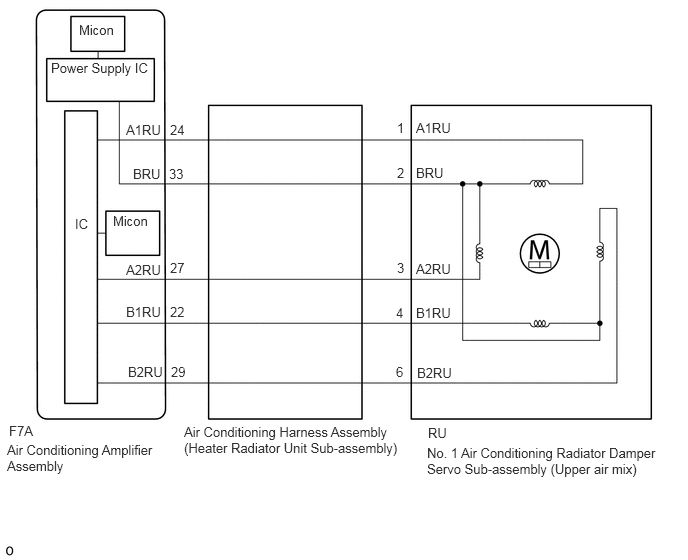
CAUTION / NOTICE / HINT
- HINT:
-
When installing the damper servo motor, make sure to install it correctly.
-
Click hereVehicle Interior>HEATING / AIR CONDITIONING>AIR CONDITIONING UNIT (for VALEO Made)>REASSEMBLY
PROCEDURE
Connect the GTS to the DLC3.
Turn the ignition switch ON.
Turn the GTS on.
Enter the following menus: Body Electrical / Air Conditioner / Active Test.
Perform the Active Test according to the display on the GTS.
- Body Electrical > Air Conditioner > Active Test
-
Tester Display Measurement Item Control Range Diagnostic Note Upper Air Mix (Driver Side) No. 1 air conditioning radiator damper servo sub-assembly (Upper air mix) Min.: 0
Max.: 100Operates between
0 to 100%
- Body Electrical > Air Conditioner > Active Test
-
Tester Display Upper Air Mix (Driver Side) - 50004 121 204
- OK:
No. 1 air conditioning radiator damper servo sub-assembly (upper air mix) operates normally.
- Result:
Result Proceed to NG (When troubleshooting according to Problem Symptoms Table) A NG (When troubleshooting according to the DTC) B OK (When troubleshooting according to Problem Symptoms Table) C OK (When troubleshooting according to the DTC) D
A
B
C
D
Check for a wire harness caught between the links of the motors and dampers.
- OK:
No wire harnesses are caught between the links of the motors and dampers.
- Result:
Proceed to OK NG
OK
NG
Remove the No. 1 air conditioning radiator damper servo sub-assembly (front passenger side upper air mix).
Click hereVehicle Interior>HEATING / AIR CONDITIONING>AIR CONDITIONING UNIT (for VALEO Made)>DISASSEMBLY
Operate the dampers by hand.
- OK:
The dampers are easily operated by hand.
- Result:
Proceed to OK NG
OK
NG
Click hereVehicle Interior>HEATING / AIR CONDITIONING>AIR CONDITIONING UNIT (for VALEO Made)>DISASSEMBLY
Remove the air conditioning harness assembly (heater radiator unit sub-assembly).
Click hereVehicle Interior>HEATING / AIR CONDITIONING>AIR CONDITIONING UNIT (for VALEO Made)>DISASSEMBLY
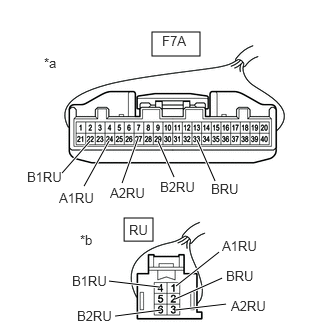
| *a | Front view of wire harness connector
(to Air Conditioning Amplifier Assembly) |
| *b | Front view of wire harness connector
(to No. 1 Air Conditioning Radiator Damper Servo Sub-assembly (Upper Air Mix)) |
Measure the resistance according to the value(s) in the table below.
- Standard Resistance:
Tester Connection Condition Specified Condition F7A-24 (A1RU) -LU-1 (A1RU) Always Below 1 Ω F7A-33 (BRU) -LU-2 (BRU) Always Below 1 Ω F7A-27 (A2RU) -LU-3 (A2RU) Always Below 1 Ω F7A-22 (B1RU) -LU-4 (B1RU) Always Below 1 Ω F7A-29 (B2RU) -LU-6 (B2RU) Always Below 1 Ω F7A-24 (A1RU) or LU-1 (A1RU) - Body ground Always 10 kΩ or higher F7A-33 (BRU) or LU-2 (BRU) - Body ground Always 10 kΩ or higher F7A-27 (A2RU) or LU-3 (A2RU) - Body ground Always 10 kΩ or higher F7A-22 (B1RU) or LU-4 (B1RU) - Body ground Always 10 kΩ or higher F7A-29 (B2RU) or LU-6 (B2RU) - Body ground Always 10 kΩ or higher
- Result:
Proceed to OK NG
OK
NG
Click hereVehicle Interior>HEATING / AIR CONDITIONING>AIR CONDITIONING UNIT (for VALEO Made)>DISASSEMBLY
Replace the No. 1 air conditioning radiator damper servo sub-assembly (upper air mix) with a new one or the No. 1 air conditioning radiator damper servo sub-assembly (lower air mix) if it is functioning properly.
Click hereVehicle Interior>HEATING / AIR CONDITIONING>AIR CONDITIONING UNIT (for VALEO Made)>DISASSEMBLY
- Result:
Proceed to NEXT
NEXT
Connect the GTS to the DLC3.
Turn the ignition switch ON.
Turn the GTS on.
Enter the following menus: Body Electrical / Air Conditioner / Active Test.
Perform the Active Test according to the display on the GTS.
- Body Electrical > Air Conditioner > Active Test
-
Tester Display Measurement Item Control Range Diagnostic Note Upper Air Mix (Driver Side) No. 1 air conditioning radiator damper servo sub-assembly (upper air mix) Min.: 0
Max.: 100Operates between
0 to 100%
- Body Electrical > Air Conditioner > Active Test
-
Tester Display Upper Air Mix (Driver Side) - 50004 121 204
- OK:
No. 1 air conditioning radiator damper servo sub-assembly (upper air mix) operates normally.
- Result:
Proceed to OK NG
OK
Click hereVehicle Interior>HEATING / AIR CONDITIONING>AIR CONDITIONING UNIT (for VALEO Made)>DISASSEMBLY
NG
Clear the DTCs.
- Body Electrical > Air Conditioner > Clear DTCs
- 50002 121
Check for DTCs.
- Body Electrical > Air Conditioner > Trouble Codes
- 50001 121
- Result:
Result Proceed to DTCs are not output A DTCs are output B
A
Click hereGeneral>INTRODUCTION>HOW TO TROUBLESHOOT ECU CONTROLLED SYSTEMS>HOW TO PROCEED WITH TROUBLESHOOTING
B