GF1A TRANSFER / 4WD / AWD TRANSFER CASE FRONT OIL SEAL(for LH Side) REPLACEMENT
CAUTION / NOTICE / HINT
The necessary procedures (adjustment, calibration, initialization, or registration) that must be performed after parts are removed and installed, or replaced during the transfer case oil seal removal/installation are shown below.
| Replacement Part or Procedure | Necessary Procedure | Effect/Inoperative when not Performed | Link |
|---|---|---|---|
| Disconnect cable from negative battery terminal | Perform steering sensor zero point calibration | ·
Lane departure alert system (w/ Steering Control) ·
Toyota parking assist-sensor system*1 ·
Parking support brake system*1 ·
Simple intelligent parking assist system*1 ·
Pre-collision system |
( ) |
| Memorize steering angle neutral point | Panoramic view monitor system | ()
|
|
| Initialize back door lock | Power door lock control system | ()
|
|
| Replacement of CVT fluid | ATF thermal degradation estimate reset | The value of the Data List item "ATF Thermal Degradation Estimate" is not estimated correctly | ()
|
| Front wheel alignment adjustment | 1.
Clear zero point calibration data. 2.
Perform yaw rate and acceleration sensor zero point calibration. |
·
DTCs are stored ·
ABS warning light illuminates ·
Slip indicator light illuminates ·
VSC disabled or malfunctions |
()
|
*1: When performing learning using the GTS.
Click hereAudio / Visual / Telematics>PARK ASSIST / MONITORING>PARKING SUPPORT BRAKE SYSTEM>CALIBRATION
PROCEDURE

 36100
1.REMOVE TRANSFER ASSEMBLY
36100A
2.REMOVE TRANSFER AND TRANSAXLE SETTING STUD BOLT
36100
3.SECURE TRANSFER ASSEMBLY
36111B
4.REMOVE TRANSFER CASE OIL SEAL
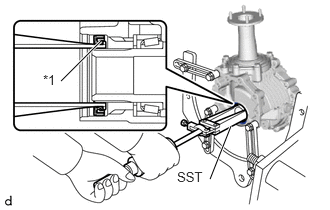
| *1 | Transfer Case Oil Seal |
Using SST, remove the transfer case oil seal from the transfer case.
- SST
- 09308-00010
- NOTICE:
- ·
Do not scratch the press-fitting surface of the transfer case oil seal.
·Wear or damage to the front drive shaft oil seal RH on the transmission side will cause transfer oil leakage.
If it is worn or damaged, replace the front drive shaft oil seal RH.
Click hereDrivetrain>K313F (MULTIDRIVE / CVT)>FRONT DIFFERENTIAL OIL SEAL (for RH Side)>REPLACEMENT
36111B
5.INSTALL TRANSFER CASE OIL SEAL
Coat the lip of a new transfer case oil seal with MP grease.
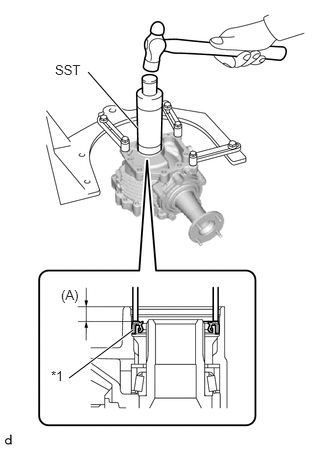
| *1 | Transfer Case Oil Seal |
Using SST and a hammer, tap in a new transfer case oil seal as shown in the illustration.
- SST
- 09316-60011 (09316-00011)
- Drive in depth (A):
9.5 to 10.5 mm (0.375 to 0.413 in.)
- NOTICE:
- ·
Tap the transfer case oil seal uniformly so that the transfer case oil seal is straight.
·Do not tap the transfer case oil seal in too far.
36100
6.REMOVE TRANSFER ASSEMBLY
36100A
7.INSTALL TRANSFER AND TRANSAXLE SETTING STUD BOLT
36100
8.INSTALL TRANSFER ASSEMBLY