3ZR-FAE FUEL FUEL PUMP INSTALLATION
PROCEDURE

 77020A
1.INSTALL FUEL SUCTION TUBE WITH PUMP AND GAUGE ASSEMBLY
Install a new fuel suction tube set gasket to the fuel tank assembly.
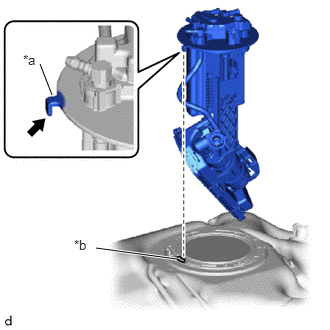
| *a | Protrusion |
| *b | Notch |
Set the fuel suction tube with pump and gauge assembly to the fuel tank assembly.
- NOTICE:
- ·
Be careful not to bend the arm of the fuel sender gauge assembly.
·Make sure the horizontal angle of the No. 1 plate sub-assembly is less than 90°.
·To avoid applying excessive force to the tip of the fuel sender gauge assembly, tilt the fuel sub-tank sub-assembly diagonally and insert it into the fuel tank assembly as shown in the illustration.
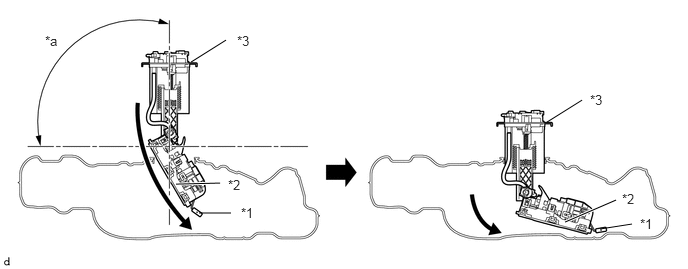 1.99,0.646 2.354,0.417 false 5.698,1.271 6.063,1.042 false 2.073,2.219 2.406,2.219 false 6.25,2.385 6.583,2.333 false 1.833,1.917 2.292,1.906 true 5.885,2.313 6.417,2.083 true 0.469,0.344 0.781,0.542 0.313,0.198 10 false *a 2.469,0.344 2.781,0.542 0.313,0.198 10 false *3 6.146,0.958 6.458,1.156 0.313,0.198 10 false *3 2.51,2.135 2.823,2.333 0.313,0.198 10 false *1 6.667,2.25 6.979,2.448 0.313,0.198 10 false *1 2.375,1.844 2.688,2.042 0.313,0.198 10 false *2 6.479,1.99 6.792,2.188 0.313,0.198 10 false *2
*1 Fuel Sender Gauge Assembly *2 Fuel Sub-Tank Sub-assembly *3 No. 1 Plate Sub-assembly - - *a 90° - -
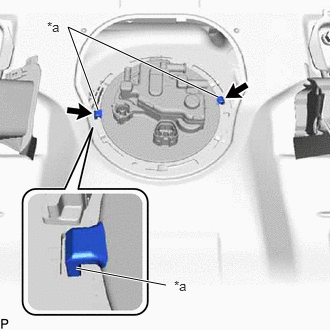
| *a | Protrusion |

|
Notch |
Align the protrusions of the fuel suction tube with pump and gauge assembly with the notches in the fuel tank assembly.
77144
2.INSTALL FUEL PUMP GAUGE RETAINER
Install the fuel pump gauge retainer.
While pressing down on the fuel suction tube with pump and gauge assembly, temporarily install the fuel pump gauge retainer.
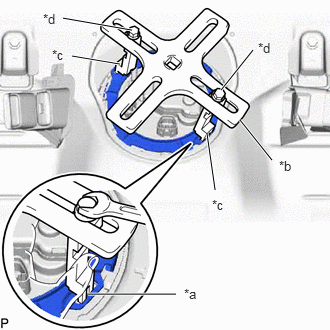
| *a | Insertion Point |
| *b | SST (Plate) |
| *c | SST (Claw) |
| *d | SST (Bolt) |
Temporarily install SST (plate) and SST (claw) to the fuel pump gauge retainer.
- SST
- 09808-01071
09808-14031 (09808-01030, 09808-01090)
- HINT:
-
Securely insert the ends of SST (claw) into the insertion points in the fuel pump gauge retainer.
While firmly pressing SST (claw) into the insertion points in the fuel pump gauge retainer, tighten SST (bolt).
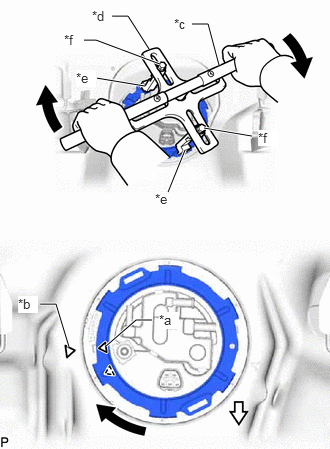
| *a | Triangle Mark (Fuel Pump Gauge Retainer) |
| *b | Triangle Mark (Fuel Tank Assembly) |
| *c | SST (Handle) |
| *d | SST (Plate) |
| *e | SST (Claw) |
| *f | SST (Bolt) |

|
Front Side of Vehicle |
Install SST (handle) to SST (plate).
- SST
- 09808-01071
09808-14031 (09808-01010, 09808-01030, 09808-01090)
Using SST, rotate the fuel pump gauge retainer so that the triangle mark on the fuel pump gauge retainer are aligned with the triangle mark on the fuel tank assembly to install the fuel suction tube with pump and gauge assembly to the fuel tank assembly.
- NOTICE:
- ·
Do not use any tools other than specified as this may result in damage to the fuel pump gauge retainer or fuel tank assembly.
·Do not press down on SST excessively as this may make the fuel pump gauge retainer hard to rotate, and may damage components.
·Make sure to rotate SST (handle) horizontally. If it is rotated at an angle, SST may come off.
·Do not spin SST too fast or use an impact wrench as this may result in damage to components.
·If SST comes off of the fuel pump gauge retainer, loosen SST (bolt) and reinstall SST.
·Make sure that the fuel suction tube set gasket does not come off.
77209F
3.CONNECT FUEL TANK MAIN TUBE SUB-ASSEMBLY
Push the fuel tube joint onto the plug of the No. 1 plate sub-assembly, then install the tube joint clip.
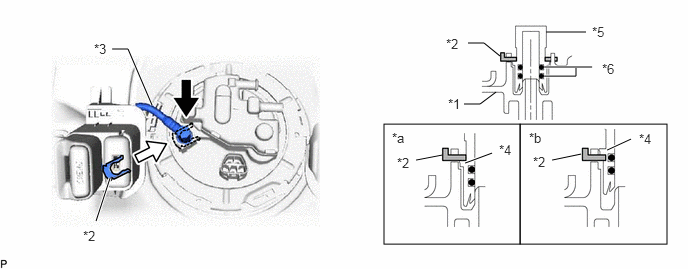
| *1 | No. 1 Plate Sub-assembly | *2 | Tube Joint Clip |
| *3 | Fuel Tank Main Tube Sub-assembly | *4 | Collar |
| *5 | Fuel Tube Joint | *6 | O-ring |
| *a | Correct | *b | Incorrect |
|
|
Insert |
|
Insert |
- NOTICE:
- ·
Check that there are no scratches or foreign matter around the connecting parts of the fuel tube joint and plug before performing this work.
·Check that the fuel tube joint is securely inserted to the end.
·Check that the tube joint clip is on the collar of the fuel tube joint as shown in the illustration.
·After installing the tube joint clip, check that the fuel tank main tube sub-assembly is securely connected by pulling on it.
Engage the 2 claws to install the No. 1 fuel tube clamp.
77754B
4.CONNECT CHARCOAL CANISTER OUTLET HOSE
Connect the charcoal canister outlet hose to the fuel suction tube with pump and gauge assembly.
77026A
5.CONNECT NO. 1 FUEL EVAPORATION TUBE SUB-ASSEMBLY
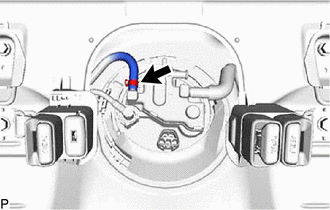
Connect the No. 1 fuel evaporation tube sub-assembly to the fuel suction tube with pump and gauge assembly and slide the clip to secure it.
58325E
6.INSTALL REAR FLOOR SERVICE HOLE COVER
Remove any remaining butyl tape from the rear floor service hole cover and vehicle body.
Clean the installation surfaces of the rear floor service hole cover and vehicle body.
Connect the fuel suction tube with pump and gauge assembly connector.
Install the rear floor service hole cover with new butyl tape.
71305A
7.INSTALL CENTER REAR SEATBACK HINGE SUB-ASSEMBLY
Install the center rear seatback hinge sub-assembly to the vehicle body with the 2 bolts.
- Torque:
- 36.8 N*m (375 kgf*cm, 27 ft.*lbf)
8.CONNECT CABLE TO NEGATIVE BATTERY TERMINAL
9. INITIALIZATION AFTER RECONNECTING BATTERY TERMINAL
- HINT:
-
When disconnecting and reconnecting the battery, there is an automatic leaning function that completes learning when the respective system is used.
-
Click hereGeneral>SETUP>WHEN DISCONNECTING OR RECONNECTING BATTERY TERMINAL>AUTOMATIC LEARNING CHART
10.INSPECT FOR FUEL LEAK
11.INSTALL REAR SEAT ASSEMBLY
12.PERFORM INITIALIZATION
Perform "Inspection After Repair" after replacing the fuel pump.
Click hereEngine / Hybrid System>3ZR-FAE (ENGINE CONTROL)>SFI SYSTEM>INITIALIZATION