C0200/31 Right Front Wheel Speed Sensor Signal Malfunction
Diagnostic trouble codes · Vehicles built Jun 2006 – Sep 2006
Also covers:
- C0205/32 Left Front Wheel Speed Sensor Signal Malfunction
- C1271/71 Low Output Signal of Front Speed Sensor RH (Test Mode DTC)
- C1272/72 Low Output Signal of Front Speed Sensor LH (Test Mode DTC)
- C1275/75 Abnormal Change in Output Signal of Front Speed Sensor RH (Test Mode DTC)
- C1276/76 Abnormal Change in Output Signal of Front Speed Sensor LH (Test Mode DTC)
- C1330/35 Right Front Speed Sensor Circuit
- C1331/36 Left Front Speed Sensor Circuit
Versions by build date: Jun 2006 – Sep 2006 Oct 2006 – May 2009 from Jun 2009
DESCRIPTION
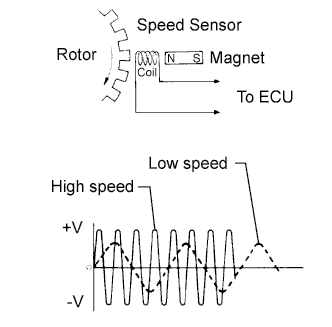
The speed sensors detect wheel speed and transmit the signals to the skid control ECU. These signals are used for control of the ABS control system. Each of the front and rear rotors has 48 serrations.When the rotors rotate, the magnetic field generated by the permanent magnet in the speed sensor induces AC voltage. Since the frequency of this AC voltage changes in direct proportion to the speed of the rotor, the frequency is used by the ECU to detect the speed of each wheel.
DTCs C1271/71 to C1276/76 can be deleted when the speed sensor sends a wheel speed signal or the test mode ends. DTCs C1271/71 to C1276/76 are output only in the test mode.

| DTC No. |
DTC Detecting Condition |
Trouble Area |
| C0200/31 C0205/32 |
When either of the following is detected:
|
|
| C1330/35 C1331/36 |
Abnormality in the resistance value of each speed sensor is detected. |
|
| C1271/71 C1272/72 |
Detected only during test mode. |
|
| C1275/75 C1276/76 |
Detected only during test mode. |
|
- HINT:
- DTC No. C0200/31 and C1330/35 are for the front speed sensor RH.
- DTC No. C0205/32 and C1331/36 are for the front speed sensor LH.
WIRING DIAGRAM
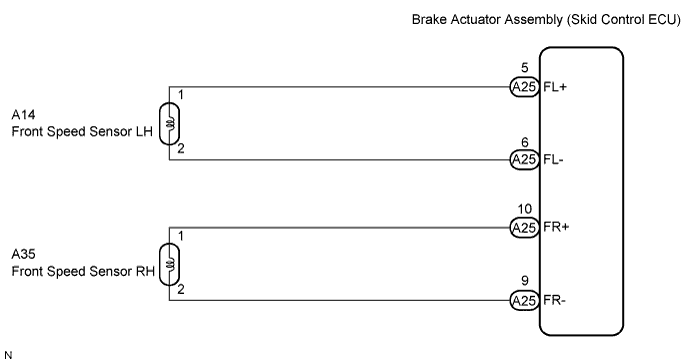
INSPECTION PROCEDURE
- HINT:
- Check the condition of each related circuit connector before troubleshooting (Click here).
| 1. READ VALUE USING INTELLIGENT TESTER (FRONT SPEED SENSOR) |

Connect the intelligent tester to the DLC3.
Start the engine.
Select "Data List" and read the value displayed on the intelligent tester (Click here).
Data List: ABS Tester Display
Measurement Item/Range
Normal Condition
Diagnostic Note
FR Wheel Speed
Wheel speed sensor (FR) reading / min.: 0 km/h (0 mph), max.: 326 km/h (202 mph)
Actual wheel speed
Speed indicated on speedometer
FL Wheel Speed
Wheel speed sensor (FL) reading / min.: 0 km/h (0 mph), max.: 326 km/h (202 mph)
Actual wheel speed
Speed indicated on speedometer
Check that there is no difference between the speed value output from the speed sensor displayed on the intelligent tester and the speed value displayed on the speedometer when driving the vehicle.
- OK:
- The speed value output from the speed sensor displayed on the intelligent tester is the same as the actual vehicle speed.
|
|
||||

| OK | |
 |
| 2. PERFORM TEST MODE INSPECTION (SIGNAL CHECK) |
Check if test mode (signal check) DTCs are detected (Click here).
- Result:
Condition
Proceed to
Test mode (signal check) DTC is not output
A
Test mode (signal check) DTC is output
B
|
|
||||
| A | |
|
| 3. INSPECT SPEED SENSOR SIGNAL WAVEFORM |
Lift up the vehicle.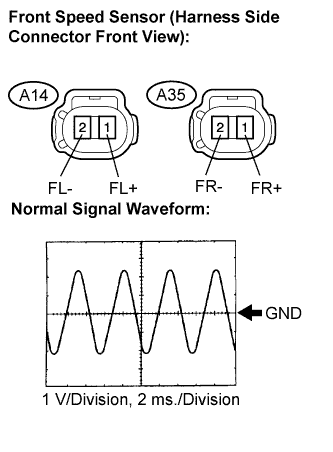
Perform the inspection using an oscilloscope.
Disconnect the front speed sensor connector.
Connect the oscilloscope to terminals 1 and 2 of the front speed sensor.
Check that a waveform is output when the tires are rotated.
- OK:
- The same waveform is output from front wheels and there is no noise or interference in the waveform.
- HINT:
- As vehicle speed (wheel rotation speed) increases, the width of the waveform narrows and the output voltage becomes greater.
- When noise is identified in the waveform on the oscilloscope, the erratic signals are generated due to rotor scratches, looseness or foreign matter attached to the speed sensor.
- As vehicle speed (wheel rotation speed) increases, the width of the waveform narrows and the output voltage becomes greater.
Connect the connector.
|
|
||||
| OK | |
|
| 4. RECONFIRM DTC |
Clear the DTCs (Click here).
Drive the vehicle at a speed of approximately 40 km/h (25 mph) or more for 60 seconds or more.
Check if the same DTCs are recorded (Click here).
- HINT:
- Reinstall the sensors, connectors, etc. and restore the vehicle to its prior condition before rechecking for DTCs.
- Result:
Condition
Proceed to
DTCs (C0200/31, C0205/32, C1330/35 and C1331/36) are output
A
DTCs (C0200/31, C0205/32, C1330/35 and C1331/36) are not output (When troubleshooting in accordance with the PROBLEM SYMPTOMS TABLE)
B
DTCs (C0200/31, C0205/32, C1330/35 and C1331/36) are not output (When troubleshooting in accordance with the DTC CHART)
C
|
|
||||
|
|
||||

| A | |
|
| 5. INSPECT FRONT SPEED SENSOR INSTALLATION |
Check the front speed sensor installation.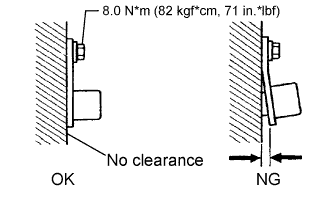
- OK:
- The installation bolt is tightened properly.
There is no clearance between the sensor and front steering knuckle.
- Torque:
- 8.0 N*m{ 82 kgf*cm , 71 in.*lbf }
- NOTICE:
- Check the speed sensor signal after replacement (Click here).
|
|
||||
| OK | |
|
| 6. INSPECT FRONT SPEED SENSOR |
Make sure that there is no looseness at the locking part and the connecting part of the connectors.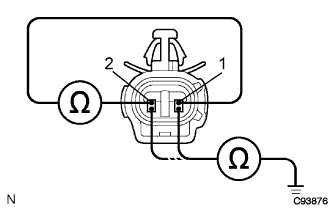
Disconnect the front speed sensor connectors.
Measure the resistance according to the value(s) in the table below.
- Standard resistance:
- LH:
Tester Connection
Specified Condition
A14-1 (FL+) - A14-2 (FL-)
1.4 to 1.8 kΩ at 20°C (68°F)
A14-1 (FL+) - Body ground
10 kΩ or higher
A14-2 (FL-) - Body ground
10 kΩ or higher
- RH:
Tester Connection
Specified Condition
A35-1 (FR+) - A35-2 (FR-)
1.4 to 1.8 kΩ at 20°C (68°F)
A35-1 (FR+) - Body ground
10 kΩ or higher
A35-2 (FR-) - Body ground
10 kΩ or higher
- NOTICE:
- Check the speed sensor signal after replacement (Click here).
|
|
||||
| OK | |
|
| 7. CHECK HARNESS AND CONNECTOR (FRONT SPEED SENSOR TO SKID CONTROL ECU) |
Disconnect the skid control ECU connector.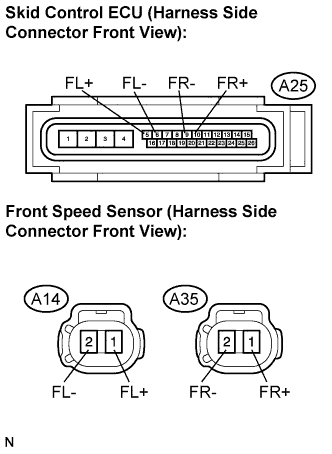
Measure the resistance according to the value(s) in the table below.
- Standard resistance:
- LH:
Tester Connection
Specified Condition
A25-5 (FL+) - A14-1 (FL+)
Below 1 Ω
A25-6 (FL-) - A14-2 (FL-)
Below 1 Ω
A14-1 (FL+) - Body ground
10 kΩ or higher
A14-2 (FL-) - Body ground
10 kΩ or higher
- RH:
Tester Connection
Specified Condition
A25-10 (FR+) - A35-1 (FR+)
Below 1 Ω
A25-9 (FR-) - A35-2 (FR-)
Below 1 Ω
A35-1 (FR+) - Body ground
10 kΩ or higher
A35-2 (FR-) - Body ground
10 kΩ or higher
Connect the connectors.
|
|
||||
| OK | |
|
| 8. INSPECT SPEED SENSOR SIGNAL WAVEFORM |
Lift up the vehicle.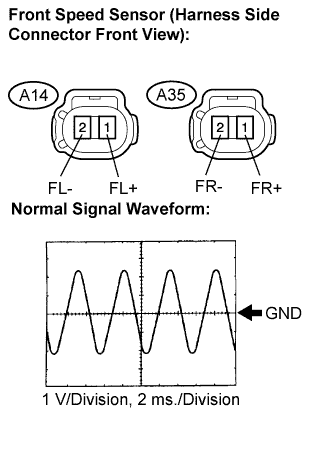
Perform the inspection using an oscilloscope.
Disconnect the front speed sensor connector.
Connect the oscilloscope to terminals 1 and 2 of the front speed sensor.
Check that a waveform is output when the tires are rotated.
- OK:
- The same waveforms is output from front wheels and there is no noise or interference in the waveform.
- HINT:
- As vehicle speed (wheel rotation speed) increases, the width of the waveform narrows and the output voltage becomes greater.
- When noise is identified in the waveform on the oscilloscope, the erratic signals are generated due to rotor scratches, looseness or foreign matter attached to the speed sensor.
- As vehicle speed (wheel rotation speed) increases, the width of the waveform narrows and the output voltage becomes greater.
Connect the connector.
|
|
||||
| OK | |
|
| 9. READ VALUE USING INTELLIGENT TESTER (FRONT SPEED SENSOR) |
Connect the intelligent tester to the DLC3.
Start the engine.
Select "Data List" and read the value displayed on the intelligent tester (Click here).
Data List: ABS Tester Display
Measurement Item/Range
Normal Condition
Diagnostic Note
FR Wheel Speed
Wheel speed sensor (FR) reading / min.: 0 km/h (0 mph), max.: 326 km/h (202 mph)
Actual wheel speed
Speed indicated on speedometer
FL Wheel Speed
Wheel speed sensor (FL) reading / min.: 0 km/h (0 mph), max.: 326 km/h (202 mph)
Actual wheel speed
Speed indicated on speedometer
Check that there is no difference between the speed value output from the speed sensor displayed on the intelligent tester and the speed value displayed on the speedometer when driving the vehicle.
- OK:
- The speed value output from the speed sensor displayed on the intelligent tester is the same as the actual vehicle speed.
- HINT:
- If troubleshooting has been carried out according to the "PROBLEM SYMPTOMS TABLE", refer back to the table and proceed to the next step before replacing the part (Click here).
|
|
||||
| OK | |
|
| 10. RECONFIRM DTC |
Clear the DTCs (Click here).
Drive the vehicle at a speed of approximately 40 km/h (25 mph) or more for 60 seconds or more.
Check if the same DTCs are recorded (Click here).
- HINT:
- Reinstall the sensors, connectors, etc. and restore the vehicle to its prior condition before rechecking for DTCs.
- Result:
Condition
Proceed to
DTCs (C0200/31, C0205/32, C1330/35 and C1331/36) are output
A
DTCs (C0200/31, C0205/32, C1330/35 and C1331/36) are not output (When troubleshooting in accordance with PROBLEM SYMPTOMS TABLE)
B
DTCs (C0200/31, C0205/32, C1330/35 and C1331/36) are not output (When troubleshooting in accordance with the DTC CHART)
C
|
|
||||
|
|
||||
| A | |
|
| 11. INSPECT SPEED SENSOR TIP |
Remove the front speed sensor (Click here).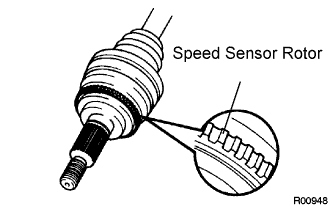
Check the sensor tip.
- OK:
- No scratches or foreign matter on the sensor tip.
- NOTICE:
- Check the speed sensor signal after cleaning or replacement (Click here).
Install the speed sensor.
|
|
||||
| OK | ||
 |
||
| ||