B2274 ACC Monitor Malfunction
Diagnostic trouble codes · Vehicles built from Jun 2009
Versions by build date: Oct 2006 – May 2009 from Jun 2009
DESCRIPTION
This DTC is output when there is a problem in the ACCD output circuit, which is from the inside of the main body ECU to the ACC relay.- HINT:
- When the main body ECU is replaced with a new one and the negative (-) battery terminal is connected, the power source mode becomes the IG-ON mode. When the battery is removed and reinstalled, the power source mode that was selected when the battery was removed is restored.
- After the main body ECU is replaced, perform the registration procedures for the engine immobiliser system.
| DTC No. |
DTC Detection Condition |
Trouble Area |
| B2274 |
ACC relay actuation circuit inside main body ECU or other related circuit is malfunctioning |
|
WIRING DIAGRAM
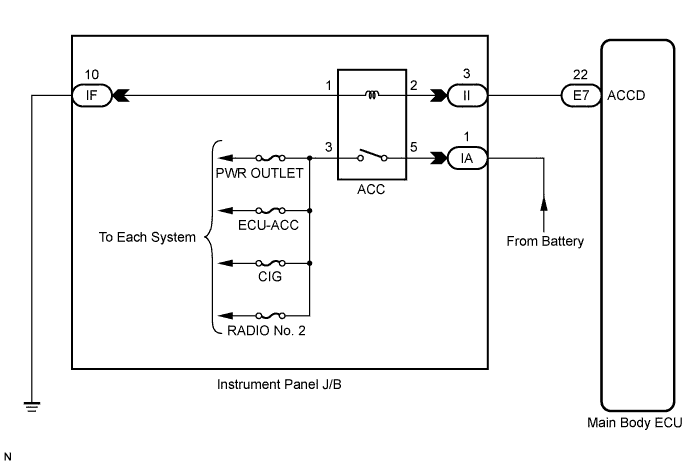

INSPECTION PROCEDURE
| 1. READ VALUE USING INTELLIGENT TESTER |

Connect the intelligent tester to the DLC3.
Turn the engine switch on (IG) and turn the intelligent tester main switch on.
Read the Data List according to the displays on the tester.
- HINT:
- When using the intelligent tester with the engine switch off, turn on and off any of the door courtesy light switches repeatedly at 1.5 second intervals or less until communication between the tester and vehicle starts.
Body: Tester Display
Measurement Item/Range
Normal Condition
Diagnostic Note
ACC Relay Mon
Status of ACC Relay Monitor / ON or OFF
ON: Engine switch on (ACC)
OFF: Engine switch off
-
- Result:
Result
Proceed to
"ON" (engine switch on (ACC)) appears on the screen.
B
"ON" (engine switch on (ACC)) does not appear on the screen.
A
|
|
||||

| A | |
 |
| 2. CHECK ENGINE SWITCH CONDITION |
Check the power source mode change.
When the key is inside the vehicle and the shift lever is in the P position, check that pressing the engine switch causes the power source mode to change as follows:
- OK:
- off → on (ACC) → on (IG) → off
- HINT:
- If power mode does not change to ON (IG and ACC) (Click here).
- If power mode does not change to ON (IG) (Click here).
- If power mode does not change to ON (ACC) (Click here).
- If power mode does not change to ON (IG and ACC) (Click here).
|
|
||||

| OK | |
|
| 3. INSPECT RELAY (ACC RELAY) |
Remove the ACC relay from the instrument panel J/B.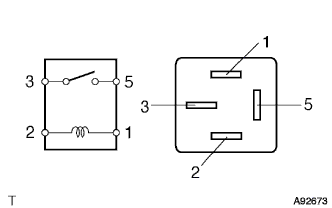
Measure the resistance according to the value(s) in the table below.
- Standard resistance:
Tester Connection
Condition
Specified Condition
3 - 5
When battery voltage is not applied to terminals 1 and 2
10 kΩ or higher
3 - 5
When battery voltage is applied to terminals 1 and 2
Below 1 Ω
|
|
||||
| OK | |
|
| 4. CHECK HARNESS AND CONNECTOR (INSTRUMENT PANEL JUNCTION BLOCK - MAIN BODY ECU) |
Disconnect the E7 ECU connector.
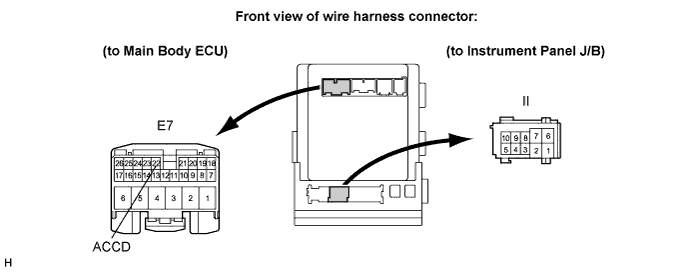
Disconnect the II J/B connector.
Measure the resistance according to the value(s) in the table below.
- Standard resistance:
Tester Connection
Condition
Specified Condition
II-3 - E7-22 (ACCD)
Always
Below 1 Ω
E7-22 (ACCD) or II-3 - Body ground
Always
10 kΩ or higher
|
|
||||
| OK | |
|
| 5. CHECK HARNESS AND CONNECTOR (INSTRUMENT PANEL JUNCTION BLOCK - BATTERY AND BODY GROUND) |
Disconnect the IF and IA J/B connectors.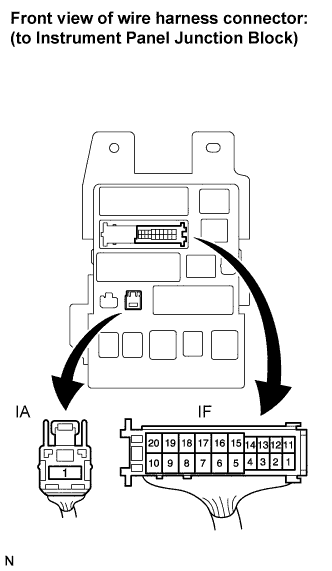
Measure the resistance according to the value(s) in the table below.
- Standard resistance:
Tester Connection
Condition
Specified Condition
IF-10 - Body ground
Always
Below 1 Ω
Measure the voltage according to the value(s) in the table below.
- Standard voltage:
Tester Connection
Condition
Specified Condition
IA-1 - Body ground
Always
11 to 14 V
|
|
||||
| OK | |
|
| 6. INSPECT INSTRUMENT PANEL JUNCTION BLOCK |
Measure the resistance according to the value(s) in the table below.
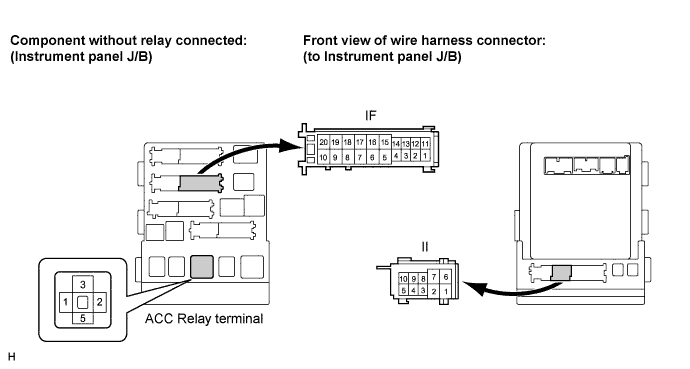
- Standard resistance:
Tester Connection
Condition
Specified Condition
Instrument Panel J/B ACC relay terminal 1 - IF-10
Always
Below 1 Ω
Instrument Panel J/B ACC relay terminal 2 - II-3
Always
Below 1 Ω
IF-10 - Body ground
Always
10 kΩ or higher
II-3 - Body ground
Always
10 kΩ or higher
|
|
||||
| OK | ||
 |
||
| ||