Rear Clearance Sonar Sensor Circuit
Circuit diagnosis · Vehicles built Oct 2006 – May 2009
Versions by build date: Oct 2006 – May 2009 from Jun 2009
DESCRIPTION
There is an open or short circuit in the communication line between the rear sensors and the clearance warning ECU, or there is a malfunction in a rear sensor.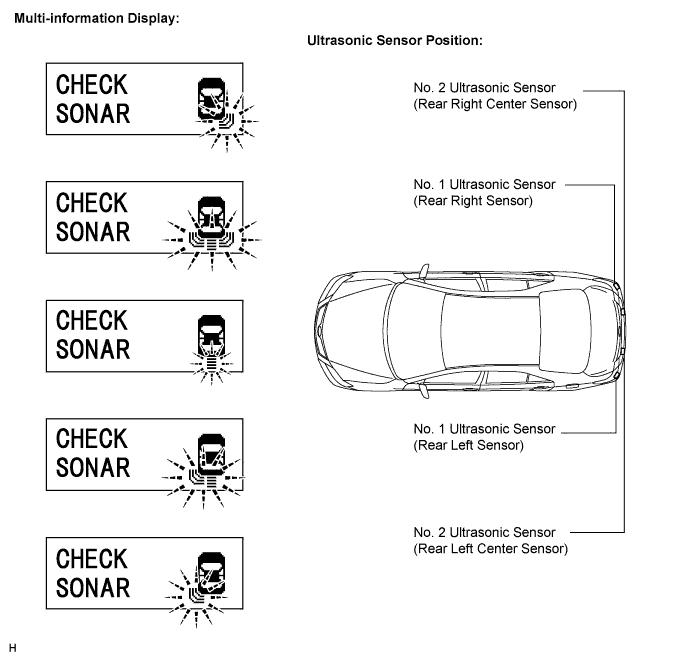

WIRING DIAGRAM
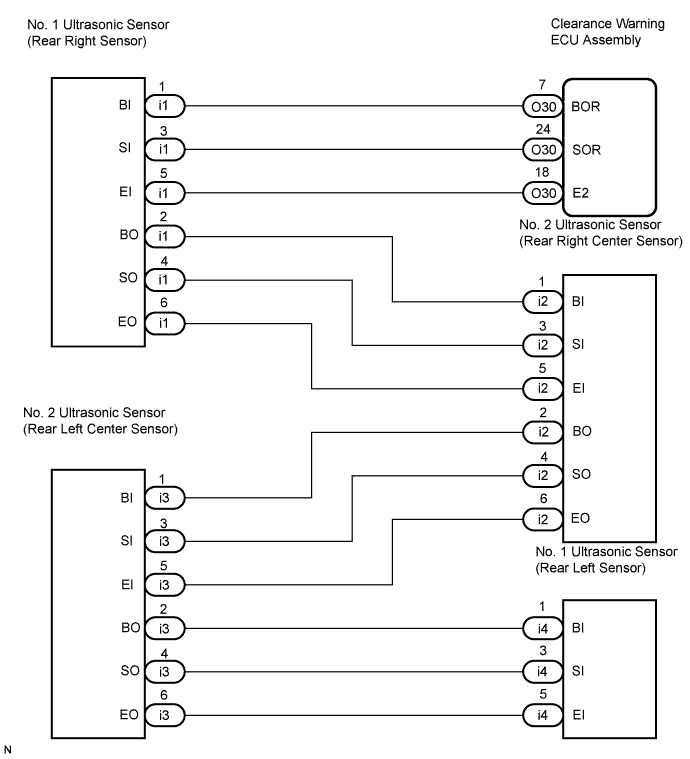
INSPECTION PROCEDURE
| 1. CHECK CLEARANCE SONAR SYSTEM |

Check the operation of the clearance sonar system (Click here).
- Result:
Result
Proceed to
Warning message is displayed on multi-information display and all rear clearance sensor indicators are blinking
A
Warning message is displayed on multi-information display and rear right clearance sensor or back sonar sensor and rear left clearance sensor indicator are blinking
B
Warning message is displayed on multi-information display and back sonar sensor indicator are blinking
C
Warning message is displayed on multi-information display and rear left clearance sensor indicator are blinking
D
|
|
||||
|
|
||||
|
|
||||

| A | |
 |
| 2. CHECK HARNESS AND CONNECTOR (CLEARANCE WARNING ECU - REAR RIGHT SENSOR) |
Disconnect the O30 ECU connector.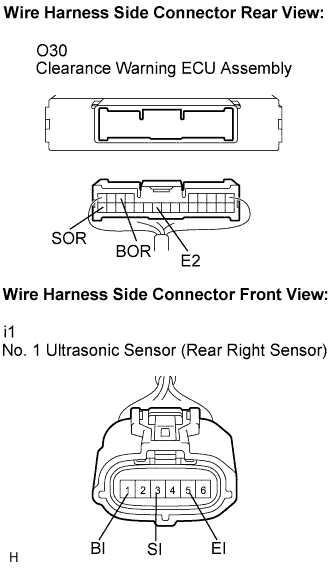
Disconnect the i1 sensor connector.
Measure the resistance according to the value(s) in the table below.
- Standard resistance:
Tester Connection
Condition
Specified Condition
O30-7 (BOR) - i1-1 (BI)
Always
Below 1 Ω
O30-24 (SOR) - i1-3 (SI)
O30-18 (E2) - i1-5 (EI)
O30-7 (BOR) - Body ground
10 kΩ or higher
O30-24 (SOR) - Body ground
O30-18 (E2) - Body ground
|
|
||||

| OK | |
|
| 3. INSPECT CLEARANCE WARNING ECU ASSEMBLY |
Reconnect the O30 ECU connector.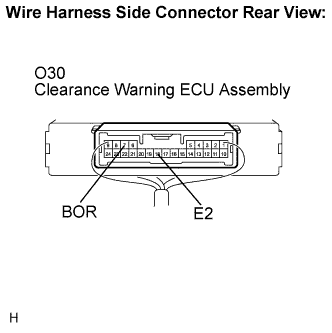
Measure the resistance according to the value(s) in the table below.
- Standard resistance:
Tester Connection
Condition
Specified Condition
O30-18 (E2) - Body ground
Always
Below 1 Ω
Measure the voltage according to the value(s) in the table below.
- Standard voltage:
Tester Connection
Condition
Specified Condition
O30-7 (BOR) - Body ground
Ignition switch on (IG)
7 to 9 V
|
|
||||
| OK | |
|
| 4. REPLACE NO. 1 ULTRASONIC SENSOR (REAR RIGHT SENSOR) |
Replace the ultrasonic sensor (Click here) with a normally functioning sensor.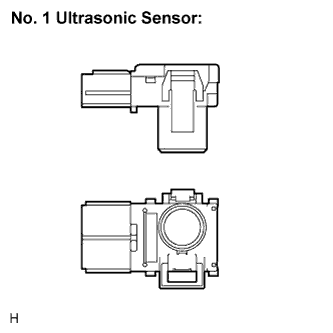
- HINT:
- All the corner sensors are the same. Switch the right and left sensors to confirm if the sensors function normally.
| NEXT | |
|
| 5. CHECK CLEARANCE SONAR SYSTEM |
Check the operation of the clearance sonar system (Click here).
- Result:
Result
Proceed to
Clearance sonar system malfunction
A
Clearance sonar system normal operation
B
|
|
||||
| A | |
|
| 6. CHECK HARNESS AND CONNECTOR (REAR RIGHT SENSOR - REAR RIGHT CENTER SENSOR) |
Disconnect the i1 and i2 sensor connectors.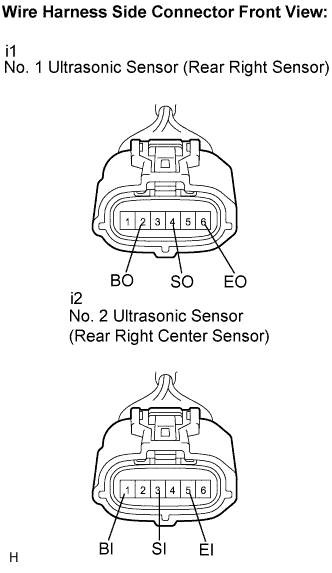
Measure the resistance according to the value(s) in the table below.
- Standard resistance:
Tester Connection
Condition
Specified Condition
i1-2 (BO) - i2-1 (BI)
Always
Below 1 Ω
i1-4 (SO) - i2-3 (SI)
i1-6 (EO) - i2-5 (EI)
i1-2 (BO) - Body ground
10 kΩ or higher
i1-4 (SO) - Body ground
i1-6 (EO) - Body ground
| OK | |
|
| 7. REPLACE NO. 2 ULTRASONIC SENSOR (REAR RIGHT CENTER SENSOR) |
Replace the ultrasonic sensor (Click here) with a normally functioning sensor.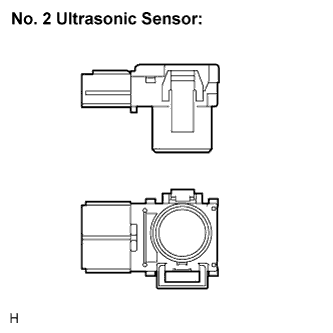
- HINT:
- All the rear center sensors are the same. Switch the right and left sensors to confirm if the sensors function normally.
| NEXT | |
|
| 8. CHECK CLEARANCE SONAR SYSTEM |
Check the operation of the clearance sonar system (Click here).
- Result:
Result
Proceed to
Warning message is displayed on multi-information display and rear center clearance sensor and rear left clearance sonar indicators are blinking
A
Warning message is displayed on multi-information display and rear center clearance sensor indicators are blinking
B
No warning message is displayed on multi-information display
C
|
|
||||
|
|
||||
| A | |
|
| 9. CHECK HARNESS AND CONNECTOR (REAR RIGHT CENTER SENSOR - REAR LEFT CENTER SENSOR) |
Disconnect the i2 and i3 sensor connectors.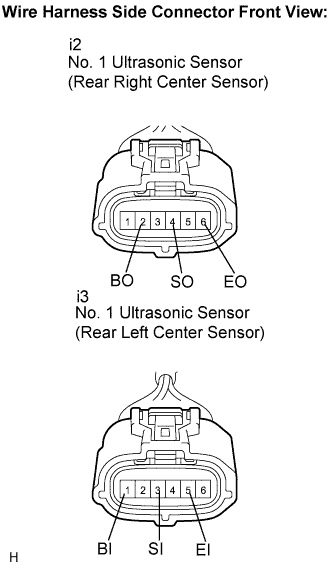
Measure the resistance according to the value(s) in the table below.
- Standard resistance:
Tester Connection
Condition
Specified Condition
i2-2 (BO) - i3-1 (BI)
Always
Below 1 Ω
i2-4 (SO) - i3-3 (SI)
i2-6 (EO) - i3-5 (EI)
i2-2 (BO) - Body ground
10 kΩ or higher
i2-4 (SO) - Body ground
i2-6 (EO) - Body ground
|
|
||||
| OK | |
|
| 10. REPLACE NO. 2 ULTRASONIC SENSOR (REAR LEFT CENTER SENSOR) |
Replace the ultrasonic sensor (Click here) with a normally functioning sensor.
- HINT:
- All the rear center sensors are the same. Switch the right and left sensors to confirm if the sensors function normally.
| NEXT | |
|
| 11. CHECK CLEARANCE SONAR SYSTEM |
Check the operation of the clearance sonar system (Click here).
- Result:
Result
Proceed to
Clearance sonar system malfunction
A
Clearance sonar system normal operation
B
|
|
||||
| A | |
|
| 12. CHECK HARNESS AND CONNECTOR (REAR LEFT CENTER SENSOR - REAR LEFT SENSOR) |
Disconnect the i3 and i4 sensor connectors.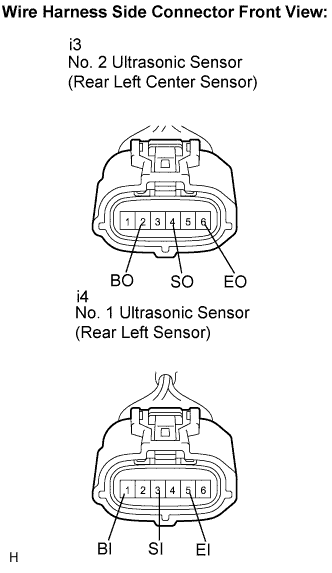
Measure the resistance according to the value(s) in the table below.
- Standard resistance:
Tester Connection
Condition
Specified Condition
i3-2 (BO) - i4-1 (BI)
Always
Below 1 Ω
i3-4 (SO) - i4-3 (SI)
i3-6 (EO) - i4-5 (EI)
i3-2 (BO) - Body ground
10 kΩ or higher
i3-4 (SO) - Body ground
i3-6 (EO) - Body ground
|
|
||||
| OK | |
|
| 13. REPLACE NO. 1 ULTRASONIC SENSOR (REAR LEFT SENSOR) |
Replace the ultrasonic sensor (Click here) with a normally functioning sensor.
- HINT:
- All the corner sensors are the same. Switch the right and left sensors to confirm if the sensors function normally.
| NEXT | |
|
| 14. CHECK CLEARANCE SONAR SYSTEM |
Check the operation of the clearance sonar system (Click here).
- Result:
Result
Proceed to
Clearance sonar system malfunction
A
Clearance sonar system normal operation
B
|
|
||||
| A | ||
 |
||
| ||