Rear Brake
Brake
COMPONENTS
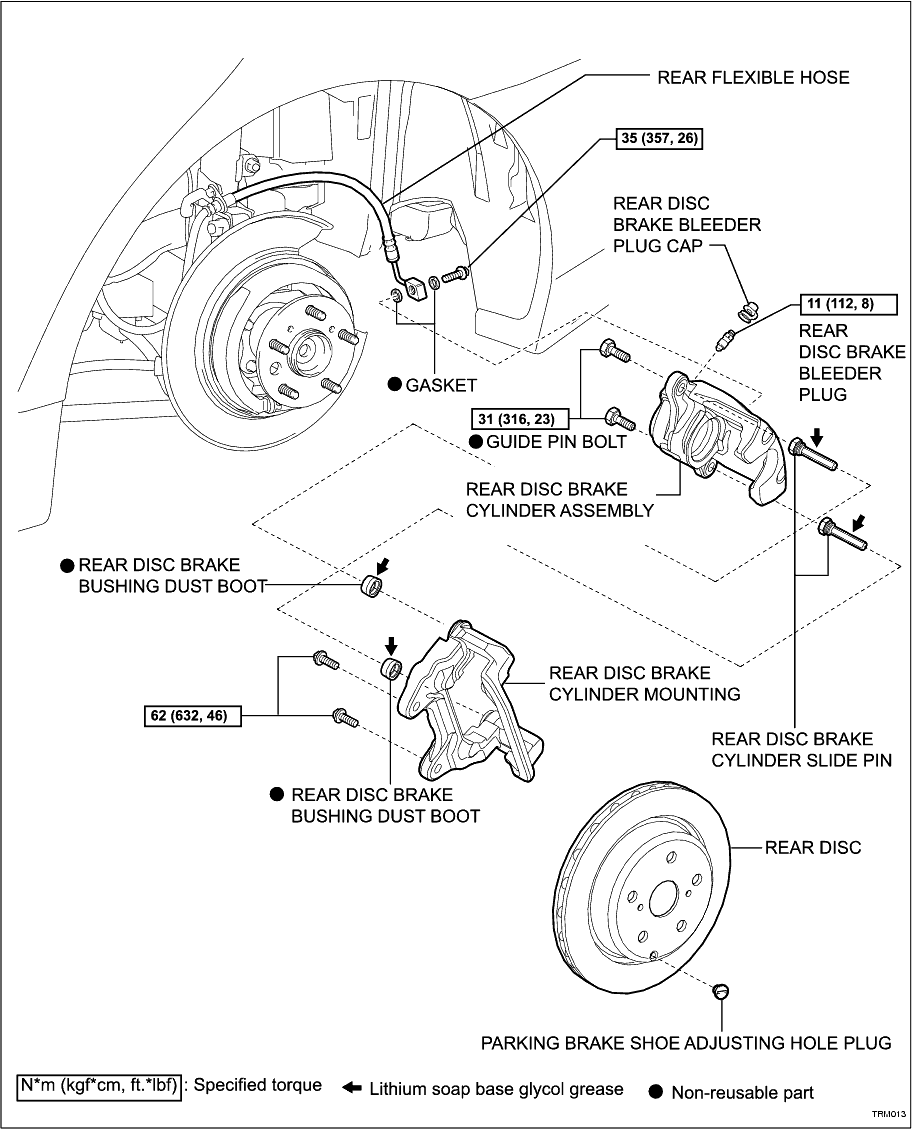
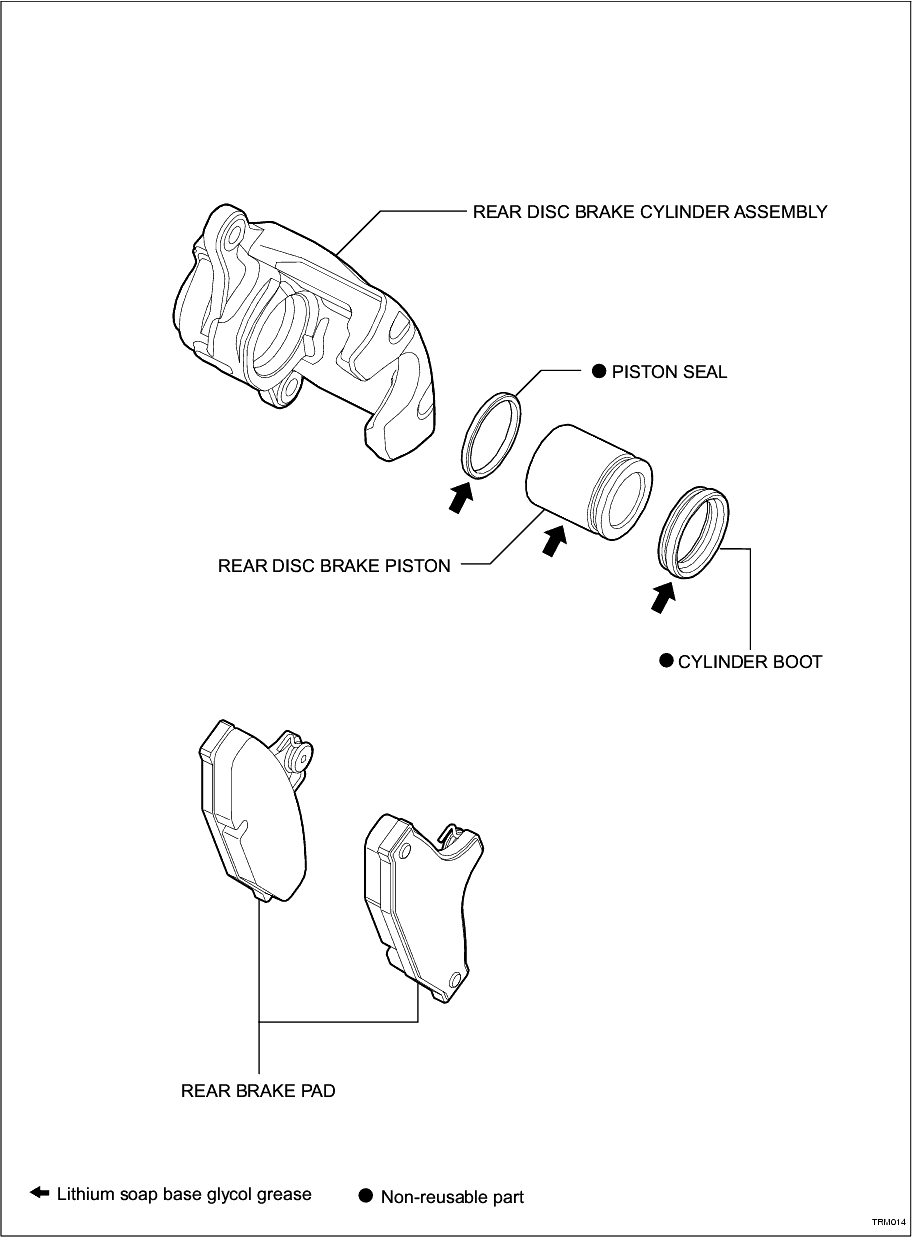
REMOVAL
HINT:
• Use the same procedures for the LH side and RH side.
• The procedures listed below are for the LH side.
1. REMOVE REAR WHEEL
2. DRAIN BRAKE FLUID
3. DISCONNECT REAR BRAKE FLEXIBLE HOSE
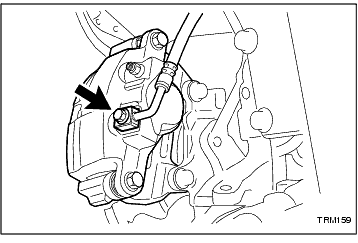
(a) Remove the union bolt and 2 gaskets from the rear disc brake cylinder assembly, then disconnect the rear flexible hose.
-
4. REMOVE REAR DISC BRAKE CYLINDER ASSEMBLY
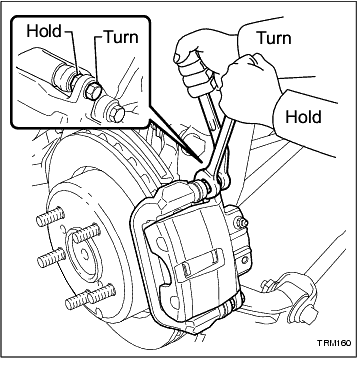
(a) Hold the 2 rear disc brake cylinder slide pins and remove the 2 bolts and rear disc brake cylinder assembly.
-
DISASSEMBLY
1. REMOVE REAR BRAKE PAD
(a) Remove the 2 rear disc brake pads.
-
2. REMOVE REAR DISC BRAKE CYLINDER MOUNTING
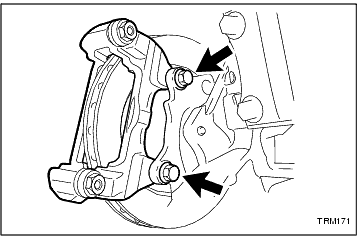
(a) Remove the 2 bolts and the rear disc brake cylinder mounting.
-
3. REMOVE REAR DISC BRAKE CYLINDER SLIDE PIN
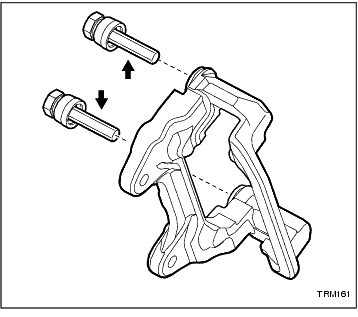
(a) Remove the 2 rear disc brake cylinder slide pins (upper and lower) from the rear disc brake cylinder mounting.
-
4. REMOVE REAR DISC BRAKE BUSHING DUST BOOT
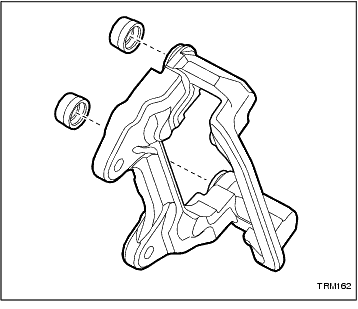
(a) Remove the 2 rear disc brake bushing dust boots from the rear disc brake cylinder mounting.
-
5. REMOVE REAR DISC BRAKE PISTON
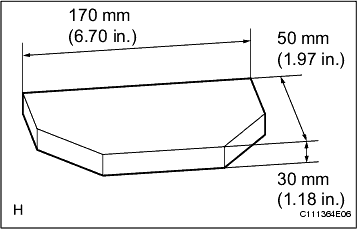
(a) Prepare a wooden plate to hold the brake pistons.
-
(b) Place the wooden plate between the rear disc brake piston and the rear disc brake cylinder assembly.
-
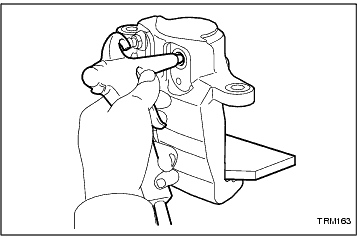
(c) Use compressed air to remove the rear disc brake piston from the rear disc brake cylinder assembly.
CAUTION:
Do not place your fingers in front of the brake piston when using compressed air.
NOTICE:
Be careful not to spatter the brake fluid.
-
6. REMOVE CYLINDER BOOT
(a) Remove the cylinder boot from the disc brake cylinder assembly.
-
7. REMOVE PISTON SEAL
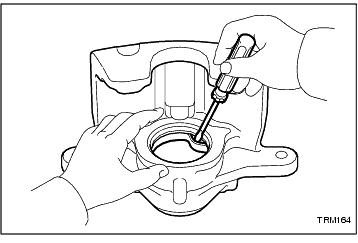
(a) Using a screwdriver, remove the piston seal from the rear disc brake cylinder assembly.
NOTICE:
Be careful not to damage the inner cylinder and cylinder groove.
HINT:
Tape the screwdriver tip before use.
-
8. REMOVE REAR DISC BRAKE BLEEDER PLUG CAP
(a) Remove the bleeder plug cap from the rear disc brake bleeder plug.
-
9. REMOVE REAR DISC BRAKE BLEEDER PLUG
(a) Remove the rear disc brake bleeder plug from the rear disc brake cylinder assembly.
-
10. REMOVE REAR DISC
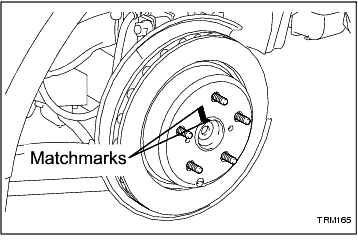
(a) Release the parking brake and put matchmarks on the rear disc and the axle hub.
-
(b) Remove the rear disc.
HINT:
• If the rear disc is difficult to remove, rotate the disc while removing.
• If the rear disc jams, return the disc to its original position, remove the adjusting hole plug and turn the shoe adjusting nut in the clockwise direction to contract the parking brake shoe.
-
INSPECTION
1. INSPECT BRAKE CYLINDER AND PISTON
(a) Inspect the cylinder bore and the piston for rust or scoring. If necessary, replace the rear disc brake cylinder assembly and piston.
-
2. INSPECT PAD LINING THICKNESS
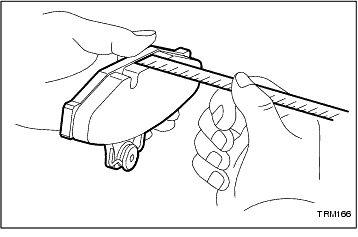
(a) Using a ruler, measure the pad lining thickness.
Standard thickness:
8.5 mm (0.334 in.)
Minimum thickness:
2.0 mm (0.079 in.)
If the pad lining thickness is less than the minimum, replace the brake pads.
HINT:
Check for wear of the rear disc after replacing the brake pad with a new one.
-
3. INSPECT DISC THICKNESS
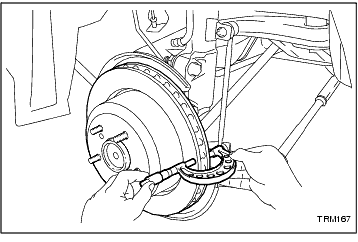
(a) Using a micrometer, measure the disc thickness.
Standard thickness:
18.0 mm (0.708 in.)
Minimum thickness:
16.0 mm (0.630 in.)
If the disc thickness is less than the minimum, replace the rear disc.
-
4. INSPECT DISC RUNOUT
(a) Install the rear disc.
-
(b) Temporarily fasten the rear disc with the 3 hub nuts.
Torque:
103 N*m
(1,050 kgf*cm,
76 ft.*lbf)
-
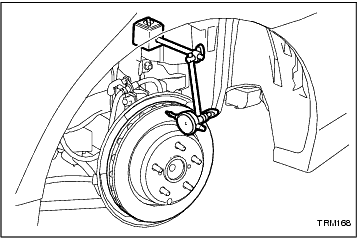
(c) Using a dial indicator, measure the disc runout 10 mm (0.39 in.) away from the outer edge of the rear disc.
Maximum disc runout:
0.15 mm (0.0059 in.)
NOTICE:
• Keep the magnet of the dial indicator away from the axle hub and speed sensor.
• Install the dial indicator to the shock absorber.
-
(d) If the runout exceeds the maximum value, change the installation positions of the disc and axle so the runout will become minimal. If the runout exceeds the maximum even after the installation positions are changed, check the rear axle hub bearing looseness (
Click Here
)
If the hub bearing looseness and runout are normal and if the disc thickness is not within the specified range, grind the disc. If the disc thickness is less than the minimum, replace the disc.
-
(e) Remove the 3 hub nuts.
-
(f) Remove the rear disc.
-
REASSEMBLY
1. INSPECT PARKING BRAKE SHOE DIAMETER (
Click Here
)
2. ADJUST PARKING BRAKE SHOE DIAMETER (
Click Here
)
3. INSTALL REAR DISC
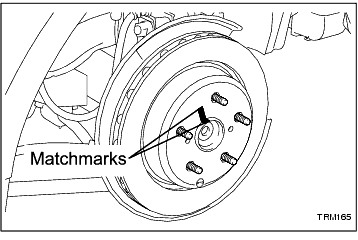
(a) Align the matchmarks and install the rear disc.
-
(b) Install the adjusting hole plug, if removed.
HINT:
When replacing the rear disc with a new one, select the installation position where the rear disc has the minimum runout.
-
4. INPSECT FOR PARKING BRAKE SHOE DRAG (
Click Here
)
5. TEMPORARILY TIGHTEN REAR DISC BRAKE BLEEDER PLUG
(a) Temporarily install the rear disc brake bleeder plug to the rear disc brake cylinder sub-assembly.
-
6. INSTALL REAR DISC BRAKE BLEEDER PLUG CAP
(a) Install the rear disc brake bleeder plug cap to the rear disc brake bleeder plug.
-
7. INSTALL PISTON SEAL
(a) Apply lithium soap base glycol grease to a new piston seal.
-
(b) Install the piston seal to the rear disc brake cylinder assembly.
-
8. INSTALL CYLINDER BOOT
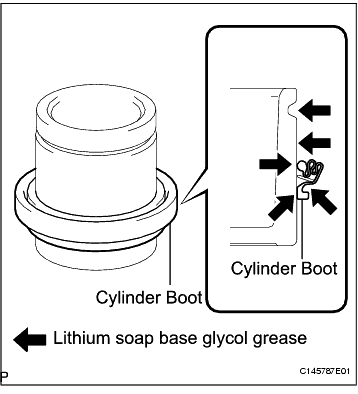
(a) Apply lithium soap base glycol grease to the piston and a new cylinder boot.
-
(b) Install the cylinder boot to the piston as shown in the illustration.
-
9. INSTALL REAR DISC BRAKE PISTON
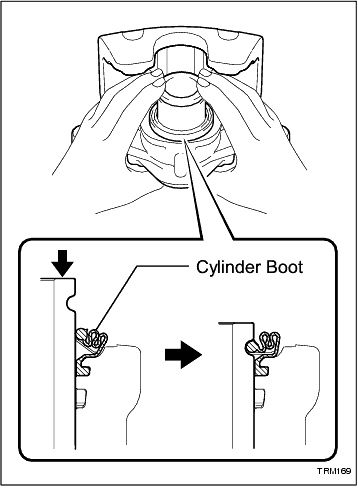
(a) Install the boot securely to the grooves of the cylinder.
-
(b) Push in the piston by hand and install the boot onto the grooves of the piston.
NOTICE:
Install the boot securely to the grooves of the piston.
-
10. INSTALL REAR DISC BRAKE BUSHING DUST BOOT
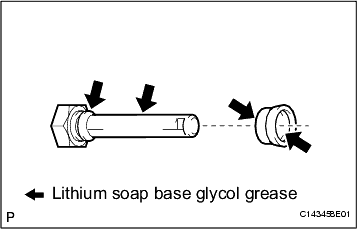
(a) Apply lithium soap base glycol grease to the seal surfaces of 2 new rear disc brake bushing dust boots.
-
(b) Apply lithium soap base glycol grease to the sliding part and the seal surface of the rear disc brake cylinder slide pins.
-
(c) Install the 2 rear disc brake bushing dust boots to the rear disc brake cylinder slide pins.
-
11. INSTALL REAR DISC BRAKE CYLINDER SLIDE PIN
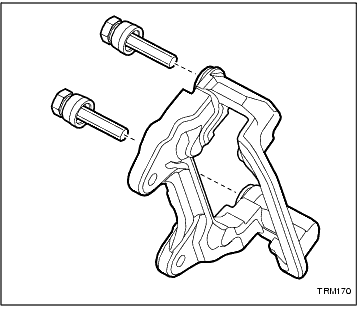
(a) Install the 2 pins (upper and lower) to the bottom side of the rear brake cylinder mounting.
-
(b) Install the 2 rear disc brake bushing dust boots to the groove of the rear brake cylinder mounting.
-
12. INSTALL REAR DISC BRAKE CYLINDER MOUNTING
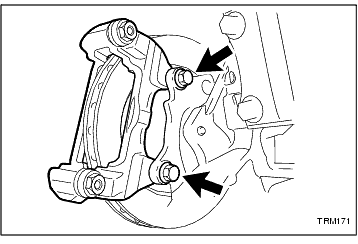
(a) Install the rear disc brake cylinder mounting with the 2 bolts.
Torque:
62 N*m
(632 kgf*cm,
46 ft.*lbf)
-
13. INSTALL REAR BRAKE PAD
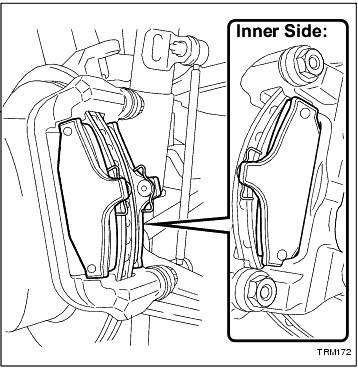
(a) Install the 2 rear brake pads to the rear disc brake cylinder mounting.
-
INSTALLATION
1. INSTALL REAR DISC BRAKE CYLINDER ASSEMBLY
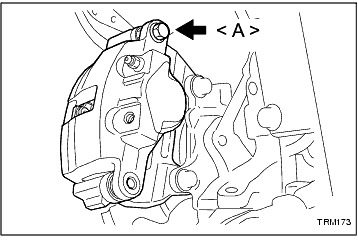
(a) Temporarily tighten new bolt <A> to install the upper part of the rear disc brake cylinder assembly.
-
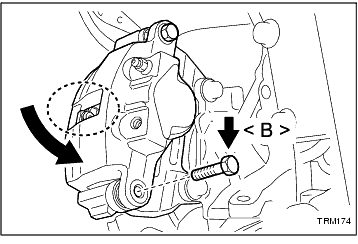
(b) Temporarily tighten new bolt <B> to install the lower part of the rear disc brake cylinder assembly while holding the lower part of the rear disc brake cylinder assembly.
NOTICE:
Ensure the rear brake pad springs do not get caught at the point on the rear disc brake cylinder assembly shown in the illustration.
-
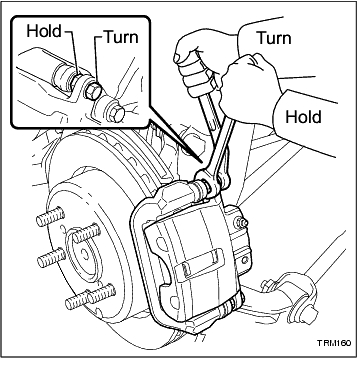
(c) Fully tighten the rear disc brake cylinder assembly with the 2 bolts.
Torque:
31 N*m
(316 kgf*cm,
23 ft.*lbf)
-
2. CONNECT REAR BRAKE FLEXIBLE HOSE
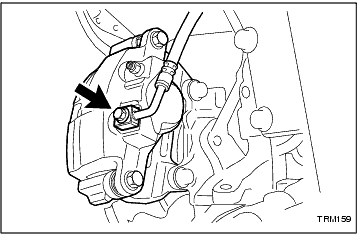
(a) Connect the rear brake flexible hose with the union bolt and a new gasket.
Torque:
35 N*m
(357 kgf*cm,
26 ft.*lbf)
NOTICE:
Install the flexible hose lock securely in the lock hole in the disc brake cylinder assembly.
-
3. FILL RESERVOIR WITH BRAKE FLUID (
Click Here
)
4. BLEED BRAKE LINE (
Click Here
)
5. INSPECT FLUID LEVEL IN RESERVOIR (
Click Here
)
6. INSPECT FOR FLUID LEAK
7. INSTALL REAR WHEEL
8. INSPECT PARKING BRAKE PEDAL TRAVEL (
Click Here
)
9. ADJUST PARKING BRAKE PEDAL TRAVEL (
Click Here
)