HEATING / AIR CONDITIONING COMPRESSOR INSTALLATION
PROCEDURE

 1.ADJUST COMPRESSOR OIL LEVEL
When replacing the compressor with a new one:
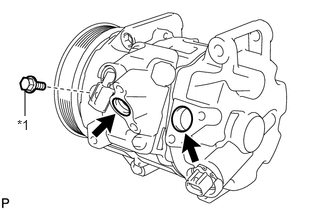
| *1 | Drain bolt (washer) |
Remove the drain bolt (washer).
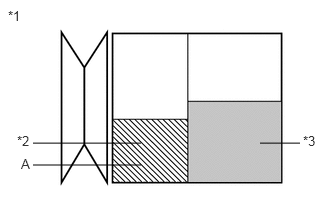
| *1 | Removed Compressor |
| *2 | Amount of oil drain from removed compressor |
| *3 | Amount of oil remaining in the reserve chamber (60 cc (3.66 fl.oz)) |
Gradually discharge the inert gas from the service valve. Then drain the following amount of oil from the new compressor before installation so that the amount of oil contained in it is the same as that in the compressor to be replaced.
- HINT:
-
New compressors are filled with sufficient oil for the whole air conditioning system. Therefore, it is necessary to drain oil from the new compressor to compensate for oil remaining in the condenser and cooling unit.
- Standard:
(The amount of oil inside a new compressor: 100 (+15) cc (6.10 (+0.92) fl.oz)) - (The amount of oil remaining in the old compressor A + oil remaining in the reserve chamber: 60 cc (3.66 fl.oz)) = (The amount of oil to be removed from the new compressor)
- NOTICE:
- ·
When A + 60 cc (3.66 fl.oz) exceeds the standard oil fill volume specified for the compressor by part number, install the compressor without adjusting the oil volume.
Example:
If A = 45 cc (2.75 fl.oz), A + 60 cc (3.66 fl.oz) = 105 cc (6.41 fl.oz). If the standard volume is 100 cc (6.10 fl.oz), install the compressor as is.
·When checking the compressor oil level, observe the precautions for cooler removal/installation.
·If the amount of oil remaining in the removed compressor is too low, check for oil leaks.
·Use ND-OIL8 or equivalent for compressor oil.
Install the drain bolt (washer).
- Torque:
- 30 N*m (306 kgf*cm, 22 ft.*lbf)
If draining the oil is difficult, drain the oil using the following procedure:
Remove the suction seal cap.
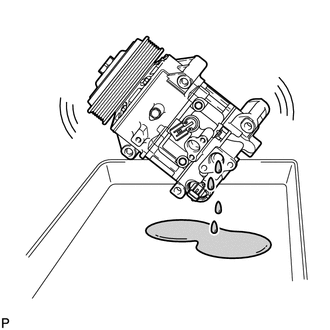
Lightly shake the compressor with the suction port facing down, and drain the oil (*1).
- NOTICE:
-
Do not allow the pulley to come into contact with the compressor oil.
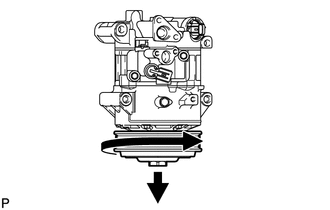
With the DL pulley facing down, rotate the pulley in the direction shown by the arrow 10 times at a rate of approximately once every 2 seconds (*2).
- CAUTION:
-
If the pulley is rotated, refrigerant or oil might splash out. Thus, keep your face away from the compressor port.
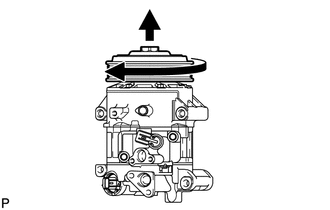
Rotate the pulley once in the direction shown by the arrow while quickly turning the compressor so that the pulley is up (*3).
Proceed with the above procedure (*1) and drain the oil (*4).
Drain the oil by repeating the procedures above approximately 5 times (from (*2) to (*4)).
88310
2.INSTALL COMPRESSOR ASSEMBLY WITH PULLEY
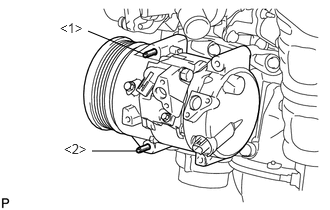
Using an E8 "TORX" socket, temporarily install the compressor assembly with pulley with the 2 stud bolts.
- Torque:
- 10 N*m (102 kgf*cm, 7 ft.*lbf)
- HINT:
-
Tighten the stud bolts in the order shown in the illustration.
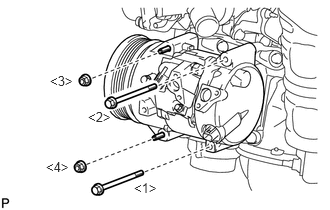
Install the compressor assembly with pulley with the 2 bolts and 2 nuts.
- Torque:
- 25 N*m (250 kgf*cm, 18 ft.*lbf)
- HINT:
-
Tighten the bolts and nuts in the order shown in the illustration to install the compressor.
88704
3.CONNECT SUCTION HOSE SUB-ASSEMBLY
Remove the attached vinyl tape from the hose.
Apply sufficient compressor oil to a new O-ring and the fitting surface of the compressor assembly with pulley.
- Compressor oil:
ND-OIL 8 or equivalent
Install the O-ring onto the suction hose sub-assembly.
Install the suction hose sub-assembly onto the compressor assembly with pulley with the bolt.
- Torque:
- 9.8 N*m (100 kgf*cm, 87 in.*lbf)
88711
4.CONNECT NO. 1 COOLER REFRIGERANT DISCHARGE HOSE
Remove the attached vinyl tape from the hose.
Apply sufficient compressor oil to a new O-ring and the fitting surface of the compressor assembly with pulley.
- Compressor oil:
ND-OIL 8 or equivalent
Install the O-ring onto the No. 1 cooler refrigerant discharge hose.
Install the No. 1 cooler refrigerant discharge hose onto the compressor assembly with pulley with the bolt.
- Torque:
- 9.8 N*m (100 kgf*cm, 87 in.*lbf)
Connect the 2 connectors.
Install the bolt.
16361A
5.INSTALL V-RIBBED BELT
53736
6.INSTALL FRONT FENDER APRON SEAL RH
7.INSTALL RADIATOR ASSEMBLY
8.CHARGE AIR CONDITIONING SYSTEM WITH REFRIGERANT
9.WARM UP ENGINE
10.INSPECT FOR REFRIGERANT LEAK