DOOR LOCK WIRELESS DOOR LOCK CONTROL SYSTEM(w/o Smart Entry and Start System) Only Wireless Control Function is Inoperative
DESCRIPTION
The door control receiver receives signals from the door control transmitter module set sub-assembly and sends these signals to the main body ECU (multiplex network body ECU). The main body ECU (multiplex network body ECU) then controls all doors by sending lock/unlock signals to each door, and sends hazard flasher relay signals to the combination meter assembly.
WIRING DIAGRAM
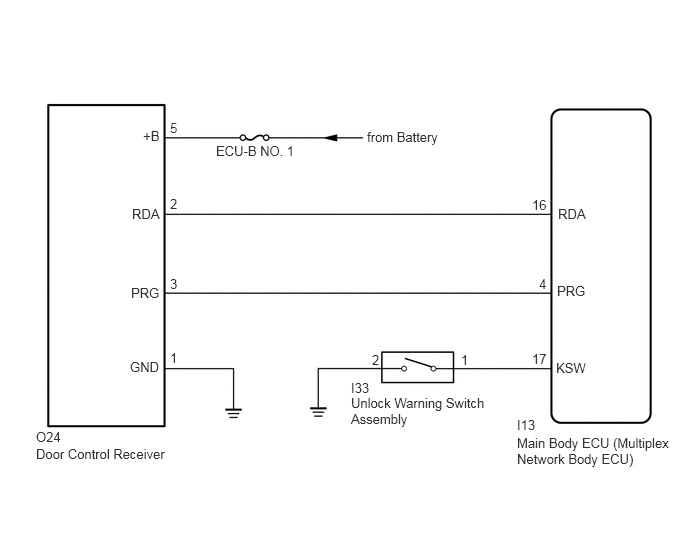
CAUTION / NOTICE / HINT
- NOTICE:
- ·
Inspect the fuses for circuits related to this system before performing the following procedure.
·When replacing or inspecting the door control receiver and wire harness, do not change the position or length of the wire harness. If the wire harness is too close to the door control receiver and wireless function performance may be affected.
PROCEDURE
Check the power door lock operation.
Click hereVehicle Interior>DOOR LOCK>POWER DOOR LOCK CONTROL SYSTEM>OPERATION CHECK
- OK:
Locked doors unlock.
- Result:
Proceed to OK NG
OK
NG
Click hereVehicle Interior>DOOR LOCK>POWER DOOR LOCK CONTROL SYSTEM>HOW TO PROCEED WITH TROUBLESHOOTING
Check that the key reminder warning buzzer operates normally.
Click hereVehicle Interior>DOOR LOCK>KEY REMINDER WARNING SYSTEM>OPERATION CHECK
- OK:
Key reminder warning buzzer operates normally.
- Result:
Proceed to OK NG
OK
NG
When a known good registered door control transmitter module set sub-assembly is used, check that the wireless functions operate normally.
- Result:
Result Proceed to Wireless door lock/unlock function operates normally with a known good door control transmitter module set sub-assembly. A Wireless door lock/unlock function does not operate. B
A
B
Check the transmitter battery level of the door control transmitter module set sub-assembly that was checked first.
Press and hold the lock switch of the transmitter for 3 seconds and check the number of times that the transmitter LED illuminates.
- Result:
Result Proceed to Transmitter LED does not illuminate when switch is pressed and held. A Transmitter LED illuminates 3 times or more when switch is pressed and held. B Transmitter LED illuminates once or twice but not a third time. C
A
B
C
Click hereVehicle Interior>DOOR LOCK>TRANSMITTER BATTERY(w/o Smart Entry and Start System)>REPLACEMENT
Inspect the battery capacity.
Remove the battery from the door control transmitter module set sub-assembly that does not operate (Click hereVehicle Interior>DOOR LOCK>TRANSMITTER BATTERY(w/o Smart Entry and Start System)>REPLACEMENT). Attach a lead wire (0.6 mm (0.0236 in.) in diameter or less including wire sheath) with tape or equivalent to the negative (-) terminal.
- NOTICE:
-
Do not wrap the lead wire around a terminal, wedge it between the terminals, or solder it. A terminal may be deformed or damaged, and the battery will not be able to be installed correctly.
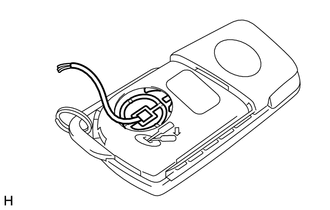
Carefully pull the lead wire out from the position shown in the illustration and install the previously removed transmitter battery.
- NOTICE:
-
When replacing the transmitter battery, before starting work, remove static electricity that has built up in the body by touching, for example, the vehicle to prevent the electrical key transmitter from being damaged.
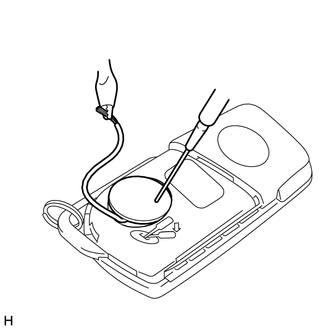
Check the transmitter battery voltage.
- HINT:
-
Measure the transmitter battery voltage while pressing the lock or unlock switch on the door control transmitter module set sub-assembly.
- Standard Voltage:
Item Content Tester Connection Transmitter battery positive (+) - Transmitter battery negative (-) Condition Ignition switch off, all doors closed and lock or unlock switch is pressed Specified Condition 2.5 to 3.2 V
- Result:
Proceed to OK NG
OK
NG
Click hereVehicle Interior>DOOR LOCK>TRANSMITTER BATTERY(w/o Smart Entry and Start System)>REPLACEMENT
Bring the door control transmitter module set sub-assembly near the door control receiver, and perform a wireless operation check.
- HINT:
- ·
When the door control transmitter module set sub-assembly is brought near the door control receiver, the possibility of wave interference decreases, and it can be determined if wave interference is causing the problem symptom.
·If the inspection result is that the problem only occurs in certain locations or times of day, the possibility of wave interference is high. Also, added vehicle components may cause wave interference. If installed, remove them and perform the operation check.
- OK:
Wireless functions operate normally.
- Result:
Proceed to OK NG
OK
NG
Switch to self-diagnostic mode by operating the ignition key cylinder.
Turn the interior light door switch on.
Make sure that the vehicle is in its initial condition. Then insert the key into the ignition key cylinder and remove it.
Within 5 seconds after removing the key, insert the key into the ignition key cylinder (ignition switch off). Then turn the ignition switch to ON and off.
Within 30 seconds after turning the ignition switch off, perform the following operation 9 times: turn the ignition switch to ON and then off.
- NOTICE:
-
If the system cannot enter self-diagnostic mode, the system returns to normal mode.
- HINT:
- ·
Turning the ignition switch to ON after the above operations have been completed ends self-diagnostic mode.
·Do not lock or unlock doors during self-diagnostic mode.
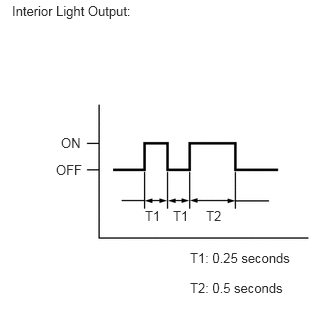
Check that the system has switched to self-diagnostic mode by checking the room light output pattern.
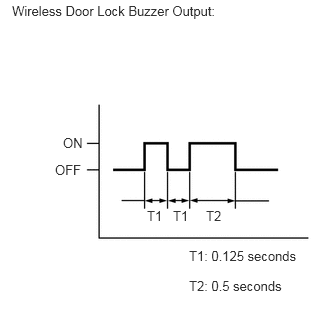
Check that the system has switched to self-diagnostic mode by checking the wireless door lock buzzer output pattern.
- Result:
Proceed to NEXT
NEXT
Inspect the diagnostic outputs when the door control transmitter module set sub-assembly switch is held down. The diagnostic outputs can be checked by the flash patterns of the interior lights and the buzzer patterns of the wireless door lock buzzer.
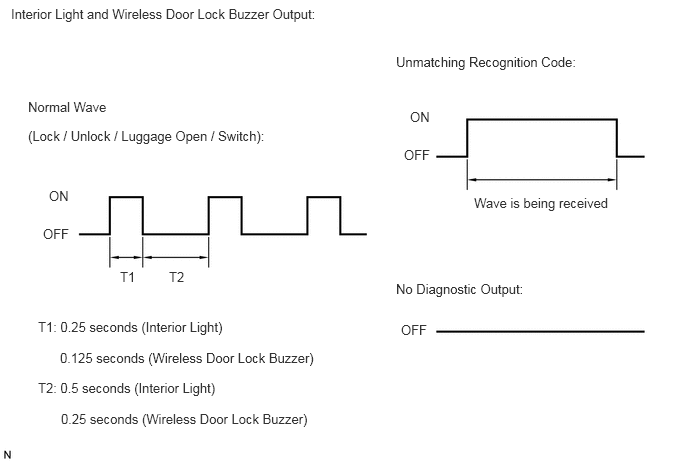
- Result:
Result Proceed to Normal wave (light flash pattern and buzzer pattern) is output. A Unmatching recognition code is output. B No diagnostic outputs. C
A
B
C
Check that the system can be switched to rewrite mode or add mode, and that a recognition code can be registered.
- OK:
Recognition code can be registered.
- Result:
Proceed to OK NG
OK
NG
Prepare the door control transmitter module set sub-assembly from another vehicle.
Press and hold down the door control transmitter module set sub-assembly switch.
Check that an unmatching recognition code is output.
- OK:
Unmatching recognition code is output.
- Result:
Proceed to OK NG
OK
NG
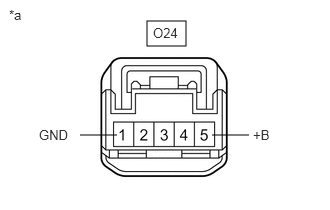
| *a | Front view of wire harness connector
(to Door Control Receiver) |
Disconnect the O24 door control receiver connector.
Measure the resistance according to the value(s) in the table below.
- Standard Resistance:
Tester Connection Condition Specified Condition O24-1 (GND) - Body ground Always Below 1 Ω
Measure the voltage according to the value(s) in the table below.
- Standard Voltage:
Tester Connection Condition Specified Condition O24-5 (+B) - Body ground Always 11 to 14 V
- Result:
Proceed to OK NG
OK
NG
Reconnect the O24 door control receiver connector.
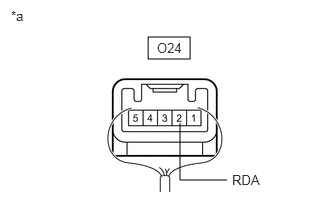
| *a | Component with harness connected
(Door Control Receiver) |
Measure the voltage according to the value(s) in the table below.
- Standard Voltage:
Tester Connection Condition Specified Condition O24-2 (RDA) - Body ground Ignition switch off, all doors closed and door control transmitter module set sub-assembly switch not pressed 11 to 14 V Ignition switch off, all doors closed and door control transmitter module set sub-assembly switch pressed Pulse generation
- Result:
Proceed to OK NG
OK
NG
Disconnect the I13 main body ECU (multiplex network body ECU) connector and the O24 door control receiver connector.
Measure the resistance according to the value(s) in the table below.
- Standard Resistance:
Tester Connection Condition Specified Condition I13-16 (RDA) - O24-2 (RDA) Always Below 1 Ω I13-16 (RDA) - Body ground Always 10 kΩ or higher I13-4 (PRG) - O24-3 (PRG) Always Below 1 Ω I13-4 (PRG) - Body ground Always 10 kΩ or higher
- Result:
Proceed to OK NG
OK
NG
Temporarily replace the door control receiver with a new or known good one.
Click hereVehicle Interior>DOOR LOCK>DOOR CONTROL RECEIVER>REMOVAL
- Result:
Proceed to NEXT
NEXT
Perform the Registration procedure.
- Result:
Proceed to NEXT
NEXT
Check that the doors can be locked and unlocked by using the door control transmitter module set sub-assembly lock and unlock switches.
- OK:
Doors can be locked and unlocked using door control transmitter module set sub-assembly.
- Result:
Proceed to OK NG
OK
NG