 |
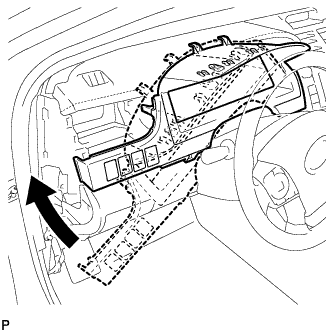
Temporarily install the instrument cluster finish panel assembly as shown in the illustration.
ENGINE SWITCH > INSTALLATION |
| 1. INSTALL ENGINE SWITCH |
Engage the 2 claws to install the engine switch.
| 2. INSTALL LOWER INSTRUMENT PANEL FINISH PANEL ASSEMBLY |
w/ Smart Key System:
Connect the connector.
Engage the 4 clips to install the lower instrument panel finish panel assembly.
| 3. INSTALL LOWER NO. 1 INSTRUMENT PANEL FINISH PANEL ASSEMBLY |
Engage the 4 claws, 9 clips and 3 guides.
Install the lower No. 1 instrument panel finish panel assembly with the bolt <B> and screw <C> or <D>.
| 4. CONNECT HOOD LOCK CONTROL LEVER SUB-ASSEMBLY |
Engage the claw and 2 guides to connect the hood lock control lever sub-assembly.
| 5. INSTALL FRONT PANEL GARNISH LH |
Engage the 3 claws, 2 clips and 8 guides to install the front panel garnish LH.
| 6. INSTALL INSTRUMENT CLUSTER FINISH PANEL ASSEMBLY |
|
Temporarily install the instrument cluster finish panel assembly as shown in the illustration.
Connect each connector.
Engage the 5 claws, 5 clips and 2 guides, and install the instrument cluster finish panel assembly.
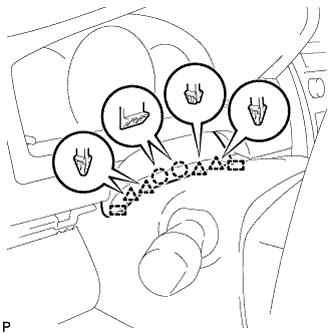 |
Engage the 2 claws, 4 clips and 2 guides.
| 7. INSTALL NO. 1 INSTRUMENT PANEL REGISTER ASSEMBLY |
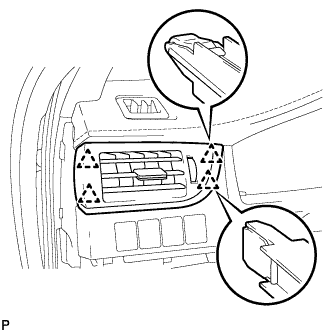 |
Engage the 4 clips to install the No. 1 instrument panel register assembly.
| 8. INSTALL NO. 1 INSTRUMENT CLUSTER FINISH PANEL GARNISH |
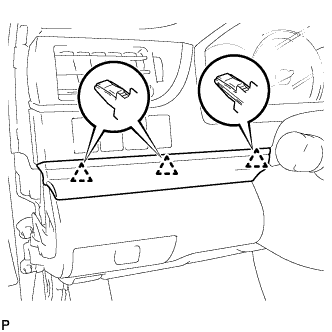 |
Engage the 3 clips to install the No. 1 instrument cluster finish panel garnish.
| 9. INSTALL INSTRUMENT SIDE PANEL LH |
Engage the 3 guides.
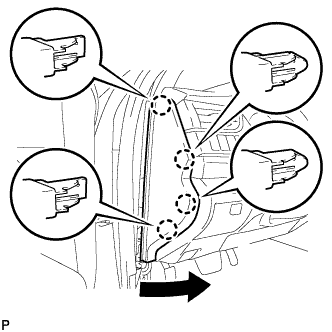 |
Engage the 4 claws to install the instrument side panel LH as shown in the illustration.
| 10. CONNECT FRONT DOOR OPENING TRIM WEATHERSTRIP LH |
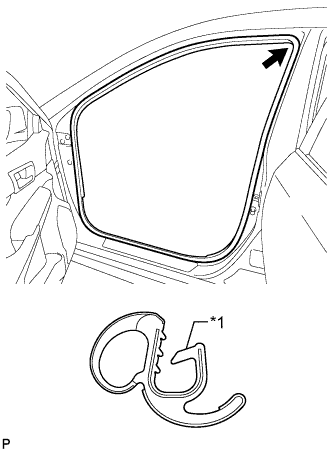 |
Align the alignment mark (Yellow) on the weatherstrip with the protruding portion on the body indicated by the arrow in the illustration, and install the front door opening trim weatherstrip LH.
| *1 | Alignment Mark (Yellow) |
| 11. INSTALL COWL SIDE TRIM SUB-ASSEMBLY LH |
Engage the 2 clips.
Install the cowl side trim sub-assembly LH with the clip.
| 12. INSTALL FRONT DOOR SCUFF PLATE LH |
Engage the 10 claws to install the front door scuff plate LH.
| 13. INSTALL RADIO RECEIVER ASSEMBLY WITH AIR CONDITIONING CONTROL ASSEMBLY (w/o Navigation System) |
| 14. INSTALL NAVIGATION RECEIVER ASSEMBLY WITH AIR CONDITIONING CONTROL ASSEMBLY (w/ Navigation System) |
| 15. CONNECT CABLE TO NEGATIVE BATTERY TERMINAL |