Home › Engine / Hybrid System ยท 2GR-FE › ENGINE MECHANICAL › ENGINE

ENGINE > ON-VEHICLE INSPECTION

for Preparation Click here


1. INSPECT ENGINE COOLANT
(Click here)


2. INSPECT ENGINE OIL
(Click here)


3. INSPECT BATTERY
(Click here)


4. INSPECT AIR CLEANER FILTER ELEMENT SUB-ASSEMBLY
  1. Remove the air cleaner filter element sub-assembly.

  1. Visually check that the air cleaner filter is not excessively damaged or oily. If necessary, replace the air cleaner filter.

    HINT:
    1. If there is any dirt or a blockage in the air cleaner filter element sub-assembly, clean it with compressed air.
    2. If any dirt or a blockage remains even after cleaning the air cleaner filter element sub-assembly with compressed air, replace it.

  1. Install the air cleaner filter element sub-assembly.


5. INSPECT V-RIBBED BELT
(Click here)


6. INSPECT V-RIBBED BELT TENSIONER ASSEMBLY
  1. Remove the V-ribbed belt (Click here).

  1. Check that nothing is caught in the tensioner by turning it clockwise and counterclockwise. If a malfunction exists, replace the tensioner.

  1. Install the V-ribbed belt (Click here).


7. INSPECT SPARK PLUG
(Click here)


8. INSPECT VALVE LASH ADJUSTER NOISE
  1. Rev up the engine several times. Check that the engine does not emit unusual noises.
    If unusual noises occur, warm up the engine and idle it for over 30 minutes. Then perform the preceding inspection.

    HINT:
    If any defects or problems are found during the preceding inspection, perform lash adjuster inspection .


9. INSPECT IGNITION TIMING
  1. Warm up and stop the engine.

    HINT:
    A warmed up engine should have an engine coolant temperature of over 80°C (176°F), an engine oil temperature of 60°C (140°F), and the engine speed should be stabilized.

  1. When using the Techstream:
    Check the ignition timing.

    1. Connect the Techstream to the DLC3.

    2. Start the engine and run it at idle.

    3. Turn the Techstream main switch on.

    4. Enter the following menus: Powertrain / Engine / Data List / IGN Advance.

      Standard ignition timing:
      9.5 to 24.5° BTDC at idle

      NOTICE:
      1. Check the ignition timing with the cooling fans off.
      2. Turn off all electrical systems and the A/C.
      3. When checking the ignition timing, the transaxle should be in neutral or park.

      HINT:
      Refer to the Techstream operator's manual for further details.

    5. Check that the ignition timing advances immediately when the engine speed is increased.

    6. Enter the following menus: Powertrain / Engine / Active Test / Connect the TC and TE1.

    7. Monitor IGN Advance.

    8. Perform the Active Test.

      Standard ignition timing:
      8 to 12° BTDC at idle

      NOTICE:
      When checking the ignition timing, the transaxle should be in neutral or park.

      HINT:
      Refer to the Techstream operator's manual for further details.


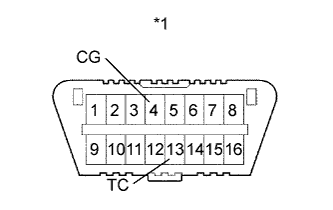
  1. When not using the Techstream:


      A122830E37
    1. Using SST, connect terminals 13 (TC) and 4 (CG) of the DLC3.
      Text in Illustration 
      *1
      DLC3

      SST
      09843-18040  

      NOTICE:
      1. Confirm the terminals before connecting them. Connecting the wrong terminals may result in damage to electrical components.
      2. Check the ignition timing with the cooling fans off.
      3. Turn off all the electrical systems and the A/C.
      4. When checking the ignition timing, the transaxle should be in neutral or park.

    2. Remove the V-bank cover sub-assembly .

    3. Connect the timing light tester probe to the ignition coil wire for No. 1 cylinder.

      NOTICE:
      Use a timing light that detects primary signals.

    4. Check the ignition timing at idle.

      Standard ignition timing:
      8 to 12° BTDC at idle

      NOTICE:
      When checking the ignition timing, the transaxle should be in neutral or park.

      HINT:
      Run the engine at 1000 to 1300 rpm for 5 seconds, and then check that the engine rpm returns to idle speed.

    5. Disconnect terminals 13 (TC) and 4 (CG) of the DLC3.

    6. Check the ignition timing at idle.

      Standard ignition timing:
      9.5 to 24.5° BTDC at idle

    7. Confirm that the ignition timing advances immediately when the engine rpm is increased.

    8. Remove the timing light from the engine.

    9. Install the V-bank cover sub-assembly .


10. INSPECT ENGINE IDLE SPEED
  1. Warm up and stop the engine.

    HINT:
    A warmed up engine should have an engine coolant temperature of over 80°C (176°F), an engine oil temperature of 60°C (140°F), and the engine speed should be stabilized.

  1. When using the Techstream:
    Check the idle speed.

    1. Connect the Techstream to the DLC3.

    2. Start the engine and run it at idle.

    3. Turn the Techstream main switch on.

    4. Enter the following menus: Powertrain / Engine / Data List / Engine Speed.

    5. Read the value displayed on the tester.

      Standard idle speed:
      600 to 700 rpm

      NOTICE:
      1. Check the idle speed with the cooling fans off.
      2. Turn off all the electrical systems and the A/C.
      3. When checking the idle speed, the transaxle should be in neutral or park.

      HINT:
      1. Refer to the Techstream operator's manual for further details.
      2. If the speed is not as specified, check the air intake system.


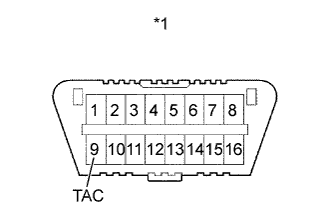
  1. When not using the Techstream:


      A122830E38
    1. Using SST, connect a tachometer probe to terminal 9 (TAC) of the DLC3.
      Text in Illustration 
      *1
      DLC3

      SST
      09843-18030  

    2. Check the idle speed.

      Standard idle speed:
      600 to 700 rpm

      NOTICE:
      1. Check the idle speed with the cooling fans off.
      2. Turn off all the electrical systems and the A/C.
      3. When checking the idle speed, the transaxle should be in neutral or park.

      HINT:
      If the speed is not as specified, check the air intake system.


11. INSPECT COMPRESSION
  1. Warm up and stop the engine.

    HINT:
    A warmed up engine should have an engine coolant temperature of over 80°C (176°F), an engine oil temperature of 60°C (140°F), and the engine speed should be stabilized.

  1. Remove the 6 spark plugs (Click here).


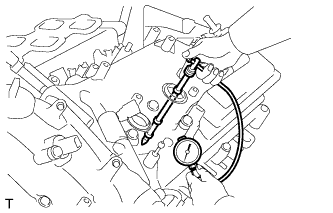
    A129621
  1. Check the cylinder compression pressure.

    1. Insert a compression gauge into the spark plug hole.

    2. While cranking the engine, measure the compression pressure.

      Standard compression pressure:
      1300 kPa (13 kgf/cm2, 189 psi)

      Minimum pressure:
      980 kPa (10 kgf/cm2, 142 psi)

      Difference between each cylinder:
      100 kPa (1.0 kgf/cm2, 15 psi)

      NOTICE:
      1. Always use a fully charged battery to obtain an engine speed of 250 rpm or more.
      2. Check the compression pressure of the other cylinders in the same way.
      3. This measurement must be done as quickly as possible.

    3. If the cylinder compression is low, pour a small amount of engine oil into the cylinder through the spark plug hole and inspect again.

      HINT:
      1. If adding oil increases the compression, the piston rings and/or cylinder bore may be worn or damaged.
      2. If the pressure stays low, a valve may be stuck or seated improperly, or there may be leakage in the gasket.

  1. Install the 6 spark plugs (Click here).


12. INSPECT CO/HC

HINT:
This check determines whether or not the idle CO/HC complies with regulations.

  1. Start the engine.

  1. Keep the engine speed at 2500 rpm for approximately 180 seconds.

  1. Insert the CO/HC meter testing probe at least 40 cm (1.31 ft.) into the tailpipe during idle.

  1. Immediately check CO/HC concentration during idle and when running at 2500 rpm.

    HINT:
    When performing the 2 mode (with the engine idling/running at 2500 rpm) test, follow the measurement order determined by applicable local regulations.
    If the CO/HC concentration does not comply with the regulations, perform troubleshooting in the order given below.


    1. Check the DTCs (Click here).

    2. See the table below for possible causes, then inspect and correct the applicable causes if necessary.

      CO
      HC
      Problem
      Cause
      Normal
      High
      Rough idle
      1. Faulty ignition:
        1. Incorrect valve timing
        2. Fouled, shorted or improperly gapped plugs
      2. Incorrect valve clearance (valve lash adjuster)
      3. Leaks in intake or exhaust valves
      4. Leaks in cylinders
      Low
      High
      Rough idle
      (Fluctuating HC reading)
      1. Vacuum leaks:
        1. PCV hoses
        2. Intake manifold
        3. Throttle body assembly
        4. Brake booster line
      2. Lean mixture causing misfire
      High
      High
      Rough idle
      (Black smoke from exhaust)
      1. Restricted air cleaner filter element sub-assembly
      2. Plugged PCV valve
      3. Faulty SFI system:
        1. Faulty fuel pressure regulator
        2. Defective engine coolant temperature sensor
        3. Defective mass air flow meter
        4. Faulty ECM
        5. Faulty injector assemblies
        6. Faulty throttle position sensor (built in throttle body assembly)