DOOR / HATCH FUEL LID LOCK CONTROL CABLE ASSEMBLY INSTALLATION
PROCEDURE

 77035
1.INSTALL FUEL LID LOCK CONTROL CABLE SUB-ASSEMBLY
Engage the 7 clamps and install the fuel lid lock control cable sub-assembly and luggage door lock control cable sub-assembly.
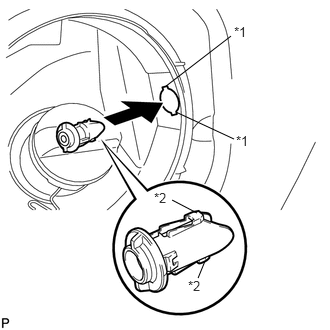
| *1 | Cutout |
| *2 | Guide <C> |
Align the cutouts and guides <C>, and then insert the fuel filler opening lid lock retainer.
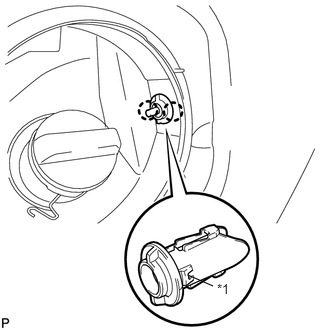
| *1 | Claw |
Engage the 2 claws and install the fuel filler opening lid lock retainer.
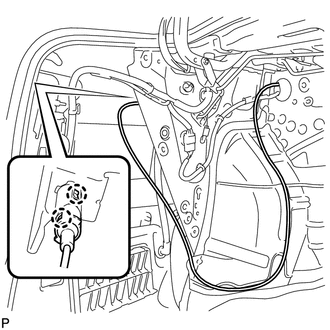
Engage the 2 claws and install the fuel lid lock control cable sub-assembly.
Install a new No. 2 noise control plate.
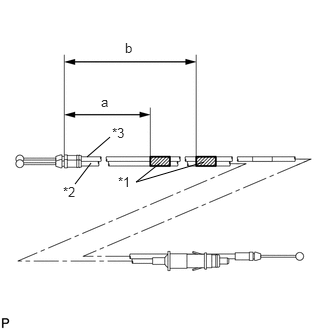
| *1 | Tape |
| *2 | Fuel Lid Lock Control Cable Sub-assembly |
| *3 | Luggage Door Lock Control Cable Sub-assembly |
Install the fuel lid lock control cable sub-assembly to the luggage door lock control cable sub-assembly with the 2 pieces of tape as shown in the illustration.
| Area | Measurement |
|---|---|
| a | 295 to 305 mm (11.6 to 12.0 in.) |
| b | 935 to 955 mm (36.8 to 37.6 in.) |
- NOTICE:
- ·
Wrap tape around the designated position 1 to 3 times.
·Make sure that the fuel lid lock control cable sub-assembly and luggage door lock control cable sub-assembly are not kinked.
Return the floor carpet to the original position.
Engage the 2 clamps and install the 2 scuff plate clips.
Engage the 3 clamps and connect the wire harness.
77306
2.INSTALL FUEL LID LOCK OPEN LEVER SUB-ASSEMBLY
64722
3.INSTALL LUGGAGE COMPARTMENT INNER TRIM COVER LH
64725D
4.INSTALL NO. 1 LUGGAGE COMPARTMENT TRIM HOOK
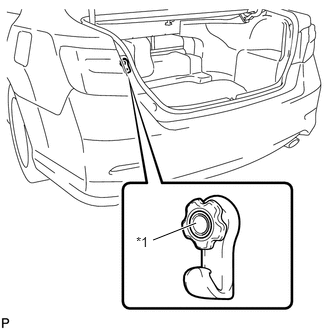
| *1 | Pin |
Engage the pin to install the No. 1 luggage compartment trim hook.
64717A
5.INSTALL LUGGAGE COMPARTMENT FRONT TRIM COVER
58387
6.INSTALL REAR FLOOR FINISH PLATE
64711
7.INSTALL LUGGAGE COMPARTMENT FLOOR MAT
8.INSTALL REAR SIDE SEATBACK ASSEMBLY LH
72693
9.INSTALL REAR SEAT CUSHION LOCK HOOK
10.INSTALL REAR SEAT CUSHION ASSEMBLY
67918A
11.INSTALL REAR DOOR SCUFF PLATE LH
- HINT:
-
Use the same procedure as for the RH side.
-
Click hereVehicle Interior>INTERIOR PANELS / TRIM>ROOF HEADLINING>INSTALLATION
62413A
12.INSTALL CENTER PILLAR LOWER GARNISH RH
73210
13.CONNECT FRONT SEAT OUTER BELT ASSEMBLY RH
73233
14.INSTALL LAP BELT OUTER ANCHOR COVER
62331A
15.INSTALL REAR DOOR OPENING TRIM WEATHERSTRIP RH
67917A
16.INSTALL REAR DOOR SCUFF PLATE RH
62311B
17.INSTALL FRONT DOOR OPENING TRIM WEATHERSTRIP RH
67913
18.INSTALL FRONT DOOR SCUFF PLATE RH
19.INSTALL FRONT SEAT ASSEMBLY RH