Home › Vehicle Exterior › LIGHTING (EXT) › LIGHTING SYSTEM › 2012.02–2015.04
RM2040EQ _59 Vehicle Exterior _014738 LIGHTING (EXT) _0075173 LIGHTING SYSTEM J

LIGHTING (EXT)  LIGHTING SYSTEM  Front Fog Light Circuit  


DESCRIPTION

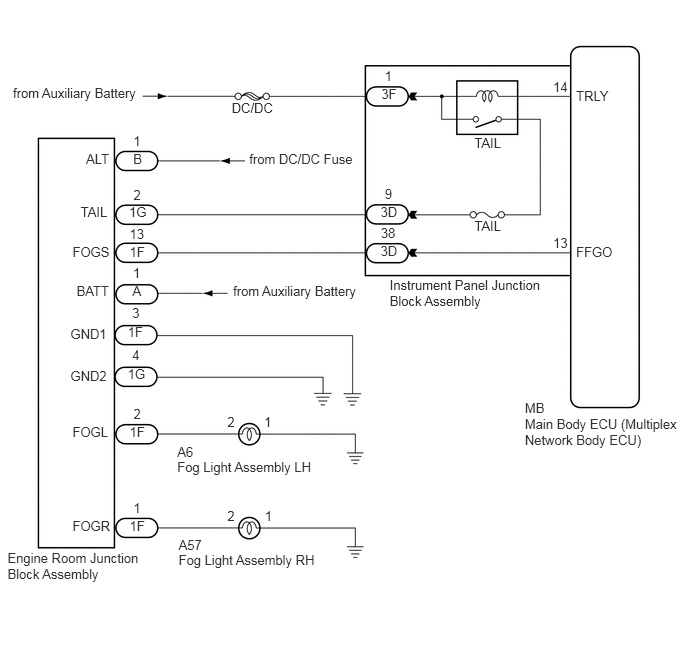
The main body ECU (multiplex network body ECU) controls the front fog lights via the engine room junction block assembly.

WIRING DIAGRAM
E235888E04
6.001,0.912 6.409,1.086 0.408,0.174 10 TRLY 6.001,2.544 6.409,2.719 0.408,0.174 10 FFGO 0.135,0.89 1.548,1.065 1.413,0.174 10 from Auxiliary Battery 4.059,2.883 5.685,3.215 1.625,0.332 10 Instrument Panel Junction Block Assembly 5.762,0.824 5.937,0.999 0.175,0.174 10 14 5.762,2.453 5.937,2.627 0.175,0.174 10 13 3.972,0.898 4.179,1.072 0.208,0.174 10 3F 4.008,0.712 4.102,0.887 0.095,0.174 10 1 3.964,2.126 4.187,2.300 0.223,0.174 10 3D 4.008,1.94 4.102,2.115 0.095,0.174 10 9 3.964,2.53 4.187,2.705 0.223,0.174 10 3D 3.967,2.345 4.142,2.519 0.174,0.174 10 38 1.345,2.13 1.558,2.305 0.213,0.174 10 1G 1.39,1.948 1.485,2.123 0.095,0.174 10 2 1.35,4.415 1.580,4.590 0.229,0.174 10 1F 1.39,4.23 1.485,4.404 0.095,0.174 10 2 1.35,5.391 1.580,5.566 0.229,0.174 10 1F 1.39,5.209 1.485,5.384 0.095,0.174 10 1 1.35,2.54 1.580,2.714 0.229,0.174 10 1F 0.84,2.13 1.175,2.305 0.335,0.174 10 TAIL 1.387,1.57 1.516,1.744 0.130,0.174 10 B 1.39,1.388 1.485,1.562 0.095,0.174 10 1 0.896,1.57 1.176,1.744 0.279,0.174 10 ALT 0.755,4.415 1.174,4.590 0.420,0.174 10 FOGL 0.755,5.391 1.174,5.566 0.420,0.174 10 FOGR 0.755,2.54 1.174,2.714 0.420,0.174 10 FOGS 1.35,2.358 1.524,2.532 0.174,0.174 10 13 2.413,1.045 2.878,1.220 0.465,0.174 10 DC/DC 4.941,1.408 5.254,1.583 0.313,0.174 10 TAIL 4.941,2.266 5.254,2.441 0.313,0.174 10 TAIL 5.467,4.329 7.108,4.661 1.641,0.332 10 Main Body ECU (Multiplex Network Body ECU) 5.467,4.17 5.780,4.345 0.313,0.174 10 MB 0.078,5.725 1.494,6.057 1.416,0.332 10 Engine Room Junction Block Assembly 1.846,4.627 2.070,4.801 0.224,0.174 10 A6 1.846,4.786 3.302,4.960 1.456,0.174 10 Fog Light Assembly LH 1.86,5.591 2.181,5.765 0.321,0.174 10 A57 1.86,5.75 3.339,5.924 1.479,0.174 10 Fog Light Assembly RH 2.368,4.316 2.462,4.490 0.095,0.174 10 2 2.752,4.316 2.846,4.490 0.095,0.174 10 1 2.368,5.297 2.462,5.471 0.095,0.174 10 2 2.759,5.297 2.853,5.471 0.095,0.174 10 1 2.428,2.95 3.848,3.124 1.420,0.174 10 from Auxiliary Battery 2.596,1.577 3.746,1.751 1.150,0.174 10 from DC/DC Fuse 1.331,3.38 1.560,3.555 0.230,0.174 10 1F 0.734,3.396 1.151,3.570 0.417,0.174 10 GND1 1.377,3.18 1.474,3.354 0.097,0.174 10 3 1.331,3.815 1.560,3.989 0.230,0.174 10 1G 0.734,3.83 1.151,4.005 0.417,0.174 10 GND2 1.377,3.614 1.474,3.788 0.097,0.174 10 4 1.379,2.944 1.518,3.119 0.139,0.174 10 A 1.386,2.758 1.483,2.932 0.097,0.174 10 1 0.797,2.944 1.173,3.119 0.376,0.174 10 BATT

CAUTION / NOTICE / HINT

NOTICE:

Inspect the fuses and bulbs for circuits related to this system before performing the following procedure.


PROCEDURE

1.CHECK OPERATION (TAILLIGHTS)
a.

Check the operation of the taillights.

OK:

Taillights operate normally.


Result:
Proceed to
OK
NG


OK

2.PERFORM ACTIVE TEST USING INTELLIGENT TESTER

NG

2.PERFORM ACTIVE TEST USING INTELLIGENT TESTER
a.

Connect the intelligent tester to the DLC3.


b.

Turn the power switch on (IG).


c.

Turn the intelligent tester on.


d.

Enter the following menus: Body / Main Body / Active Test.


e.

Check that the relay operates.

Body Electrical > Main Body > Active Test
Tester Display Measurement Item Control Range Diagnostic Note
Front Fog Light Relay Front fog light relay ON/OFF Light control switch is in tail position
Body Electrical > Main Body > Active Test
Tester Display
Front Fog Light Relay
50004 123 16
OK:

Front fog light relay operates. (Front fog lights come on.)


Result:
Proceed to
OK
NG


OK

PROCEED TO NEXT SUSPECTED AREA SHOWN IN PROBLEM SYMPTOMS TABLE

NG

3.CHECK ENGINE ROOM JUNCTION BLOCK ASSEMBLY
a.

Using a voltmeter, check the signal reading of the engine room junction block assembly.

Click herePower Source / Network>POWER DISTRIBUTION>INTEGRATION RELAY>ON-VEHICLE INSPECTION

OK:

Output signal reading is normal.


Result:
Proceed to
OK
NG


OK

4.CHECK HARNESS AND CONNECTOR (ENGINE ROOM JUNCTION BLOCK ASSEMBLY POWER SOURCE AND BODY GROUND)

NG

INSPECT ENGINE ROOM JUNCTION BLOCK ASSEMBLY (RESULTS OF SIGNAL READING CHECK)

4.CHECK HARNESS AND CONNECTOR (ENGINE ROOM JUNCTION BLOCK ASSEMBLY POWER SOURCE AND BODY GROUND)
a.

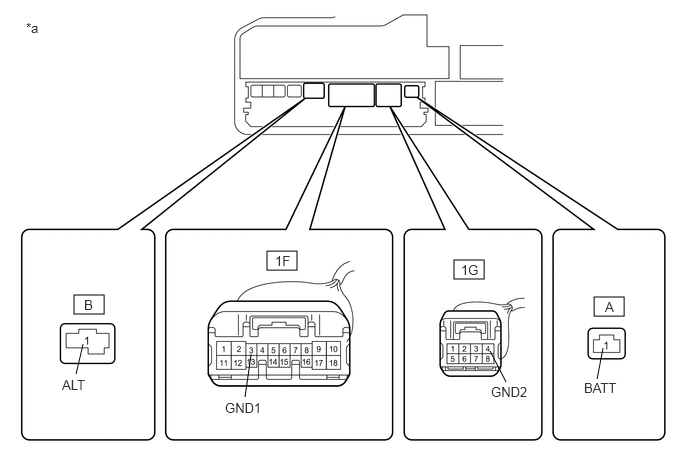
Remove the engine room junction block assembly from the engine room relay block and junction block assembly.
E230000C11
2.781,2.615 3.094,2.813 0.313,0.198 4.729,2.708 5.042,2.906 0.313,0.198 6.188,3.094 6.5,3.292 0.313,0.198 0.771,3.073 1.083,3.271 0.313,0.198 5.104,3.656 5.271,3.979 false 0.865,3.583 0.792,3.896 false 2.615,3.688 2.552,4.135 false 6.281,3.625 6.219,3.948 false 2.865,2.635 3.271,2.896 0.406,0.26 10 1F 4.802,2.729 5.469,3.125 0.667,0.396 10 1G 6.302,3.115 6.75,3.438 0.448,0.323 10 A 0.875,3.094 1.406,3.469 0.531,0.375 10 B 0.271,0.208 0.688,0.552 0.417,0.344 10 *a 6.083,3.958 6.781,4.323 0.698,0.365 10 BATT 5.115,4 5.823,4.333 0.708,0.333 10 GND2 2.344,4.167 3.24,4.542 0.896,0.375 10 GND1 0.646,3.927 1.5,4.344 0.854,0.417 10 ALT
*a Component without engine room junction block assembly
(Engine Room Relay Block and Junction Block Assembly)
- -


b.

Measure the voltage according to the value(s) in the table below.

Standard Voltage:
Tester Connection Condition Specified Condition
A-1 (BATT) - Body ground Power switch off 11 to 14 V
B-1 (ALT) - Body ground Power switch off 11 to 14 V


c.

Measure the resistance according to the value(s) in the table below.

Standard Resistance:
Tester Connection Condition Specified Condition
1F-3 (GND1) - Body ground Always Below 1 Ω
1G-4 (GND2) - Body ground Always Below 1 Ω


Result:
Proceed to
OK
NG


OK

5.CHECK HARNESS AND CONNECTOR (INSTRUMENT PANEL JUNCTION BLOCK ASSEMBLY - ENGINE ROOM JUNCTION BLOCK ASSEMBLY)

NG

REPAIR OR REPLACE HARNESS OR CONNECTOR

5.CHECK HARNESS AND CONNECTOR (INSTRUMENT PANEL JUNCTION BLOCK ASSEMBLY - ENGINE ROOM JUNCTION BLOCK ASSEMBLY)
a.

Disconnect the 3D instrument panel junction block assembly connector.


b.

Measure the resistance according to the value(s) in the table below.

Standard Resistance:
Tester Connection Condition Specified Condition
1G-2 (TAIL) - 3D-9 Always Below 1 Ω
3D-9 - Body ground Always 10 kΩ or higher
1F-13 (FOGS) - 3D-38 Always Below 1 Ω
3D-38 - Body ground Always 10 kΩ or higher


Result:
Proceed to
OK
NG


OK

6.INSPECT INSTRUMENT PANEL JUNCTION BLOCK ASSEMBLY

NG

REPAIR OR REPLACE HARNESS OR CONNECTOR

6.INSPECT INSTRUMENT PANEL JUNCTION BLOCK ASSEMBLY
a.

Remove the instrument panel junction block assembly.

Click herePower Source / Network>POWER DISTRIBUTION>MAIN BODY ECU>REMOVAL


b.

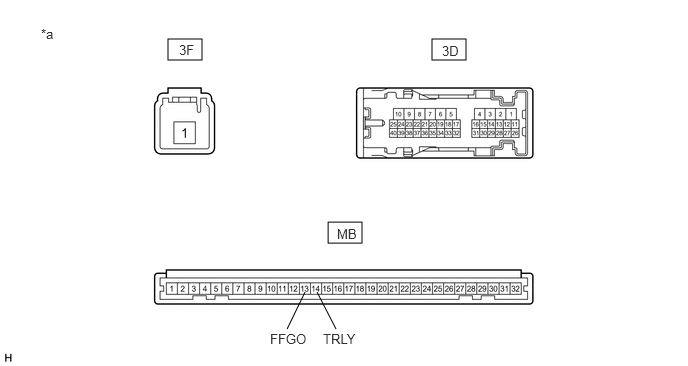
Remove the main body ECU (multiplex network body ECU) from the instrument panel junction block assembly.
E173042C13
4.5,0.406 4.854,0.625 0.354,0.219 3.417,2.313 3.771,2.531 0.354,0.219 1.75,0.406 2.104,0.625 0.354,0.219 3.177,3.042 2.99,3.427 false 3.302,3.042 3.5,3.427 false 0.427,0.271 0.625,0.427 0.198,0.156 10 false *a 2.813,3.448 3.313,3.719 0.5,0.271 10 false FFGO 3.365,3.448 4.031,3.656 0.667,0.208 10 false TRLY 4.604,0.448 5.042,0.677 0.438,0.229 10 false 3D 3.51,2.354 4.146,2.656 0.635,0.302 10 false MB 1.865,0.438 2.292,0.688 0.427,0.25 10 false 3F
*a Component without harness connected
(Instrument Panel Junction Block Assembly)
- -


c.

Measure the resistance according to the value(s) in the table below.

Standard Resistance:
Tester Connection Condition Specified Condition
MB-13 (FFGO) - 3D-38 Always Below 1 Ω
3D-38 - Body ground Always 10 kΩ or higher


d.

Connect a positive (+) lead from the auxiliary battery to terminal 3F-1.


e.

Connect a negative (-) lead from the auxiliary battery to terminal MB-14.


f.

Measure the voltage according to the value(s) in the table below.

Standard Voltage:
Tester Connection Condition Specified Condition
3D-9 - Body ground Always 11 to 14 V


Result:
Proceed to
OK
NG


OK

7.CHECK ENGINE ROOM JUNCTION BLOCK ASSEMBLY

NG

REPLACE INSTRUMENT PANEL JUNCTION BLOCK ASSEMBLY

7.CHECK ENGINE ROOM JUNCTION BLOCK ASSEMBLY
a.

Replace the engine room junction block assembly with a new or a known good one.

Click herePower Source / Network>POWER DISTRIBUTION>INTEGRATION RELAY>REMOVAL


b.

Check that the fog lights operate normally.

OK:

The fog lights operate normally.


Result:
Proceed to
OK
NG


OK

END (ENGINE ROOM JUNCTION BLOCK ASSEMBLY WAS DEFECTIVE)

NG

REPLACE MAIN BODY ECU (MULTIPLEX NETWORK BODY ECU)