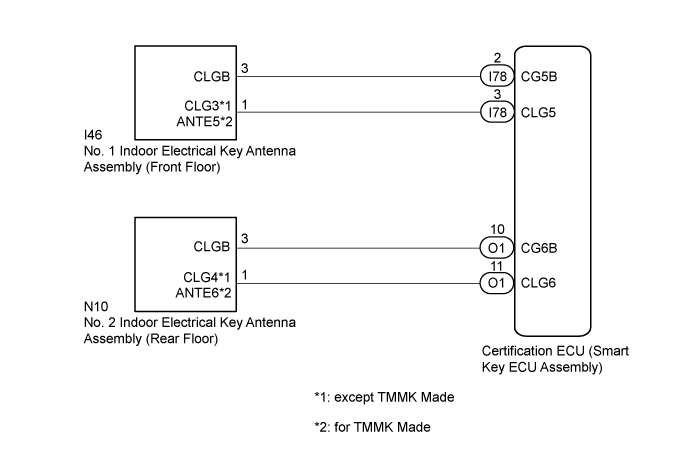
SMART ENTRY AND START SYSTEM (for Entry Function) > Room Oscillator does not Recognize Key |
| 1.CHECK ENTRY DOOR LOCK OPERATION |
Check that the entry lock and unlock functions operate for each door (Click here).
|
| ||||
| OK | |
 |
| 2.CHECK PUSH START FUNCTION |
 |
Remove the transmitter battery of the electrical key transmitter sub-assembly (Click here).
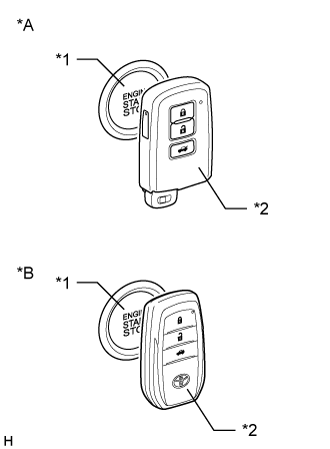
With the brake pedal depressed, hold the electrical key transmitter sub-assembly near the engine switch and then press the engine switch.
When operating the engine switch, check whether the engine starts.
| *A | for Type A |
| *B | for Type B |
| *1 | Engine Switch |
| *2 | Electrical Key Transmitter Sub-assembly |
| Result | Proceed to |
| Engine starts (w/ Wireless Charging System) | A |
| Engine starts (w/o Wireless Charging System) | B |
| Engine does not start | C |
|
| ||||
|
| ||||
| A | |
|
| 3.CHECK WIRELESS CHARGING SYSTEM |
Turn the wireless charging system off (Click here).
Check that interior verification is normal.
| Result | Proceed to |
| Interior verification is abnormal | A |
| Interior verification is normal | B |
|
| ||||
| A | |
|
| 4.CHECK WAVE ENVIRONMENT |
Install the transmitter battery to the electrical key transmitter sub-assembly (Click here).
Bring the electrical key transmitter sub-assembly near the No. 1 indoor electrical key antenna assembly (front floor) and perform a smart entry and start system check (Click here).
Bring the electrical key transmitter sub-assembly near the No. 2 indoor electrical key antenna assembly (rear floor) and perform a smart entry and start system check (Click here)
| Result | Proceed to |
| System cannot be operated | A |
| System can be operated | B |
|
| ||||
| A | |
|
| 5.CHECK KEY DIAGNOSTIC MODE |
Check the following antennas in the key diagnostic mode (Click here).
Select either channel 1 or channel 2 and inspect the key diagnostic mode for each channel.
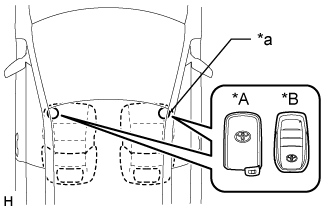 |
Check the No. 1 indoor electrical key antenna assembly (front floor).
| *A | for Type A |
| *B | for Type B |
| *a | Inspection Point |
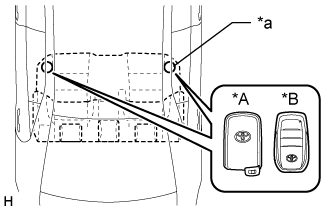 |
Check the No. 2 indoor electrical key antenna assembly (rear floor).
| *A | for Type A |
| *B | for Type B |
| *a | Inspection Point |
| Result | Proceed to |
| Front operation check fails | A |
| Rear operation check fails | B |
| Front and rear operation checks are normal | C |
|
| ||||
|
| ||||
| A | |
|
| 6.CHECK HARNESS AND CONNECTOR (NO. 1 INDOOR ELECTRICAL KEY ANTENNA - CERTIFICATION ECU) |
Disconnect the I46 No. 1 indoor electrical key antenna assembly (front floor) connector.
Disconnect the I78 certification ECU (smart key ECU assembly) connector.
Measure the resistance according to the value(s) in the table below.
| Tester Connection | Condition | Specified Condition |
| I46-1 (CLG3) - I78-3 (CLG5) | Always | Below 1 Ω |
| I46-3 (CLGB) - I78-2 (CG5B) | Always | Below 1 Ω |
| I46-1 (CLG3) or I78-3 (CLG5) - Body ground | Always | 10 kΩ or higher |
| I46-3 (CLGB) or I78-2 (CG5B) - Body ground | Always | 10 kΩ or higher |
| Tester Connection | Condition | Specified Condition |
| I46-1 (ANTE5) - I78-3 (CLG5) | Always | Below 1 Ω |
| I46-3 (CLGB) - I78-2 (CG5B) | Always | Below 1 Ω |
| I46-1 (ANTE5) or I78-3 (CLG5) - Body ground | Always | 10 kΩ or higher |
| I46-3 (CLGB) or I78-2 (CG5B) - Body ground | Always | 10 kΩ or higher |
|
| ||||
| OK | |
|
| 7.CHECK CERTIFICATION ECU (SMART KEY ECU ASSEMBLY) (OUTPUT TO NO. 1 INDOOR ELECTRICAL KEY ANTENNA) |
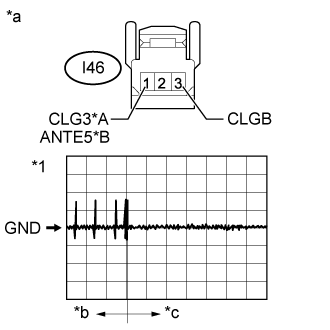 |
Disconnect the I46 No. 1 indoor electrical key antenna assembly (front floor) connector.
Connect the I78 certification ECU (smart key ECU assembly) connector.
Using an oscilloscope, check the waveform.
| Tester Connection | Switch Condition | Tool Setting | Specified Condition |
| I46-1 (CLG3) - I46-3 (CLGB) | Procedure:
| 2 V/DIV., 500 ms/DIV. | Pulse generation (See waveform) |
| Tester Connection | Switch Condition | Tool Setting | Specified Condition |
| I46-1 (ANTE5) - I46-3 (CLGB) | Procedure:
| 2 V/DIV., 500 ms/DIV. | Pulse generation (See waveform) |
| *A | except TMMK Made |
| *B | for TMMK Made |
| *1 | Waveform |
| *a | Front view of wire harness connector (to No. 1 indoor Electrical Key Antenna [Front Floor]) |
| *b | Within approximately 30 seconds from when the door is closed |
| *c | After approximately 30 seconds from when the door is closed |
|
| ||||
| OK | |
|
| 8.REPLACE NO. 1 INDOOR ELECTRICAL KEY ANTENNA ASSEMBLY (FRONT FLOOR) |
Temporarily replace the No. 1 indoor electrical key antenna assembly (front floor) with a new or known good one (Click here).
| NEXT | |
|
| 9.CHECK KEY DIAGNOSTIC MODE |
Check the following antenna in the key diagnostic mode (Click here).
Select either channel 1 or channel 2 and inspect the key diagnostic mode for each channel.
|
Check the No. 1 indoor electrical key antenna assembly (front floor).
When the electrical key transmitter sub-assembly is at the inspection point, check that the wireless door lock buzzer sounds.
| *A | for Type A |
| *B | for Type B |
| *a | Inspection Point |
|
| ||||
| OK | ||
 | ||
| ||
| 10.CHECK HARNESS AND CONNECTOR (NO. 2 INDOOR ELECTRICAL KEY ANTENNA - CERTIFICATION ECU) |
Disconnect the N10 No. 2 indoor electrical key antenna assembly (rear floor) connector.
Disconnect the O1 certification ECU (smart key ECU assembly) connector.
Measure the resistance according to the value(s) in the table below.
| Tester Connection | Condition | Specified Condition |
| N10-1 (CLG4) - O1-11 (CLG6) | Always | Below 1 Ω |
| N10-3 (CLGB) - O1-10 (CG6B) | Always | Below 1 Ω |
| N10-1 (CLG4) or O1-11 (CLG6) - Body ground | Always | 10 kΩ or higher |
| N10-3 (CLGB) or O1-10 (CG6B) - Body ground | Always | 10 kΩ or higher |
| Tester Connection | Condition | Specified Condition |
| N10-1 (ANTE6) - O1-11 (CLG6) | Always | Below 1 Ω |
| N10-3 (CLGB) - O1-10 (CG6B) | Always | Below 1 Ω |
| N10-1 (ANTE6) or O1-11 (CLG6) - Body ground | Always | 10 kΩ or higher |
| N10-3 (CLGB) or O1-10 (CG6B) - Body ground | Always | 10 kΩ or higher |
|
| ||||
| OK | |
|
| 11.CHECK CERTIFICATION ECU (SMART KEY ECU ASSEMBLY) (OUTPUT TO NO. 2 INDOOR ELECTRICAL KEY ANTENNA) |
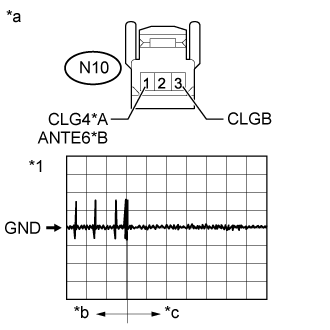 |
Disconnect the N10 No. 2 indoor electrical key antenna assembly (rear floor) connector.
Connect the O1 certification ECU (smart key ECU assembly) connector.
Using an oscilloscope, check the waveform.
| Tester Connection | Switch Condition | Tool Setting | Specified Condition |
| N10-1 (CLG4) - N10-3 (CLGB) | Procedure:
| 2 V/DIV., 500 ms/DIV. | Pulse generation (See waveform) |
| Tester Connection | Switch Condition | Tool Setting | Specified Condition |
| N10-1 (ANTE6) - N10-3 (CLGB) | Procedure:
| 2 V/DIV., 500 ms/DIV. | Pulse generation (See waveform) |
| *A | except TMMK Made |
| *B | for TMMK Made |
| *1 | Waveform |
| *a | Front view of wire harness connector (to No. 2 indoor Electrical Key Antenna [Rear Floor]) |
| *b | Within approximately 30 seconds from when the door is closed |
| *c | After approximately 30 seconds from when the door is closed |
|
| ||||
| OK | |
|
| 12.REPLACE NO. 2 INDOOR ELECTRICAL KEY ANTENNA ASSEMBLY (REAR FLOOR) |
Temporarily replace the No. 2 indoor electrical key antenna assembly (rear floor) with a new or known good one (Click here).
| NEXT | |
|
| 13.CHECK KEY DIAGNOSTIC MODE |
Check the following antenna in the key diagnostic mode (Click here).
Select either channel 1 or channel 2 and inspect the key diagnostic mode for each channel.
|
Check the No. 2 indoor electrical key antenna assembly (rear floor).
When the electrical key transmitter sub-assembly is at the inspection point, check that the wireless door lock buzzer sounds.
| *A | for Type A |
| *B | for Type B |
| *a | Inspection Point |
|
| ||||
| OK | ||
| ||
| ||

