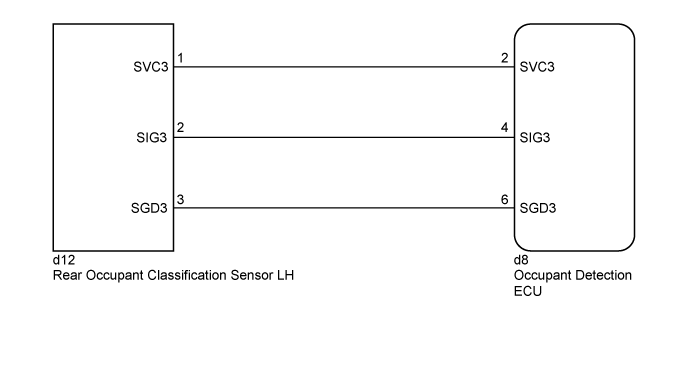
DTC B1782 Rear Occupant Classification Sensor LH Circuit Malfunction |
| DTC No. | DTC Detection Condition | Trouble Area |
| B1782 |
|
|
| 1.CHECK CONNECTORS |
Turn the engine switch off.
Disconnect the cable from the negative (-) battery terminal.
Check that the connectors are properly connected to the occupant detection ECU and rear occupant classification sensor LH.
Disconnect the connectors from the occupant detection ECU and rear occupant classification sensor LH.
Check that the terminals of the connectors are not damaged.
|
| ||||
| OK | |
 |
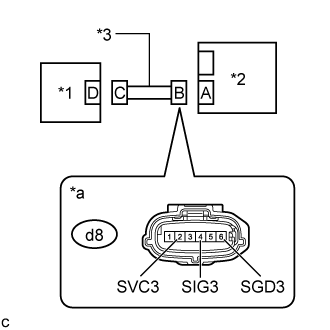
| 2.CHECK FRONT SEAT WIRE RH (SHORT TO B+) |
 |
Connect the cable to the negative (-) battery terminal.
Turn the engine switch on (IG).
Measure the voltage according to the value(s) in the table below.
| Tester Connection | Condition | Specified Condition |
| d8-2 (SVC3) - Body ground | Engine switch on (IG) | Below 1 V |
| d8-4 (SIG3) - Body ground | Engine switch on (IG) | Below 1 V |
| d8-6 (SGD3) - Body ground | Engine switch on (IG) | Below 1 V |
Turn the engine switch off.
Disconnect the cable from the negative (-) battery terminal.
| *1 | Rear Occupant Classification Sensor LH |
| *2 | Occupant Detection ECU |
| *3 | Front Seat Wire RH |
| *a | Front view of wire harness connector (to Occupant Detection ECU) |
|
| ||||
| OK | |
|
| 3.CHECK FRONT SEAT WIRE RH (OPEN) |
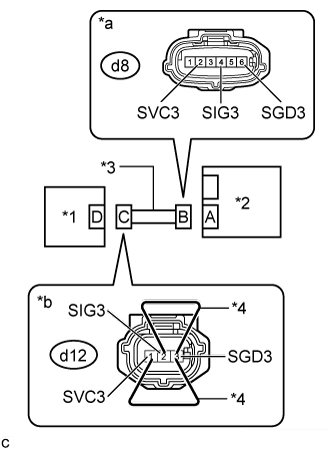 |
Using service wires, connect terminals 1 (SVC3) and 3 (SGD3), and connect terminals 2 (SIG3) and 3 (SGD3) of connector C.
Measure the resistance according to the value(s) in the table below.
| Tester Connection | Condition | Specified Condition |
| d8-2 (SVC3) - d8-6 (SGD3) | Always | Below 1 Ω |
| d8-4 (SIG3) - d8-6 (SGD3) | Always | Below 1 Ω |
Disconnect the service wires from connector C.
| *1 | Rear Occupant Classification Sensor LH |
| *2 | Occupant Detection ECU |
| *3 | Front Seat Wire RH |
| *4 | Service Wire |
| *a | Front view of wire harness connector (to Occupant Detection ECU) |
| *b | Front view of wire harness connector (to Rear Occupant Classification Sensor LH) |
|
| ||||
| OK | |
|
| 4.CHECK FRONT SEAT WIRE RH (SHORT) |
|
Measure the resistance according to the value(s) in the table below.
| Tester Connection | Condition | Specified Condition |
| d8-2 (SVC3) - d8-6 (SGD3) | Always | 1 MΩ or higher |
| d8-4 (SIG3) - d8-6 (SGD3) | Always | 1 MΩ or higher |
| d8-2 (SVC3) - d8-4 (SIG3) | Always | 1 MΩ or higher |
| *1 | Rear Occupant Classification Sensor LH |
| *2 | Occupant Detection ECU |
| *3 | Front Seat Wire RH |
| *a | Front view of wire harness connector (to Occupant Detection ECU) |
|
| ||||
| OK | |
|
| 5.CHECK FRONT SEAT WIRE RH (SHORT TO GROUND) |
|
Measure the resistance according to the value(s) in the table below.
| Tester Connection | Condition | Specified Condition |
| d8-2 (SVC3) - Body ground | Always | 1 MΩ or higher |
| d8-4 (SIG3) - Body ground | Always | 1 MΩ or higher |
| d8-6 (SGD3) - Body ground | Always | 1 MΩ or higher |
| *1 | Rear Occupant Classification Sensor LH |
| *2 | Occupant Detection ECU |
| *3 | Front Seat Wire RH |
| *a | Front view of wire harness connector (to Occupant Detection ECU) |
|
| ||||
| OK | |
|
| 6.CHECK DTC |
Connect the connectors to the occupant detection ECU and rear occupant classification sensor LH.
Connect the cable to the negative (-) battery terminal.
Clear the DTCs stored in the occupant detection ECU (Click here).
Clear the DTCs stored in the airbag sensor assembly (Click here).
Turn the engine switch off.
Turn the engine switch on (IG).
Check for DTCs (Click here).
Turn the engine switch off.
|
| ||||
| OK | ||
 | ||
| ||
| 7.CHECK OCCUPANT DETECTION ECU |
Disconnect the cable from the negative (-) battery terminal.
Replace the occupant detection ECU with a known good one (Click here).
Connect the cable to the negative (-) battery terminal.
Clear the DTCs stored in the occupant detection ECU (Click here).
Clear the DTCs stored in the airbag sensor assembly (Click here).
Turn the engine switch off.
Turn the engine switch on (IG).
Check for DTCs (Click here).
Turn the engine switch off.
Disconnect the cable from the negative (-) battery terminal.
Restore the occupant detection ECU that was installed for testing to its original location (Click here).
|
| ||||
| OK | |
|
| 8.REPLACE OCCUPANT DETECTION ECU |
Turn the engine switch off.
Disconnect the cable from the negative (-) battery terminal.
Replace the occupant detection ECU with a new one (Click here).
Connect the cable to the negative (-) battery terminal.
| NEXT | |
|
| 9.PERFORM ZERO POINT CALIBRATION AND SENSITIVITY CHECK |
Using the GTS, perform Zero Point Calibration and Sensitivity Check (Click here).
| NEXT | ||
| ||
| ||
| 10.REPLACE FRONT SEAT FRAME WITH ADJUSTER ASSEMBLY RH |
Turn the engine switch off.
Disconnect the cable from the negative (-) battery terminal.
Replace the front seat frame with adjuster assembly RH (Click here for Manual Seat, Click here for Power Seat).
Connect the cable to the negative (-) battery terminal.
| NEXT | |
|
| 11.PERFORM ZERO POINT CALIBRATION AND SENSITIVITY CHECK |
Using the GTS, perform Zero Point Calibration and Sensitivity Check (Click here).
| NEXT | ||
| ||
| ||
| 12.REPLACE FRONT SEAT FRAME WITH ADJUSTER ASSEMBLY RH |
Replace the front seat frame with adjuster assembly RH (Click here for Manual Seat, Click here for Power Seat).
Connect the cable to the negative (-) battery terminal.
| NEXT | |
|
| 13.PERFORM ZERO POINT CALIBRATION AND SENSITIVITY CHECK |
Using the GTS, perform Zero Point Calibration and Sensitivity Check (Click here).
| NEXT | ||
| ||
| ||

