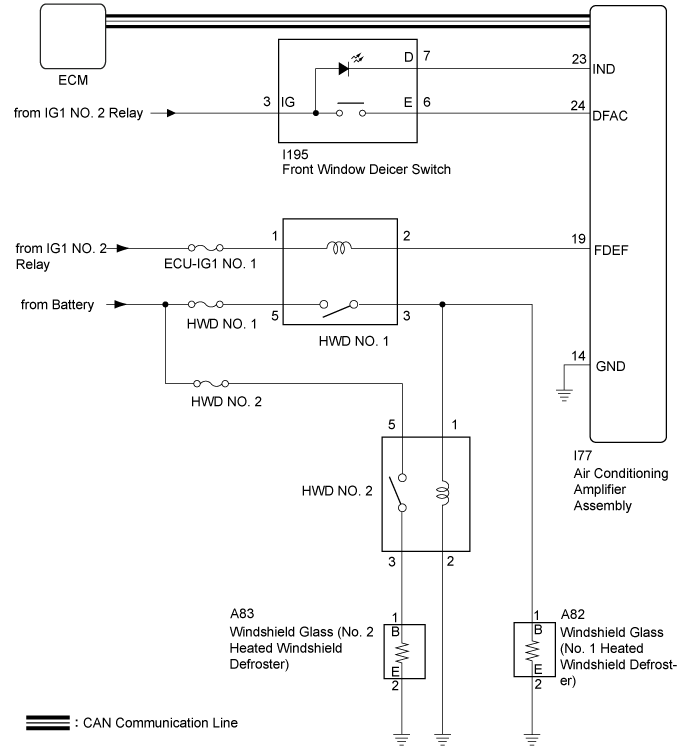
HEATED WINDSHIELD DEFROSTER SYSTEM > Heated Windshield Defroster System does not operate |
| 1.CHECK AIR CONDITIONING SYSTEM |
(a) Check that the air conditioning system can be operated using the remote touch.
|
| ||||
| OK | |
 |
| 2.CHECK HEATED WINDSHIELD DEFROSTER SYSTEM |
Activate the heated windshield defroster system and check the symptoms.
| Result | Proceed to |
| Both heated windshield defrosters do not warm up. | A |
| Only No. 1 heated windshield defroster does not warm up. | B |
| Only No. 2 heated windshield defroster does not warm up. | C |
|
| ||||
|
| ||||
| A | |
|
| 3.PERFORM ACTIVE TEST USING GTS |
Connect the GTS to the DLC3.
Turn the engine switch on (IG).
Turn the GTS on.
Enter the following menus: Body Electrical / Air Conditioner / Active Test.
Perform the Active Test according to the display on the GTS.
| Tester Display | Test Part | Control Range | Diagnostic Note |
| HWD Relay | HWD relay | OFF or ON | - |
|
| ||||
| OK | |
|
| 4.INSPECT FRONT WINDOW DEICER SWITCH |
Remove the front window deicer switch (Click here).
Inspect the front window deicer switch (Click here).
|
| ||||
| OK | |
|
| 5.CHECK HARNESS AND CONNECTOR (FRONT WINDOW DEICER SWITCH - POWER SUPPLY) |
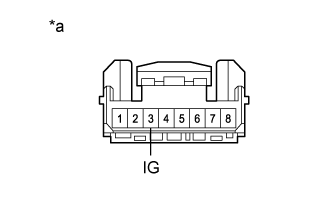 |
Measure the voltage according to the value(s) in the table below.
| Tester Connection | Condition | Specified Condition |
| I195-3 (IG) - Body ground | Engine switch off | Below 1 V |
| I195-3 (IG) - Body ground | Engine switch on (IG) | 11 to 14 V |
| *a | Front view of wire harness connector (to Front Window Deicer Switch) |
|
| ||||
| OK | |
|
| 6.CHECK HARNESS AND CONNECTOR (FRONT WINDOW DEICER SWITCH - AIR CONDITIONING AMPLIFIER ASSEMBLY) |
Disconnect the I77 air conditioning amplifier assembly connector.
Measure the resistance according to the value(s) in the table below.
| Tester Connection | Condition | Specified Condition |
| I195-7 (D) - I77-23 (IND) | Always | Below 1 Ω |
| I195-7 (D) or I77-23 (IND) - Body ground | Always | 10 kΩ or higher |
| I195-6 (E) - I77-24 (DFAC) | Always | Below 1 Ω |
| I195-6 (E) or I77-24 (DFAC) - Body ground | Always | 10 kΩ or higher |
|
| ||||
| OK | ||
 | ||
| ||
| 7.INSPECT HWD1 RELAY |
Inspect the HWD1 relay (Click here).
|
| ||||
| OK | |
|
| 8.CHECK HARNESS AND CONNECTOR (HWD NO. 1 RELAY - POWER SUPPLY) |
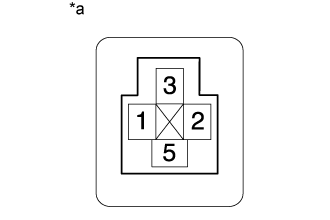 |
Measure the voltage according to the value(s) in the table below.
| Tester Connection | Condition | Specified Condition |
| HWD1 relay holder terminal-2 - Body ground | Engine switch off | Below 1 V |
| HWD1 relay holder terminal-2 - Body ground | Engine switch on (IG) | 11 to 14 V |
| HWD1 relay holder terminal-5 - Body ground | Always | 11 to 14 V |
| *a | HWD No. 1 Relay Holder |
|
| ||||
| OK | |
|
| 9.CHECK HARNESS AND CONNECTOR (HWD NO. 1 RELAY - AIR CONDITIONING AMPLIFIER ASSEMBLY) |
|
Disconnect the I77 air conditioning amplifier assembly connector.
Measure the resistance according to the value(s) in the table below.
| Tester Connection | Condition | Specified Condition |
| HWD1 relay holder terminal-1 - I77-19 (FDEF) | Always | Below 1 Ω |
| HWD1 relay holder terminal-1 or I77-19 (FDEF) - Body ground | Always | 10 kΩ or higher |
| *a | HWD No. 1 Relay Holder |
|
| ||||
| OK | |
|
| 10.CHECK HARNESS AND CONNECTOR (HWD NO. 1 RELAY - HWD NO. 2 RELAY) |
Disconnect the A82 windshield glass (No. 1 heated windshield defroster) connector.
Remove the HWD No. 2 relay from the No. 2 engine room relay block and junction block assembly.
|
Measure the resistance according to the value(s) in the table below.
| Tester Connection | Condition | Specified Condition |
| HWD1 relay holder terminal-3 - HWD2 relay holder terminal-2 | Always | Below 1 Ω |
| HWD1 relay holder terminal-3 or HWD2 relay holder terminal-2 - Body ground | Always | 10 kΩ or higher |
| *a | HWD No. 1 Relay and HWD No. 2 Relay Holder |
|
| ||||
| OK | ||
| ||
| ||
| 11.CHECK HARNESS AND CONNECTOR (WINDSHIELD GLASS (NO. 1 HEATED WINDSHIELD DEFROSTER) - HWD NO. 1 RELAY AND BODY GROUND) |
Remove the HWD No. 1 relay and HWD No. 2 relay from the No. 2 engine room relay block and junction block assembly.
Disconnect the A82 windshield glass (No. 1 heated windshield defroster) connector.
|
Measure the resistance according to the value(s) in the table below.
| Tester Connection | Condition | Specified Condition |
| HWD1 relay holder terminal-3 - A82-1 (B) | Always | Below 1 Ω |
| HWD1 relay holder terminal-3 or A82-1 (B) - Body ground | Always | 10 kΩ or higher |
| A82-2 (E) - Body ground | Always | Below 1 Ω |
| *a | HWD No. 1 Relay and HWD No. 2 Relay Holder |
|
| ||||
| OK | ||
| ||
| ||
| 12.INSPECT HWD2 RELAY |
Inspect the HWD2 relay (Click here).
|
| ||||
| OK | |
|
| 13.CHECK HARNESS AND CONNECTOR (HWD NO. 2 RELAY - POWER SUPPLY) |
|
Measure the voltage according to the value(s) in the table below.
| Tester Connection | Condition | Specified Condition |
| HWD2 relay holder terminal-5 - Body ground | Always | 11 to 14 V |
| *a | HWD No. 2 Relay Holder |
|
| ||||
| OK | |
|
| 14.CHECK HARNESS AND CONNECTOR (HWD NO. 2 RELAY - HWD NO. 1 RELAY AND BODY GROUND) |
Remove the HWD1 relay from the No. 2 engine room relay block and junction block assembly.
|
Measure the resistance according to the value(s) in the table below.
| Tester Connection | Condition | Specified Condition |
| HWD1 relay holder terminal-3 - HWD2 relay holder terminal-2 | Always | Below 1 Ω |
| HWD2 relay holder terminal-1 - Body ground | Always | Below 1 Ω |
| *a | HWD No. 1 Relay and HWD No. 2 Relay Holder |
|
| ||||
| OK | |
|
| 15.CHECK HARNESS AND CONNECTOR (WINDSHIELD GLASS (NO. 2 HEATED WINDSHIELD DEFROSTER) - HWD NO. 2 RELAY AND BODY GROUND |
|
Disconnect the A83 windshield glass (heated windshield defroster No. 2) connector.
Measure the resistance according to the value(s) in the table below.
| Tester Connection | Condition | Specified Condition |
| HWD2 relay holder terminal-3 - A83-1 (B) | Always | Below 1 Ω |
| HWD2 relay holder terminal-3 or A83-1 (B) - Body ground | Always | 10 kΩ or higher |
| A83-2 (E) - Body ground | Always | Below 1 Ω |
| *a | HWD No. 2 Relay Holder |
|
| ||||
| OK | ||
| ||
| ||

