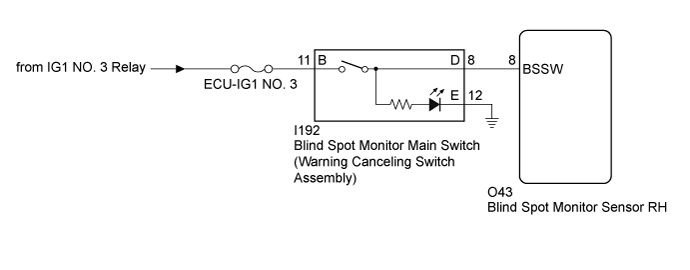
BLIND SPOT MONITOR SYSTEM > Main Switch Circuit |
| 1.CHECK BLIND SPOT MONITOR MAIN SWITCH (WARNING CANCELING SWITCH ASSEMBLY) |
Check that the blind spot monitor indicator on the blind spot monitor main switch (warning canceling switch assembly) illuminates normally when the blind spot monitor main switch (warning canceling switch assembly) is turned from off to on.
Check that the blind spot monitor indicator on the blind spot monitor main switch (warning canceling switch assembly) turns off normally when the blind spot monitor main switch (warning canceling switch assembly) is turned from on to off.
|
| ||||
| OK | ||
 | ||
| ||
| 2.READ VALUE USING GTS |
Connect the GTS to the DLC3.
Turn the ignition switch to ON.
Turn the GTS on.
Enter the following menus: Body Electrical / Blind Spot Monitor Master / Data list.
According to the display on the GTS, read the Data List.
| Tester Display | Measurement Item/Range | Normal Condition | Diagnostic Note |
| Main Switch | Blind spot monitor main switch (warning canceling switch assembly) / ON or OFF | ON: Blind spot monitor main switch (warning canceling switch assembly) on OFF: Blind spot monitor main switch (warning canceling switch assembly) off | - |
| Result | Proceed to |
| The display does not change as shown above when the blind spot monitor main switch (warning canceling switch assembly) is operated. | A |
| The display changes as shown above when the blind spot monitor main switch (warning canceling switch assembly) is operated. | B |
|
| ||||
| A | |
 |
| 3.INSPECT BLIND SPOT MONITOR MAIN SWITCH (WARNING CANCELING SWITCH ASSEMBLY) |
Remove the blind spot monitor main switch (warning canceling switch assembly) (Click here).
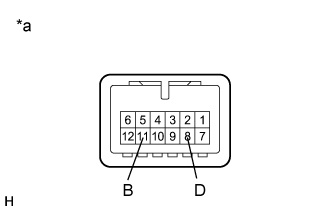 |
Measure the resistance according to the value(s) in the table below.
| Tester Connection | Condition | Specified Condition |
| 11 (B) - 8 (D) | Blind spot monitor main switch (warning canceling switch assembly) is on (not protruding) | Below 1 Ω |
| 11 (B) - 8 (D) | Blind spot monitor main switch (warning canceling switch assembly) is off (protruding) | 10 kΩ or higher |
| *a | Component without harness connected (Blind Spot Monitor Main Switch (Warning Canceling Switch Assembly)) |
|
| ||||
| OK | |
|
| 4.CHECK HARNESS AND CONNECTOR (BLIND SPOT MONITOR MAIN SWITCH (WARNING CANCELING SWITCH ASSEMBLY) - BATTERY) |
Measure the voltage according to the value(s) in the table below.
| Tester Connection | Condition | Specified Condition |
| I192-11 (B) - Body ground | Ignition switch ON | 11 to 14 V |
| I192-11 (B) - Body ground | Ignition switch off | Below 1 V |
|
| ||||
| OK | |
|
| 5.CHECK HARNESS AND CONNECTOR (BLIND SPOT MONITOR SENSOR RH - BLIND SPOT MONITOR MAIN SWITCH (WARNING CANCELING SWITCH ASSEMBLY)) |
Disconnect the O43 blind spot monitor sensor RH connector.
Measure the resistance according to the value(s) in the table below.
| Tester Connection | Condition | Specified Condition |
| O43-8 (BSSW) - I192-8 (D) | Always | Below 1 Ω |
| O43-8 (BSSW) - Body ground | Always | 10 kΩ or higher |
|
| ||||
| OK | ||
| ||
| ||
| 6.INSPECT BLIND SPOT MONITOR MAIN SWITCH (WARNING CANCELING SWITCH ASSEMBLY) |
Remove the blind spot monitor main switch (warning canceling switch assembly) (Click here).
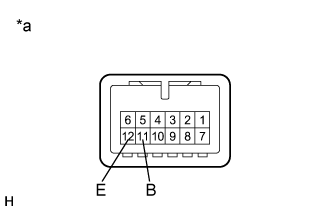 |
Apply battery voltage to the blind spot monitor main switch (warning canceling switch assembly) connector and check the operation of the blind spot monitor indicator, as shown in the table below.
| Connection | Condition | Specified Condition |
| Battery positive (+) → Terminal 11 (B) Battery negative (-) → Terminal 12 (E) | Blind spot monitor main switch (warning canceling switch assembly) is on (not protruding) | Blind spot monitor indicator illuminates |
| Blind spot monitor main switch (warning canceling switch assembly) is off (protruding) | Blind spot monitor indicator not illuminate |
| *a | Component without harness connected (Blind Spot Monitor Main Switch (Warning Canceling Switch Assembly)) |
|
| ||||
| OK | |
|
| 7.CHECK HARNESS AND CONNECTOR (BLIND SPOT MONITOR MAIN SWITCH (WARNING CANCELING SWITCH ASSEMBLY) - BODY GROUND) |
Disconnect the O43 blind spot monitor sensor RH connector.
Measure the resistance according to the value(s) in the table below.
| Tester Connection | Condition | Specified Condition |
| I192-12 (E) - Body ground | Always | Below 1 Ω |
|
| ||||
| OK | ||
| ||
| ||

