FUEL INJECTOR (for Port Injection) > INSTALLATION |
| 1. INSTALL PORT FUEL INJECTOR ASSEMBLY |
Apply a light coat of spindle oil or gasoline to a new O-ring, and install one to each port fuel injector assembly.
![]() |
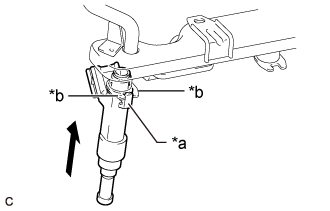
Install the 4 port fuel injector assemblies to the fuel delivery pipe.
| *a | Claw |
| *b | Stopper |
| 2. INSTALL INJECTOR VIBRATION INSULATOR |
Install 4 new injector vibration insulators to the cylinder head sub-assembly.
| 3. INSTALL FUEL DELIVERY SPACER |
Install the 2 fuel delivery spacers to the cylinder head sub-assembly.
| 4. INSTALL FUEL DELIVERY PIPE |
Place the fuel delivery pipe with the port fuel injector assemblies onto the cylinder head sub-assembly.
Install the fuel delivery pipe with the port fuel injector assemblies with the 2 bolts.
| 5. CONNECT NO. 8 ENGINE WIRE |
Engage the 3 clamps to connect the No. 8 engine wire to the fuel delivery pipe.
Connect the 4 port fuel injector assembly connectors.
| 6. CONNECT NO. 2 VENTILATION HOSE |
Connect the No. 2 ventilation hose to the PCV valve (ventilation valve sub-assembly) and slide the clip to secure it.
| 7. CONNECT FUEL TUBE SUB-ASSEMBLY |
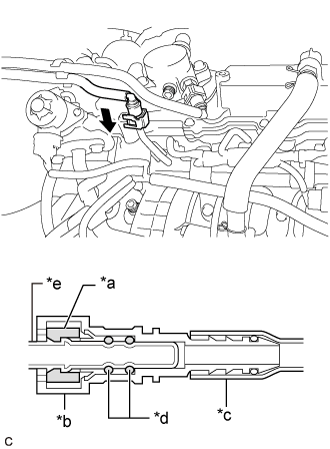
Connect the fuel tube sub-assembly to the fuel delivery pipe.
![]() |
Align the fuel tube connector with the fuel pipe, and push them together until the fuel tube connector makes a "click" sound. If it is difficult to push the fuel pipe into the fuel tube connector, apply a small amount of clean engine oil to the tip of the fuel pipe and reinsert it.
| *a | Retainer |
| *b | Fuel Tube Connector |
| *c | Nylon Tube |
| *d | O-ring |
| *e | Fuel Pipe |
![]() | Push |
After connecting the fuel pipes, check that the fuel pipe and fuel tube connector are securely connected by pulling on them.
Push in the fuel tube connector cover.
| 8. TEMPORARILY INSTALL NO. 1 FUEL PIPE SUB-ASSEMBLY |
Connect the No. 1 fuel pipe sub-assembly to the fuel delivery pipe sub-assembly and tighten the union nut by hand.
Connect the No. 1 fuel pipe sub-assembly to the fuel pump with seal sub-assembly and tighten the union nut by hand.
| 9. INSTALL NO. 1 FUEL PIPE SUB-ASSEMBLY |
![]() |
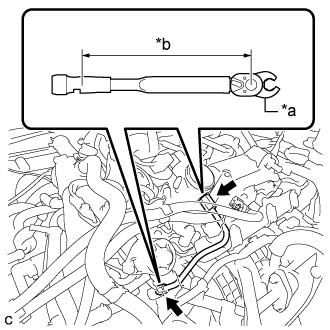
Using a 17 mm union nut wrench, tighten the union nuts on the fuel pump with seal sub-assembly side of the No. 1 fuel pipe sub-assembly.
| *a | 17 mm Union Nut Wrench |
| *b | Torque Wrench Fulcrum Length |
Using a 17 mm union nut wrench, tighten the union nuts on the fuel delivery pipe sub-assembly side of the No. 1 fuel pipe sub-assembly.
| 10. INSTALL THROTTLE BODY WITH MOTOR ASSEMBLY |
| 11. INSTALL FUEL PUMP PROTECTOR |
Install the fuel pump protector to the cylinder head cover sub-assembly with the 2 bolts.
| 12. CONNECT CABLE TO NEGATIVE BATTERY TERMINAL |
| 13. INSPECT FOR FUEL LEAK |
Check fuel pump operation.
Connect the GTS to the DLC3.
Turn the engine switch to on (IG).
Turn the GTS on.
Enter the following menus: Powertrain / Engine / Active Test / Activate the Circuit Relay.
Check for pressure in the fuel tube sub-assembly from the fuel line. Check that sounds of fuel flowing from the fuel tank assembly can be heard. If no sounds can be heard, check the integration relay, fuel pump, ECM and wiring connectors.
Inspect for fuel leaks.
Check that there are no fuel leaks from the fuel system after doing any maintenance or repairs. If there is a fuel leak, repair or replace parts as necessary.
Turn the engine switch off.
Disconnect the GTS from the DLC3.
| 14. PERFORM INITIALIZATION |
Perform "Inspection After Repair" after replacing a port fuel injector assembly (Click here).