BRAKE CONTROL / DYNAMIC CONTROL SYSTEMS VEHICLE STABILITY CONTROL SYSTEM C1237 Speed Sensor Rotor Faulty
DESCRIPTION
The skid control ECU (brake actuator assembly) measures the speed of each wheel by receiving signals from each speed sensor.
These signals are used for recognizing that all four wheels are operating properly.
Therefore, signals from all wheels must be equal.
| DTC No. | Detection Item | DTC Detection Condition | Trouble Area |
|---|---|---|---|
| C1237 | Speed Sensor Rotor Faulty | Any of the following is detected:
1.
Discrepancy among four wheel speed sensor output. 2.
Abnormal pulse signals from 3 or more sensors. 3.
Continuous ABS control is performed for 60 seconds or more. 4.
VSC control is performed for 5 seconds or more. |
·
Tire and wheel size ·
Tire deformation ·
Speed sensor rotor ·
Speed sensor ·
Speed sensor circuit ·
Skid control ECU (brake actuator assembly) |
| Vehicle Condition | |||||
|---|---|---|---|---|---|
| Pattern 1 | Pattern 2 | Pattern 3 | Pattern 4 | ||
| Diagnosis Condition | - | - | - | - | - |
| Malfunction Status | Discrepancy among four wheel speed sensor output. | ○ | - | - | - |
| Abnormal pulse signals from 3 or more sensors. | - | ○ | - | - | |
| Continuous ABS control is performed. | - | - | ○ | - | |
| VSC control is performed. | - | - | - | ○ | |
| Detection Time | - | - | 60 seconds or more | 5 seconds or more | |
| Number of Trips | 1 trip | 1 trip | 1 trip | 1 trip | |
- HINT:
-
DTC will be output when conditions for either of the patterns in the table above are met.
WIRING DIAGRAM
Refer to DTCs C1330, C1331, C1332, C1333, C1464, C1465, C1466 and C1467.
Click hereBrake>BRAKE CONTROL / DYNAMIC CONTROL SYSTEMS>VEHICLE STABILITY CONTROL SYSTEM>C1330
CAUTION / NOTICE / HINT
- NOTICE:
-
When replacing the skid control ECU (brake actuator assembly), perform system variant learning and acceleration sensor zero point calibration.
-
Click hereBrake>BRAKE CONTROL / DYNAMIC CONTROL SYSTEMS>VEHICLE STABILITY CONTROL SYSTEM>CALIBRATION
- HINT:
-
When C1330, C1331, C1332, C1333, C1464, C1465, C1466 and/or C1467 is output together with C1237, inspect and repair the trouble areas indicated by C1330, C1331, C1332, C1333, C1464, C1465, C1466 and/or C1467 first.
-
Click hereBrake>BRAKE CONTROL / DYNAMIC CONTROL SYSTEMS>VEHICLE STABILITY CONTROL SYSTEM>C1330
PROCEDURE
Check the DTCs that are output.
- Chassis > ABS/VSC/TRC > Trouble Codes
- 50001 105
- Result:
Result Proceed to C1237 and C1330, C1331, C1332, C1333, 1464, C1465, C1466, C1467 are output simultaneously A C1237 is output B
A
B
Check the size and condition of all four tires.
Click hereSuspension>TIRE / WHEEL>TIRE AND WHEEL SYSTEM>INSPECTION
- HINT:
-
The DTC is output when tire deformation or a difference in tire size is detected.
- OK:
The diameter and tire pressure of all four tires are the same.
- Result:
Proceed to OK NG
OK
NG
Connect the GTS to the DLC3.
Start the engine.
Enter the following menus: Chassis / ABS/VSC/TRC / Data List.
- Chassis > ABS/VSC/TRC > Data List
-
Tester Display Measurement Item Range Normal Condition Diagnostic Note FR Wheel Speed Front wheel speed sensor RH reading Min.: 0 km/h (0 mph), Max.: 326.4 km/h (203 mph) Vehicle stopped: 0 km/h (0 mph) When driving at constant speed: No large fluctuations FL Wheel Speed Front wheel speed sensor LH reading Min.: 0 km/h (0 mph), Max.: 326.4 km/h (203 mph) Vehicle stopped: 0 km/h (0 mph) When driving at constant speed: No large fluctuations RR Wheel Speed Rear wheel speed sensor RH reading Min.: 0 km/h (0 mph), Max.: 326.4 km/h (203 mph) Vehicle stopped: 0 km/h (0 mph) When driving at constant speed: No large fluctuations RL Wheel Speed Rear wheel speed sensor LH reading Min.: 0 km/h (0 mph), Max.: 326.4 km/h (203 mph) Vehicle stopped: 0 km/h (0 mph) When driving at constant speed: No large fluctuations
- Chassis > ABS/VSC/TRC > Data List
-
Tester Display FR Wheel Speed FL Wheel Speed RR Wheel Speed RL Wheel Speed - 50003 105 1,2,3,4
Check the speed sensor output value.
- OK:
The output value changes in accordance with the vehicle speed.
- Result:
Result Proceed to OK A NG (The output value for front speed sensor RH does not change in accordance with the vehicle speed) B NG (The output value for front speed sensor LH does not change in accordance with the vehicle speed) C NG (The output value for rear speed sensor RH (rear axle hub and bearing assembly RH) does not change in accordance with the vehicle speed) D NG (The output value for rear speed sensor LH (rear axle hub and bearing assembly LH) does not change in accordance with the vehicle speed) E NG (The output value of 2 or more sensors does not change in accordance with the vehicle speed) F
A
B
C
D
E
F
for LHD: Click hereBrake>BRAKE CONTROL / DYNAMIC CONTROL SYSTEMS>BRAKE ACTUATOR (for LHD)>REMOVAL
for RHD: Click hereBrake>BRAKE CONTROL / DYNAMIC CONTROL SYSTEMS>BRAKE ACTUATOR (for RHD)>REMOVAL
Turn the ignition switch off.
Enter the following menus: Chassis / ABS/VSC/TRC / Utility / Signal Check.
Perform the sensor check using Test Mode (Signal Check) Procedure.
Click hereBrake>BRAKE CONTROL / DYNAMIC CONTROL SYSTEMS>VEHICLE STABILITY CONTROL SYSTEM>TEST MODE PROCEDURE
- Chassis > ABS/VSC/TRC > Utility
-
Tester Display Signal Check - 50005 105 4359
- OK:
All Test Mode (Signal Check) inspection items change from incomplete to complete.
- Result:
Result Proceed to OK A NG (The Test Mode (Signal Check) inspection item for front speed sensor RH does not change from incomplete to complete) B NG (The Test Mode (Signal Check) inspection item for front speed sensor LH does not change from incomplete to complete) C NG (The Test Mode (Signal Check) inspection item for rear speed sensor RH (rear axle hub and bearing assembly RH) does not change from incomplete to complete) D NG (The Test Mode (Signal Check) inspection item for rear speed sensor LH (rear axle hub and bearing assembly LH) does not change from incomplete to complete) E NG (The Test Mode (Signal Check) inspection item for 2 or more sensors does not change from incomplete to complete) F
A
Click hereGeneral>INTRODUCTION>HOW TO TROUBLESHOOT ECU CONTROLLED SYSTEMS>HOW TO PROCEED WITH TROUBLESHOOTING
B
C
D
E
F
for LHD: Click hereBrake>BRAKE CONTROL / DYNAMIC CONTROL SYSTEMS>BRAKE ACTUATOR (for LHD)>REMOVAL
for RHD: Click hereBrake>BRAKE CONTROL / DYNAMIC CONTROL SYSTEMS>BRAKE ACTUATOR (for RHD)>REMOVAL
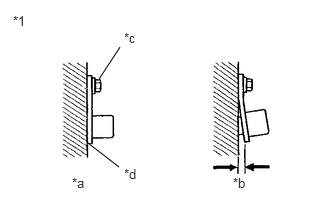
| *1 | Front Speed Sensor RH |
| *a | Correct |
| *b | Incorrect |
| *c | 8.5 N*m |
| *d | No clearance |
Turn the ignition switch off.
Check the front speed sensor RH installation.
- OK:
There is no clearance between the front speed sensor RH and the front steering knuckle RH.
The installation bolt is tightened properly.
- Torque:
8.5 N*m (87 kgf*cm, 75 in.*lbf)
- Result:
Proceed to OK NG
OK
NG
Remove the front speed sensor RH.
Click hereBrake>BRAKE CONTROL / DYNAMIC CONTROL SYSTEMS>FRONT SPEED SENSOR>REMOVAL
Check the front speed sensor RH tip.
- OK:
The front speed sensor RH tip is free of scratches, oil, and foreign matter.
- NOTICE:
- ·
If there is oil or foreign matter on the front speed sensor RH, clean the front speed sensor RH.
·If the front speed sensor RH is damaged, replace the front speed sensor RH with a new one.
·Check the front speed sensor RH signal after cleaning or replacement.
Click hereBrake>BRAKE CONTROL / DYNAMIC CONTROL SYSTEMS>VEHICLE STABILITY CONTROL SYSTEM>TEST MODE PROCEDURE
- Result:
Proceed to OK NG
OK
NG
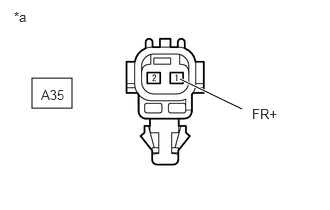
| *a | Front view of wire harness connector
(to Front Speed Sensor RH) |
Make sure that there is no looseness at the locking part and the connecting part of the connectors.
- OK:
The connector is securely connected.
Disconnect the A35 front speed sensor RH connector.
Check both the connector case and the terminals for deformation and corrosion.
- OK:
No deformation or corrosion.
Turn the ignition switch to ON.
Measure the voltage according to the value(s) in the table below.
- Standard Voltage:
Tester Connection Condition Specified Condition A35-1 (FR+) - Body ground Ignition switch ON 11 to 14 V
- Result:
Proceed to OK NG
OK
NG
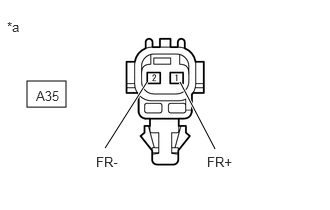
| *a | Front view of wire harness connector
(to Front Speed Sensor RH) |
Measure the voltage according to the value(s) in the table below.
- Standard Voltage:
Tester Connection Condition Specified Condition A35-1 (FR+) - A35-2 (FR-) Ignition switch ON 11 to 14 V
- Result:
Proceed to OK NG
OK
NG
Remove the front speed sensor rotor RH (front axle hub sub-assembly RH).
Click hereDrivetrain>AXLE AND DIFFERENTIAL>FRONT AXLE HUB>REMOVAL
Check the front speed sensor rotor RH.
- OK:
The front speed sensor rotor RH is free of scratches, oil, and foreign matter.
- NOTICE:
- ·
If there is oil or foreign matter on the front speed sensor rotor RH, clean the front speed sensor rotor RH.
·If the front speed sensor rotor RH is damaged, replace the front speed sensor rotor RH with a new one.
·Check the front speed sensor RH signal after cleaning or replacement.
Click hereBrake>BRAKE CONTROL / DYNAMIC CONTROL SYSTEMS>VEHICLE STABILITY CONTROL SYSTEM>TEST MODE PROCEDURE
- HINT:
- ·
The front speed sensor rotor RH is incorporated into the front axle hub sub-assembly RH.
·If the front speed sensor rotor RH needs to be replaced, replace it together with the front axle hub sub-assembly RH.
- Result:
Result Proceed to OK A NG (The front speed sensor rotor RH is damaged.) B NG (There is foreign matter on the front speed sensor rotor RH.) C
A
B
C
Turn the ignition switch off.
Make sure that there is no looseness at the locking part and the connecting part of the connectors.
- OK:
The connector is securely connected.
Disconnect the A34 skid control ECU (brake actuator assembly) connector.
Check both the connector case and the terminals for deformation and corrosion.
- OK:
No deformation or corrosion.
Measure the resistance according to the value(s) in the table below.
- Standard Resistance:
Tester Connection Condition Specified Condition A34-26 (FR-) - A35-2 (FR-) Always Below 1 Ω A34-26 (FR-) or A35-2 (FR-) - Body ground Always 10 kΩ or higher
- Result:
Proceed to OK NG
OK
for RHD: Click hereBrake>BRAKE CONTROL / DYNAMIC CONTROL SYSTEMS>BRAKE ACTUATOR (for RHD)>REMOVAL
for LHD: Click hereBrake>BRAKE CONTROL / DYNAMIC CONTROL SYSTEMS>BRAKE ACTUATOR (for LHD)>REMOVAL
NG
Turn the ignition switch off.
Make sure that there is no looseness at the locking part and the connecting part of the connectors.
- OK:
The connector is securely connected.
Disconnect the A34 skid control ECU (brake actuator assembly) connector.
Check both the connector case and the terminals for deformation and corrosion.
- OK:
No deformation or corrosion.
Measure the resistance according to the value(s) in the table below.
- Standard Resistance:
Tester Connection Condition Specified Condition A34-21 (FR+) - A35-1 (FR+) Always Below 1 Ω A34-21 (FR+) or A35-1 (FR+) - Body ground Always 10 kΩ or higher
- Result:
Proceed to OK NG
OK
for RHD: Click hereBrake>BRAKE CONTROL / DYNAMIC CONTROL SYSTEMS>BRAKE ACTUATOR (for RHD)>REMOVAL
for LHD: Click hereBrake>BRAKE CONTROL / DYNAMIC CONTROL SYSTEMS>BRAKE ACTUATOR (for LHD)>REMOVAL
NG
| *1 | Front Speed Sensor LH |
| *a | Correct |
| *b | Incorrect |
| *c | 8.5 N*m |
| *d | No clearance |
Turn the ignition switch off.
Check the front speed sensor LH installation.
- OK:
There is no clearance between the front speed sensor LH and the front steering knuckle LH.
The installation bolt is tightened properly.
- Torque:
8.5 N*m (87 kgf*cm, 75 in.*lbf)
- Result:
Proceed to OK NG
OK
NG
Remove the front speed sensor LH.
Click hereBrake>BRAKE CONTROL / DYNAMIC CONTROL SYSTEMS>FRONT SPEED SENSOR>REMOVAL
Check the front speed sensor LH tip.
- OK:
The front speed sensor LH tip is free of scratches, oil, and foreign matter.
- NOTICE:
- ·
If there is oil or foreign matter on the front speed sensor LH, clean the front speed sensor LH.
·If the front speed sensor LH is damaged, replace the front speed sensor LH with a new one.
·Check the front speed sensor LH signal after cleaning or replacement.
Click hereBrake>BRAKE CONTROL / DYNAMIC CONTROL SYSTEMS>VEHICLE STABILITY CONTROL SYSTEM>TEST MODE PROCEDURE
- Result:
Proceed to OK NG
OK
NG
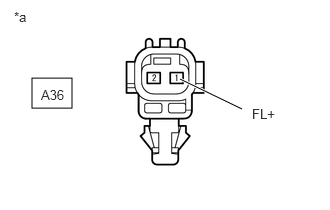
| *a | Front view of wire harness connector
(to Front Speed Sensor LH) |
Make sure that there is no looseness at the locking part and the connecting part of the connectors.
- OK:
The connector is securely connected.
Disconnect the A36 front speed sensor LH connector.
Check both the connector case and the terminals for deformation and corrosion.
- OK:
No deformation or corrosion.
Turn the ignition switch to ON.
Measure the voltage according to the value(s) in the table below.
- Standard Voltage:
Tester Connection Condition Specified Condition A36-1 (FL+) - Body ground Ignition switch ON 11 to 14 V
- Result:
Proceed to OK NG
OK
NG
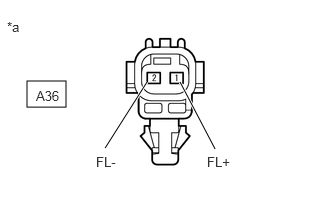
| *a | Front view of wire harness connector
(to Front Speed Sensor LH) |
Measure the voltage according to the value(s) in the table below.
- Standard Voltage:
Tester Connection Condition Specified Condition A36-1 (FL+) - A36-2 (FL-) Ignition switch ON 11 to 14 V
- Result:
Proceed to OK NG
OK
NG
Remove the front speed sensor rotor LH (front axle hub sub-assembly LH).
Click hereDrivetrain>AXLE AND DIFFERENTIAL>FRONT AXLE HUB>REMOVAL
Check the front speed sensor rotor LH.
- OK:
The front speed sensor rotor LH is free of scratches, oil, and foreign matter.
- NOTICE:
- ·
If there is oil or foreign matter on the front speed sensor rotor LH, clean the front speed sensor rotor LH.
·If the front speed sensor rotor LH is damaged, replace the front speed sensor rotor LH with a new one.
·Check the front speed sensor LH signal after cleaning or replacement.
Click hereBrake>BRAKE CONTROL / DYNAMIC CONTROL SYSTEMS>VEHICLE STABILITY CONTROL SYSTEM>TEST MODE PROCEDURE
- HINT:
- ·
The front speed sensor rotor LH is incorporated into the front axle hub sub-assembly LH.
·If the front speed sensor rotor LH needs to be replaced, replace it together with the front axle hub sub-assembly LH.
- Result:
Result Proceed to OK A NG (The front speed sensor rotor LH is damaged.) B NG (There is foreign matter on the front speed sensor rotor LH.) C
A
B
C
Turn the ignition switch off.
Make sure that there is no looseness at the locking part and the connecting part of the connectors.
- OK:
The connector is securely connected.
Disconnect the A34 skid control ECU (brake actuator assembly) connector.
Check both the connector case and the terminals for deformation and corrosion.
- OK:
No deformation or corrosion.
Measure the resistance according to the value(s) in the table below.
- Standard Resistance:
Tester Connection Condition Specified Condition A34-7 (FL-) - A36-2 (FL-) Always Below 1 Ω A34-7 (FL-) or A36-2 (FL-) - Body ground Always 10 kΩ or higher
- Result:
Proceed to OK NG
OK
for RHD: Click hereBrake>BRAKE CONTROL / DYNAMIC CONTROL SYSTEMS>BRAKE ACTUATOR (for RHD)>REMOVAL
for LHD: Click hereBrake>BRAKE CONTROL / DYNAMIC CONTROL SYSTEMS>BRAKE ACTUATOR (for LHD)>REMOVAL
NG
Turn the ignition switch off.
Make sure that there is no looseness at the locking part and the connecting part of the connectors.
- OK:
The connector is securely connected.
Disconnect the A34 skid control ECU (brake actuator assembly) connector.
Check both the connector case and the terminals for deformation and corrosion.
- OK:
No deformation or corrosion.
Measure the resistance according to the value(s) in the table below.
- Standard Resistance:
Tester Connection Condition Specified Condition A34-24 (FL+) - A36-1 (FL+) Always Below 1 Ω A34-24 (FL+) or A36-1 (FL+) - Body ground Always 10 kΩ or higher
- Result:
Proceed to OK NG
OK
for RHD: Click hereBrake>BRAKE CONTROL / DYNAMIC CONTROL SYSTEMS>BRAKE ACTUATOR (for RHD)>REMOVAL
for LHD: Click hereBrake>BRAKE CONTROL / DYNAMIC CONTROL SYSTEMS>BRAKE ACTUATOR (for LHD)>REMOVAL
NG
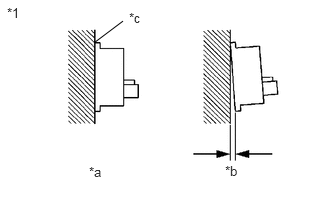
| *1 | Rear Speed Sensor RH |
| *a | OK |
| *b | NG |
| *c | No Clearance |
Turn the ignition switch off.
Check the rear speed sensor RH installation.
- OK:
There is no clearance between the rear speed sensor RH and the rear axle hub RH.
- HINT:
-
Because the rear axle hub and bearing assembly RH cannot be disassembled, if the rear speed sensor RH needs replacement, replace the rear axle hub and bearing assembly RH.
- Result:
Proceed to OK NG
OK
NG
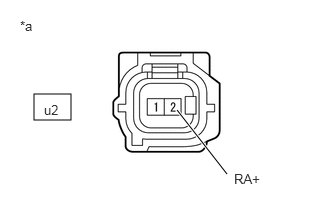
| *a | Front view of wire harness connector
(to Rear Speed Sensor RH) |
Make sure that there is no looseness at the locking part and the connecting part of the connectors.
- OK:
The connector is securely connected.
Disconnect the u2 rear speed sensor RH connector.
Check both the connector case and the terminals for deformation and corrosion.
- OK:
No deformation or corrosion.
Turn the ignition switch to ON.
Measure the voltage according to the value(s) in the table below.
- Standard Voltage:
Tester Connection Condition Specified Condition u2-2 (RA+) - Body ground Ignition switch ON 11 to 14 V
- Result:
Proceed to OK NG
OK
NG
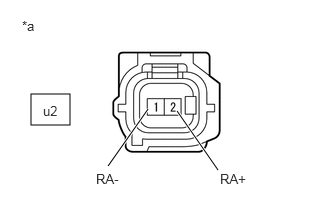
| *a | Front view of wire harness connector
(to Rear Speed Sensor RH) |
Measure the voltage according to the value(s) in the table below.
- Standard Voltage:
Tester Connection Condition Specified Condition u2-2 (RA+) - u2-1 (RA-) Ignition switch ON 11 to 14 V
- Result:
Proceed to OK NG
OK
NG
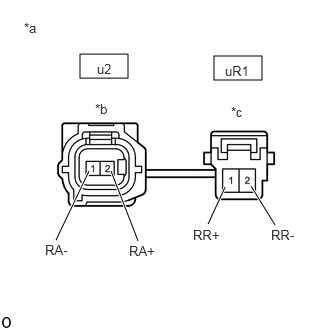
| *a | Front view of skid control sensor wire RH (No. 1 parking brake wire assembly) |
| *b | Front view of wire harness connector
(to Sensor Side Connector) |
| *c | Front view of wire harness connector
(to Vehicle Side Connector) |
Turn the ignition switch off.
Make sure that there is no looseness at the locking part and the connecting part of the connectors.
- OK:
The connector is securely connected.
Remove the skid control sensor wire RH (No. 1 parking brake wire assembly).
Check both the connector case and the terminals for deformation and corrosion.
- OK:
No deformation or corrosion.
Measure the resistance according to the value(s) in the table below.
- Standard Resistance:
Tester Connection Condition Specified Condition u2-1 (RA-) - uR1-2 (RR-) Always Below 1 Ω u2-1 (RA-) - uR1-1 (RR+) Always 10 kΩ or higher u2-1 (RA-) or uR1-2 (RR-) - Body ground Always 10 kΩ or higher
- NOTICE:
-
Check the rear speed sensor RH signal after replacement.
-
Click hereBrake>BRAKE CONTROL / DYNAMIC CONTROL SYSTEMS>VEHICLE STABILITY CONTROL SYSTEM>TEST MODE PROCEDURE
- Result:
Proceed to OK NG
OK
NG
Make sure that there is no looseness at the locking part and the connecting part of the connector.
- OK:
The connector is securely connected.
Disconnect the A34 skid control ECU (brake actuator assembly) connector.
Check both the connector case and the terminals for deformation and corrosion.
- OK:
No deformation or corrosion.
Measure the resistance according to the value(s) in the table below.
- Standard Resistance:
Tester Connection Condition Specified Condition A34-37 (RR-) - uR1-2 (RR-) Always Below 1 Ω A34-37 (RR-) or uR1-2 (RR-) - Body ground Always 10 kΩ or higher
- Result:
Proceed to OK NG
OK
for RHD: Click hereBrake>BRAKE CONTROL / DYNAMIC CONTROL SYSTEMS>BRAKE ACTUATOR (for RHD)>REMOVAL
for LHD: Click hereBrake>BRAKE CONTROL / DYNAMIC CONTROL SYSTEMS>BRAKE ACTUATOR (for LHD)>REMOVAL
NG
| *a | Front view of skid control sensor wire RH (No. 1 parking brake wire assembly) |
| *b | Front view of wire harness connector
(to Sensor Side Connector) |
| *c | Front view of wire harness connector
(to Vehicle Side Connector) |
Turn the ignition switch off.
Make sure that there is no looseness at the locking part and the connecting part of the connectors.
- OK:
The connector is securely connected.
Remove the skid control sensor wire RH (No. 1 parking brake wire assembly).
Check both the connector case and the terminals for deformation and corrosion.
- OK:
No deformation or corrosion.
Measure the resistance according to the value(s) in the table below.
- Standard Resistance:
Tester Connection Condition Specified Condition u2-2 (RA+) - uR1-1 (RR+) Always Below 1 Ω u2-2 (RA+) - uR1-2 (RR-) Always 10 kΩ or higher u2-2 (RA+) or uR1-1 (RR+) - Body ground Always 10 kΩ or higher
- NOTICE:
-
Check the rear speed sensor RH signal after replacement.
-
Click hereBrake>BRAKE CONTROL / DYNAMIC CONTROL SYSTEMS>VEHICLE STABILITY CONTROL SYSTEM>TEST MODE PROCEDURE
- Result:
Proceed to OK NG
OK
NG
Make sure that there is no looseness at the locking part and the connecting part of the connector.
- OK:
The connector is securely connected.
Disconnect the A34 skid control ECU (brake actuator assembly) connector.
Check both the connector case and the terminals for deformation and corrosion.
- OK:
No deformation or corrosion.
Measure the resistance according to the value(s) in the table below.
- Standard Resistance:
Tester Connection Condition Specified Condition A34-22 (RR+) - uR1-1 (RR+) Always Below 1 Ω A34-22 (RR+) or uR1-1 (RR+) - Body ground Always 10 kΩ or higher
- Result:
Proceed to OK NG
OK
for RHD: Click hereBrake>BRAKE CONTROL / DYNAMIC CONTROL SYSTEMS>BRAKE ACTUATOR (for RHD)>REMOVAL
for LHD: Click hereBrake>BRAKE CONTROL / DYNAMIC CONTROL SYSTEMS>BRAKE ACTUATOR (for LHD)>REMOVAL
NG
| *1 | Rear Speed Sensor LH |
| *a | OK |
| *b | NG |
| *c | No Clearance |
Turn the ignition switch off.
Check the rear speed sensor LH installation.
- OK:
There is no clearance between the rear speed sensor LH and the rear axle hub LH.
- HINT:
-
Because the rear axle hub and bearing assembly LH cannot be disassembled, if the rear speed sensor LH needs replacement, replace the rear axle hub and bearing assembly LH.
- Result:
Proceed to OK NG
OK
NG
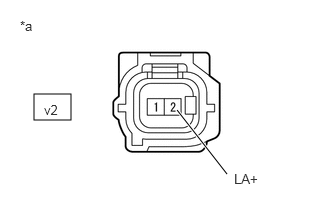
| *a | Front view of wire harness connector
(to Rear Speed Sensor LH) |
Make sure that there is no looseness at the locking part and the connecting part of the connectors.
- OK:
The connector is securely connected.
Disconnect the v2 rear speed sensor LH connector.
Check both the connector case and the terminals for deformation and corrosion.
- OK:
No deformation or corrosion.
Turn the ignition switch to ON.
Measure the voltage according to the value(s) in the table below.
- Standard Voltage:
Tester Connection Condition Specified Condition v2-2 (LA+) - Body ground Ignition switch ON 11 to 14 V
- Result:
Proceed to OK NG
OK
NG
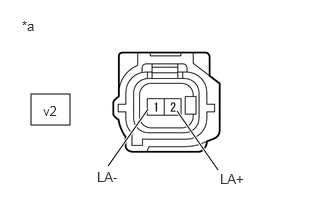
| *a | Front view of wire harness connector
(to Rear Speed Sensor LH) |
Measure the voltage according to the value(s) in the table below.
- Standard Voltage:
Tester Connection Condition Specified Condition v2-2 (LA+) - v2-1 (LA-) Ignition switch ON 11 to 14 V
- Result:
Proceed to OK NG
OK
NG
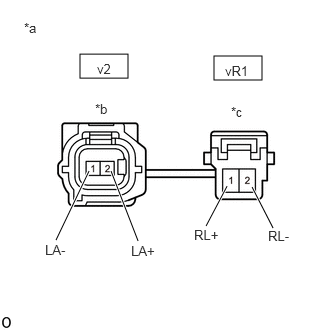
| *a | Front view of skid control sensor wire LH (No. 2 parking brake wire assembly) |
| *b | Front view of wire harness connector
(to Sensor Side Connector) |
| *c | Front view of wire harness connector
(to Vehicle Side Connector) |
Turn the ignition switch off.
Make sure that there is no looseness at the locking part and the connecting part of the connectors.
- OK:
The connector is securely connected.
Remove the skid control sensor wire LH (No. 2 parking brake wire assembly).
Check both the connector case and the terminals for deformation and corrosion.
- OK:
No deformation or corrosion.
Measure the resistance according to the value(s) in the table below.
- Standard Resistance:
Tester Connection Condition Specified Condition v2-1 (LA-) - vR1-2 (RL-) Always Below 1 Ω v2-1 (LA-) - vR1-1 (RL+) Always 10 kΩ or higher v2-1 (LA-) or vR1-2 (RL-) - Body ground Always 10 kΩ or higher
- NOTICE:
-
Check the rear speed sensor LH signal after replacement.
-
Click hereBrake>BRAKE CONTROL / DYNAMIC CONTROL SYSTEMS>VEHICLE STABILITY CONTROL SYSTEM>TEST MODE PROCEDURE
- Result:
Proceed to OK NG
OK
NG
Make sure that there is no looseness at the locking part and the connecting part of the connector.
- OK:
The connector is securely connected.
Disconnect the A34 skid control ECU (brake actuator assembly) connector.
Check both the connector case and the terminals for deformation and corrosion.
- OK:
No deformation or corrosion.
Measure the resistance according to the value(s) in the table below.
- Standard Resistance:
Tester Connection Condition Specified Condition A34-23 (RL-) - vR1-2 (RL-) Always Below 1 Ω A34-23 (RL-) or vR1-2 (RL-) - Body ground Always 10 kΩ or higher
- Result:
Proceed to OK NG
OK
for RHD: Click hereBrake>BRAKE CONTROL / DYNAMIC CONTROL SYSTEMS>BRAKE ACTUATOR (for RHD)>REMOVAL
for LHD: Click hereBrake>BRAKE CONTROL / DYNAMIC CONTROL SYSTEMS>BRAKE ACTUATOR (for LHD)>REMOVAL
NG
| *a | Front view of skid control sensor wire LH (No. 2 parking brake wire assembly) |
| *b | Front view of wire harness connector
(to Sensor Side Connector) |
| *c | Front view of wire harness connector
(to Vehicle Side Connector) |
Turn the ignition switch off.
Make sure that there is no looseness at the locking part and the connecting part of the connectors.
- OK:
The connector is securely connected.
Remove the skid control sensor wire LH (No. 2 parking brake wire assembly).
Check both the connector case and the terminals for deformation and corrosion.
- OK:
No deformation or corrosion.
Measure the resistance according to the value(s) in the table below.
- Standard Resistance:
Tester Connection Condition Specified Condition v2-2 (LA+) - vR1-1 (RL+) Always Below 1 Ω v2-2 (LA+) - vR1-2 (RL-) Always 10 kΩ or higher v2-2 (LA+) or vR1-1 (RL+) - Body ground Always 10 kΩ or higher
- NOTICE:
-
Check the rear speed sensor LH signal after replacement.
-
Click hereBrake>BRAKE CONTROL / DYNAMIC CONTROL SYSTEMS>VEHICLE STABILITY CONTROL SYSTEM>TEST MODE PROCEDURE
- Result:
Proceed to OK NG
OK
NG
Make sure that there is no looseness at the locking part and the connecting part of the connector.
- OK:
The connector is securely connected.
Disconnect the A34 skid control ECU (brake actuator assembly) connector.
Check both the connector case and the terminals for deformation and corrosion.
- OK:
No deformation or corrosion.
Measure the resistance according to the value(s) in the table below.
- Standard Resistance:
Tester Connection Condition Specified Condition A34-39 (RL+) - vR1-1 (RL+) Always Below 1 Ω A34-39 (RL+) or vR1-1 (RL+) - Body ground Always 10 kΩ or higher
- Result:
Proceed to OK NG
OK
for RHD: Click hereBrake>BRAKE CONTROL / DYNAMIC CONTROL SYSTEMS>BRAKE ACTUATOR (for RHD)>REMOVAL
for LHD: Click hereBrake>BRAKE CONTROL / DYNAMIC CONTROL SYSTEMS>BRAKE ACTUATOR (for LHD)>REMOVAL
NG