6AR-FSE ENGINE CONTROL SFI SYSTEM P003012 HO2S Heater Control Bank 1 Sensor 1 Circuit Short to Battery P003013 HO2S Heater Control Bank 1 Sensor 1 Circuit Open P101A9E A/F Sensor Heater Performance Bank 1 Sensor 1 Stuck On
DESCRIPTION
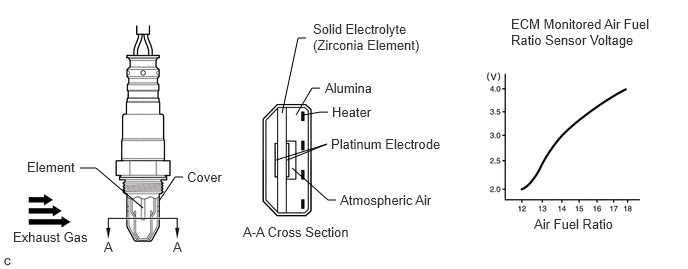
The air fuel ratio sensor generates a voltage* that corresponds to the actual air fuel ratio. This sensor voltage is used to provide the ECM with feedback so that it can control the air fuel ratio. The ECM determines the deviation from the stoichiometric air fuel ratio level, and regulates the fuel injection duration. If the air fuel ratio sensor malfunctions, the ECM is unable to control the air fuel ratio accurately.
The air fuel ratio sensor is a planar type and integrated with the heater, which heats the solid electrolyte (zirconia element). This heater is controlled by the ECM. When the intake air volume is low (the exhaust gas temperature is low), a current flows into the heater to heat the sensor, in order to facilitate accurate oxygen concentration detection. In addition, the sensor and heater portions are a narrow type. The heat generated by the heater is conducted to the solid electrolyte through the alumina, therefore sensor activation is accelerated.
In order to obtain a high purification rate of the carbon monoxide (CO), hydrocarbon (HC) and nitrogen oxide (NOx) components in the exhaust gas, a three-way catalytic converter is used. For the most efficient use of the three-way catalytic converter, the air fuel ratio must be precisely controlled so that it is always close to the stoichiometric level.
*: Value changes inside the ECM. Since the air fuel ratio sensor is a current output element, the current is converted into a voltage inside the ECM. Any measurements taken at the air fuel ratio sensor or ECM connectors will show a constant voltage.
- HINT:
- ·
When any of these DTCs are stored, the ECM enters fail-safe mode. The ECM turns off the air fuel ratio sensor heater in fail-safe mode. Fail-safe mode continues until the engine switch is turned off.
·Although the DTC titles say oxygen sensor, these DTCs relate to the air fuel ratio sensor.
·The ECM has a pulse width modulated control circuit to adjust the current through the heater. The air fuel ratio sensor heater circuit uses a relay on the +B side of the circuit.
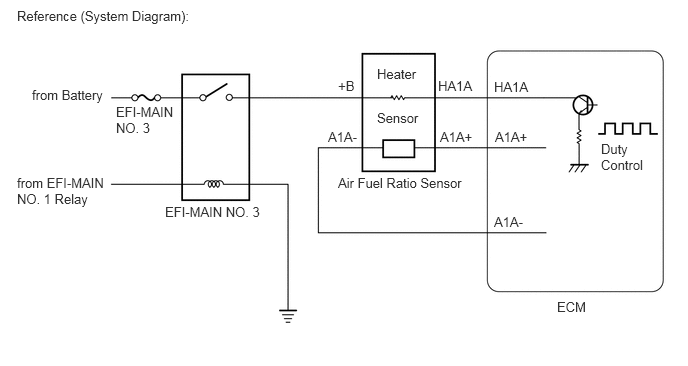 0.177,0.083 2.427,0.406 2.25,0.323 10 false Reference (System Diagram): 0.333,0.906 1.323,1.292 0.99,0.385 10 false from Battery 0.177,1.823 1.104,2.229 0.927,0.406 10 false from EFI-MAIN NO. 1 Relay 1.208,1.083 1.833,1.521 0.625,0.438 10 false EFI-MAIN NO. 3 1.719,2.125 2.823,2.49 1.104,0.365 10 false EFI-MAIN NO. 3 3.521,1.823 5.031,2.208 1.51,0.385 10 false Air Fuel Ratio Sensor 3.417,1.344 4.927,1.729 1.51,0.385 10 false A1A- 4.583,1.344 6.094,1.729 1.51,0.385 10 false A1A+ 3.521,0.813 5.031,1.198 1.51,0.385 10 false +B 4.563,0.813 6.073,1.198 1.51,0.385 10 false HA1A 3.927,0.688 5.438,1.073 1.51,0.385 10 false Heater 3.927,1.146 5.438,1.531 1.51,0.385 10 false Sensor 5.156,1.344 6.667,1.729 1.51,0.385 10 false A1A+ 5.146,0.823 6.656,1.208 1.51,0.385 10 false HA1A 5.146,2.229 6.656,2.615 1.51,0.385 10 false A1A- 5.802,3.115 6.26,3.469 0.458,0.354 10 false ECM 6.26,1.469 6.813,1.875 0.552,0.406 10 false Duty Control
| DTC No. | Detection Item | DTC Detection Condition | Trouble Area | MIL | Memory | Note |
|---|---|---|---|---|---|---|
| P003012 | HO2S Heater Control Bank 1 Sensor 1 Circuit Short to Battery | Air fuel ratio sensor heater current reaches the high limit (1 trip detection logic). | ·
Short in air fuel ratio sensor heater circuit ·
Air fuel ratio sensor ·
ECM |
Comes on | DTC stored | SAE Code:
P0032 |
| P003013 | HO2S Heater Control Bank 1 Sensor 1 Circuit Open | Air fuel ratio sensor heater current is less than 0.8 A, even when the air fuel ratio sensor heater duty cycle is 30% or higher (1 trip detection logic). | ·
Open or short in air fuel ratio sensor heater circuit ·
Air fuel ratio sensor ·
EFI-MAIN NO. 3 relay ·
ECM |
Comes on | DTC stored | SAE Code:
P0031 |
| P101A9E | A/F Sensor Heater Performance Bank 1 Sensor 1 Stuck On | Air fuel ratio sensor heater current is higher than the specified value while the heater is not operating (1 trip detection logic). | ·
Short in air fuel ratio sensor heater circuit ·
ECM |
Comes on | DTC stored | SAE Code:
P101D |
MONITOR DESCRIPTION
The ECM uses information from the air fuel ratio sensor to regulate the air fuel ratio and keep it close to the stoichiometric level. This maximizes the ability of the three-way catalytic converter to purify the exhaust gases.
The air fuel ratio sensor detects oxygen levels in the exhaust gas and transmits the information to the ECM. The inner surface of the sensor element is exposed to the outside air. The outer surface of the sensor element is exposed to the exhaust gas. The sensor element is made of platinum-coated zirconia and includes an integrated heating element.
The zirconia element generates a small voltage when there is a large difference in the oxygen concentrations between the exhaust gas and outside air. The platinum coating amplifies this voltage generation.
The air fuel ratio sensor is more efficient when heated. When the exhaust gas temperature is low, the sensor cannot generate useful voltage signals without supplementary heating. The ECM regulates the supplementary heating using a duty-cycle approach to adjust the average current in the sensor heater element. If the heater current is outside the normal range, the signal transmitted by the air fuel ratio sensor becomes inaccurate. As a result, the ECM is unable to regulate the air fuel ratio properly.
When the current in the air fuel ratio sensor heater is outside the normal operating range, the ECM interprets this as a malfunction in the sensor heater and stores a DTC.
MONITOR STRATEGY
| Frequency of Operation | Continuous |
TYPICAL ENABLING CONDITIONS
| Output duty cycle | Higher than 0% |
| Output duty cycle | 30% or higher |
| Output duty cycle | Less than 60% |
CONFIRMATION DRIVING PATTERN
Connect the GTS to the DLC3.
Turn the engine switch on (IG).
Turn the GTS on.
Clear the DTCs (even if no DTCs are stored, perform the clear DTC procedure).
Turn the engine switch off and wait for at least 30 seconds.
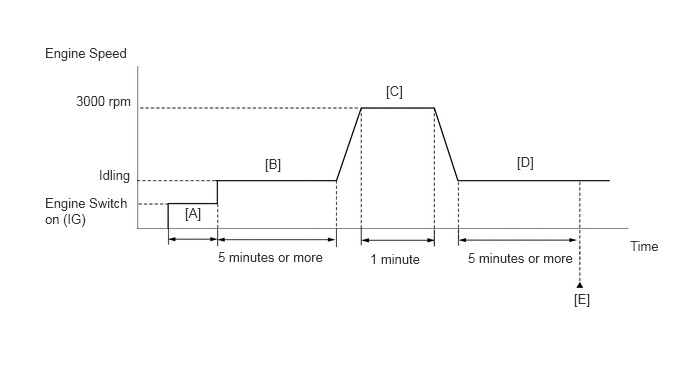
Turn the engine switch on (IG) [A].
Turn the GTS on.
Start the engine and idle it for 5 minutes or more [B].
With the vehicle stationary, depress the accelerator pedal and maintain an engine speed of 3000 rpm for 1 minute [C].
Idle the engine for 5 minutes or more [D].
Enter the following menus: Powertrain / Engine / Trouble Codes [E].
Read the pending DTCs.
- HINT:
- ·
If a pending DTC is output, the system is malfunctioning.
·If a pending DTC is not output, perform the following procedure.
Enter the following menus: Powertrain / Engine / Utility / All Readiness.
Input the DTC: P003012, P003013 or P101A9E.
Check the DTC judgment result.
| GTS Display | Description |
|---|---|
| NORMAL | ·
DTC judgment completed ·
System normal |
| ABNORMAL | ·
DTC judgment completed ·
System abnormal |
| INCOMPLETE | ·
DTC judgment not completed ·
Perform driving pattern after confirming DTC enabling conditions |
- HINT:
- ·
If the judgment result shows NORMAL, the system is normal.
·If the judgment result shows ABNORMAL, the system has a malfunction.
·If the judgment result shows INCOMPLETE, perform steps [B] through [E] again.
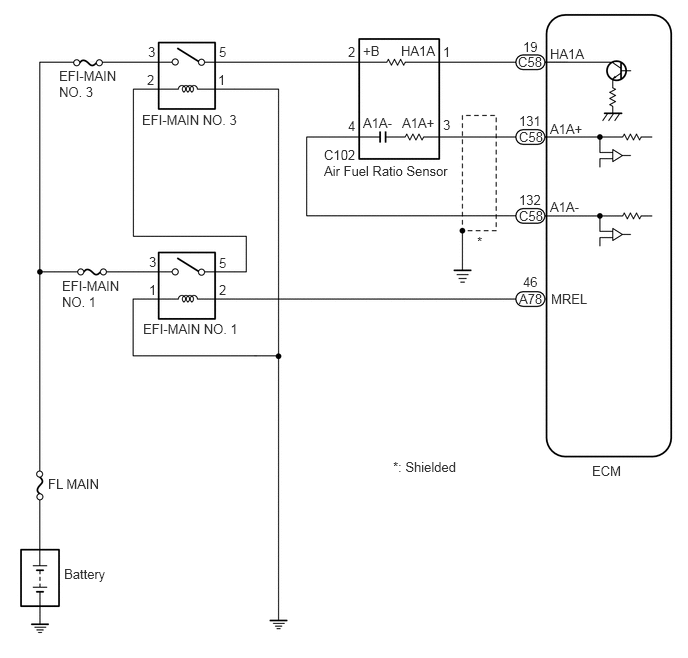
WIRING DIAGRAM
CAUTION / NOTICE / HINT
- NOTICE:
-
Inspect the fuses for circuits related to this system before performing the following procedure.
- HINT:
- ·
Refer to "Data List / Active Test" [A/F (O2) Sensor Heater Duty Ratio B1S1].
Click hereEngine / Hybrid System>6AR-FSE (ENGINE CONTROL)>SFI SYSTEM>DATA LIST / ACTIVE TEST
·Sensor 1 refers to the sensor closest to the engine assembly.
·Sensor 2 refers to the sensor farthest away from the engine assembly.
·Change the fuel injection volume using the Control the Injection Volume for A/F Sensor function provided in the Active Test and monitor the air fuel ratio sensor output voltage (Click here Engine / Hybrid System>6AR-FSE (ENGINE CONTROL)>SFI SYSTEM>P013613). If the sensor output voltage does not change (almost no reaction) while performing the Active Test, the sensor may be malfunctioning.
·Read Freeze Frame Data using the GTS. The ECM records vehicle and driving condition information as Freeze Frame Data the moment a DTC is stored. When troubleshooting, Freeze Frame Data can help determine if the vehicle was moving or stationary, if the engine was warmed up or not, if the air fuel ratio was lean or rich, and other data from the time the malfunction occurred.
PROCEDURE
Inspect the air fuel ratio sensor.
Click hereEngine / Hybrid System>6AR-FSE (ENGINE CONTROL)>AIR FUEL RATIO SENSOR>INSPECTION
- HINT:
-
Perform "Inspection After Repair" after replacing the air fuel ratio sensor.
-
Click hereEngine / Hybrid System>6AR-FSE (ENGINE CONTROL)>SFI SYSTEM>INITIALIZATION
- Result:
Proceed to OK NG
OK
NG
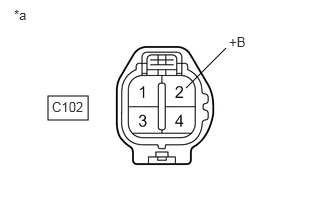
| *a | Front view of wire harness connector
(to Air Fuel Ratio Sensor) |
Disconnect the air fuel ratio sensor connector.
Turn the engine switch on (IG).
Measure the voltage according to the value(s) in the table below.
- Standard Voltage:
Tester Connection Condition Specified Condition C102-2 (+B) - Body ground Engine switch on (IG) 11 to 14 V
- Result:
Proceed to OK NG
OK
NG
Disconnect the air fuel ratio sensor connector.
Disconnect the ECM connector.
Measure the resistance according to the value(s) in the table below.
- Standard Resistance:
Tester Connection Condition Specified Condition C102-1 (HA1A) - C58-19 (HA1A) Always Below 1 Ω C102-1 (HA1A) or C58-19 (HA1A) - Body ground and other terminals Always 10 kΩ or higher
- Result:
Proceed to OK NG
OK
NG
Connect the GTS to the DLC3.
Turn the engine switch on (IG).
Turn the GTS on.
Clear the DTCs.
- Powertrain > Engine > Clear DTCs
- 50002 372
Turn the engine switch off and wait for at least 30 seconds.
- Result:
Proceed to NEXT
NEXT
Drive the vehicle in accordance with the driving pattern described in Confirmation Driving Pattern.
Enter the following menus: Powertrain / Engine / Trouble Codes.
Read the DTCs.
- Powertrain > Engine > Trouble Codes
- 50001 372
- Result:
Result Proceed to DTCs are not output A DTC P003012, P003013 or P101A9E is output B
A
Click hereEngine / Hybrid System>6AR-FSE (ENGINE CONTROL)>SFI SYSTEM>CHECK FOR INTERMITTENT PROBLEMS
B
Inspect the EFI-MAIN NO. 3 relay.
Click hereEngine / Hybrid System>6AR-FSE (ENGINE CONTROL)>RELAY>ON-VEHICLE INSPECTION
- Result:
Proceed to OK NG
OK
NG
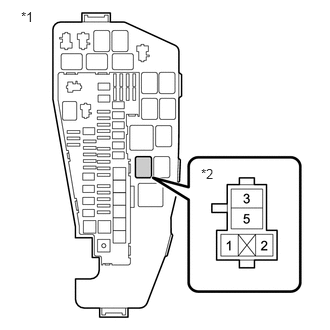
| *1 | Engine Room Relay Block and Junction Block Assembly |
| *2 | EFI-MAIN NO. 3 Relay |
Remove the EFI-MAIN NO. 3 relay from the engine room relay block and junction block assembly.
Measure the voltage according to the value(s) in the table below.
- Standard Voltage:
Tester Connection Condition Specified Condition 3 (EFI-MAIN NO. 3 relay) - Body ground Always 11 to 14 V
- Result:
Proceed to OK NG
OK
NG
Remove the EFI-MAIN NO. 3 relay from the engine room relay block and junction block assembly.
Measure the resistance according to the value(s) in the table below.
- Standard Resistance:
Tester Connection Condition Specified Condition 1 (EFI-MAIN NO. 3 relay) - Body ground Always Below 1 Ω
- Result:
Proceed to OK NG
OK
NG
Remove the EFI-MAIN NO. 3 relay from the engine room relay block and junction block assembly.
Disconnect the air fuel ratio sensor connector.
Measure the resistance according to the value(s) in the table below.
- Standard Resistance:
Tester Connection Condition Specified Condition 5 (EFI-MAIN NO. 3 relay) - C102-2 (+B) Always Below 1 Ω 5 (EFI-MAIN NO. 3 relay) or C102-2 (+B) - Body ground and other terminals Always 10 kΩ or higher
- Result:
Proceed to OK NG
OK
NG