M20A-FKS ENGINE CONTROL ACTIVE CONTROL ENGINE MOUNT(for Front Side) INSTALLATION
PROCEDURE

 12361A
1.INSTALL FRONT ENGINE MOUNTING INSULATOR
Install the front engine mounting insulator to the front frame assembly with the 3 nuts.
- Torque:
- 72 N*m (734 kgf*cm, 53 ft.*lbf)
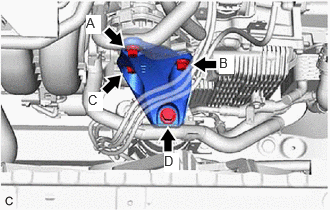
Install the front engine mounting bracket to the transaxle housing with the 3 bolts.
- Torque:
- Bolt (A), (B) and (C) : 42 N*m (428 kgf*cm, 31 ft.*lbf)
- NOTICE:
-
Temporarily tighten the bolt (A), and then fully tighten the 3 bolts in the order of (B), (C) and (A).
Install the front engine mounting bracket to the front engine mounting insulator with the bolt.
- Torque:
- Bolt (D) : 72 N*m (734 kgf*cm, 53 ft.*lbf)
Connect the vacuum hose to the front engine mounting insulator.
82121
2.CONNECT ENGINE WIRE
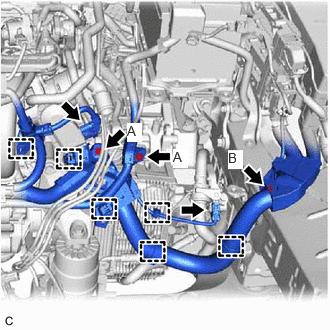
Engage the 6 clamps.
Connect the flow shutting valve (water valve) connector and throttle body with motor assembly connector.
Install the 3 bolts.
- Torque:
- Bolt (A) : 10 N*m (102 kgf*cm, 7 ft.*lbf)
- Bolt (B) : 8.0 N*m (82 kgf*cm, 71 in.*lbf)
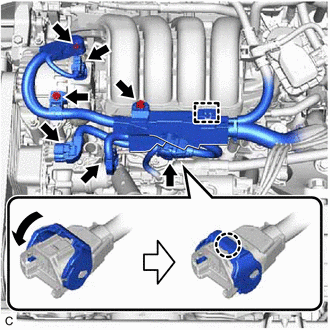
Engage the clamp.
Connect the No. 6 engine wire connector and push down the lock lever to engage the claw as shown in the illustration.
Connect the generator assembly connector, sensor wire connector and engine water pump assembly (water inlet housing) connector.
Install the nut and 2 bolts.
- Torque:
- Bolt : 10 N*m (102 kgf*cm, 7 ft.*lbf)
- Nut : 9.8 N*m (100 kgf*cm, 87 in.*lbf)
Close the terminal cap.
16261G
3.CONNECT NO. 1 WATER BY-PASS HOSE
16571C
4.CONNECT NO. 1 RADIATOR HOSE
Connect the No. 1 radiator hose to the water outlet and slide the clip to secure it.
Engage the clamp to connect the No. 1 radiator hose to the fan with motor assembly.
17650H
5.INSTALL VACUUM SWITCHING VALVE (for Active Control Engine Mount System)
6.INSTALL AIR CLEANER ASSEMBLY WITH AIR CLEANER HOSE
17750A
7.INSTALL INLET AIR CLEANER ASSEMBLY
12601B
8.INSTALL NO. 1 ENGINE COVER SUB-ASSEMBLY
53295E
9.INSTALL COOL AIR INTAKE DUCT SEAL
10.CONNECT CABLE TO NEGATIVE BATTERY TERMINAL
11.ADD ENGINE COOLANT
12.INSPECT FOR COOLANT LEAK