A25A-FXS INTAKE / EXHAUST INTAKE MANIFOLD INSTALLATION
CAUTION / NOTICE / HINT
- NOTICE:
-
This procedure includes the installation of small-head bolts. Refer to Small-Head Bolts of Basic Repair Hint to identify the small-head bolts.
-
Click hereGeneral>INTRODUCTION>REPAIR INSTRUCTION>PRECAUTION
PROCEDURE

 1.INSTALL VACUUM HOSE
Install the vacuum hose to the intake manifold.
12611B
2.INSTALL NO. 1 ENGINE COVER
Install the No. 1 engine cover with the clip.
17177
3.INSTALL NO. 1 INTAKE MANIFOLD TO HEAD GASKET
Install a new No. 1 intake manifold to head gasket to the intake manifold.
17111
4.INSTALL INTAKE MANIFOLD
w/o Stud Bolt:
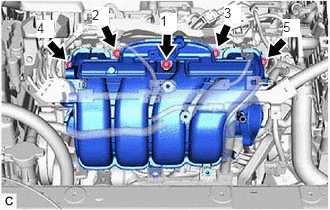
Temporarily install the intake manifold to the cylinder head sub-assembly with the 5 bolts.
Tighten the 5 bolts in the order shown in the illustration.
- Torque:
- 24 N*m (245 kgf*cm, 18 ft.*lbf)
w/ Stud Bolt:
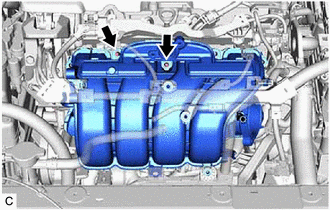
Temporarily install the intake manifold to the cylinder head sub-assembly.
Using an E8 "TORX" socket wrench, install the 2 stud bolts.
- Torque:
- 6.5 N*m (66 kgf*cm, 58 in.*lbf)
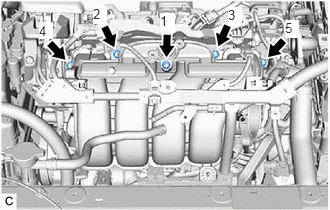
Temporarily install the 3 bolts and 2 nuts.
Tighten the 3 bolts and 2 nuts in the order shown in the illustration.
- Torque:
- 24 N*m (245 kgf*cm, 18 ft.*lbf)
23820
5.CONNECT NO. 2 FUEL VAPOR FEED HOSE
Connect the No. 2 fuel vapor feed hose to the intake manifold.
16278
6.INSTALL NO. 2 WATER BY-PASS PIPE
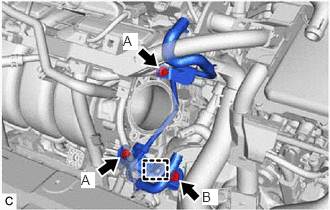
Temporarily install the No. 2 water by-pass pipe to the cylinder block sub-assembly with the bolt (B).
Using an 8 mm socket wrench, temporarily install the No. 2 water by-pass pipe to the intake manifold with the 2 bolts (A).
Tighten the bolt (B).
- Torque:
- 21 N*m (214 kgf*cm, 15 ft.*lbf)
Using the 8 mm socket wrench, tighten the 2 bolts (A).
- Torque:
- 10 N*m (102 kgf*cm, 7 ft.*lbf)
Engage the wire harness clamp to connect the HV air conditioning wire.
16279
7.CONNECT NO. 3 WATER BY-PASS PIPE
Using an 8 mm socket wrench, connect the No. 3 water by-pass pipe to the intake manifold with the bolt.
- Torque:
- 10 N*m (102 kgf*cm, 7 ft.*lbf)
Connect the No. 5 water by-pass hose to the No. 3 water by-pass pipe and slide the clip to secure it.
82121
8.CONNECT ENGINE WIRE
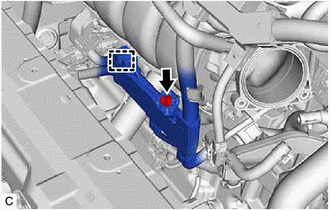
Engage the wire harness clamp to connect the engine wire to the intake manifold.
Install the bolt.
- Torque:
- 10 N*m (102 kgf*cm, 7 ft.*lbf)
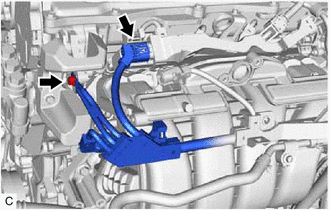
Connect the engine wire to the cylinder head sub-assembly with the bolt.
- Torque:
- 10 N*m (102 kgf*cm, 7 ft.*lbf)
Connect the No. 5 engine wire connector.
25860
9.INSTALL PURGE VALVE (PURGE VSV)
89421
10.INSTALL E.F.I. VACUUM SENSOR ASSEMBLY (MANIFOLD ABSOLUTE PRESSURE SENSOR)
25620
11.INSTALL EGR VALVE ASSEMBLY
22030
12.INSTALL THROTTLE BODY WITH MOTOR ASSEMBLY