Home › Engine / Hybrid System › A25A-FXS (ENGINE CONTROL) › SFI SYSTEM (w/o Canister Pump Module) › from 2019.10
RM33C0E _51 Engine / Hybrid System _065419 A25A-FXS ENGINE CONTROL _0331447 SFI SYSTEM(w/o Canister Pump Module) J

A25A-FXS ENGINE CONTROL  SFI SYSTEM(w/o Canister Pump Module)  VC Output Circuit  


DESCRIPTION

The ECM constantly generates a 5 V power source voltage from the auxiliary battery voltage supplied to the +B, +B2 (BATT) terminals to operate the microprocessor. The ECM also provides this power to the sensors through the VC output circuit.
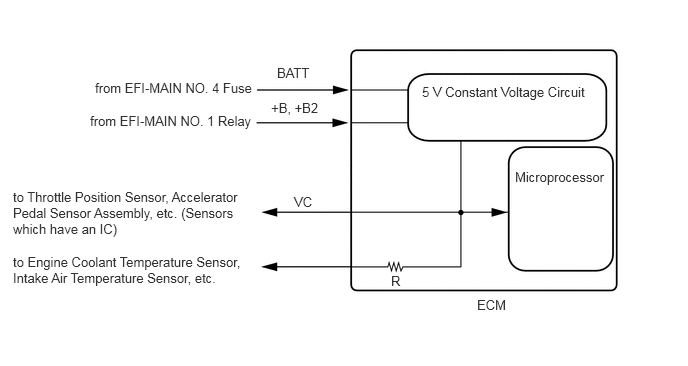
A256646E66
0.99,0.833 2.802,1.135 1.813,0.302 10 false from EFI-MAIN NO. 4 Fuse 0.938,1.177 2.698,1.531 1.76,0.354 10 false from EFI-MAIN NO. 1 Relay 0.135,1.969 2.625,2.469 2.49,0.5 10 false to Throttle Position Sensor, Accelerator Pedal Sensor Assembly, etc. (Sensors which have an IC) 0.135,2.646 2.563,3.031 2.427,0.385 10 false to Engine Coolant Temperature Sensor, Intake Air Temperature Sensor, etc. 4.969,3.094 5.313,3.406 0.344,0.313 10 false ECM 2.885,0.677 3.563,1 0.677,0.323 10 false BATT 2.823,1.042 3.49,1.292 0.667,0.25 10 false +B, +B2 3.063,2.021 3.427,2.25 0.365,0.229 10 false VC 4.396,0.875 6.188,1.229 1.792,0.354 10 false 5 V Constant Voltage Circuit 5.365,1.76 6.354,2.115 0.99,0.354 10 false Microprocessor 4.073,2.844 4.333,3.063 0.26,0.219 10 false R

When the VC circuit has a short circuit, the microprocessor in the ECM and sensors that are supplied power through the VC circuit are deactivated because power is not supplied from the VC circuit. When the system is in this condition, it will not start.

WIRING DIAGRAM

·

For the circuit diagram of the ECM power source refer to the ECM power source circuit.

Click hereEngine / Hybrid System>A25A-FXS (ENGINE CONTROL)>SFI SYSTEM (w/o Canister Pump Module)>ECM Power Source Circuit

·

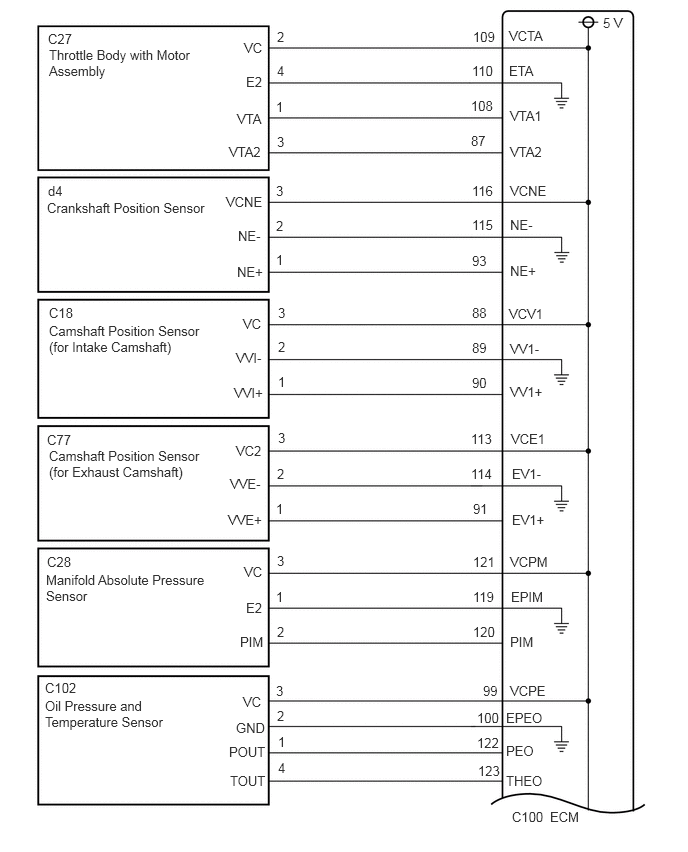
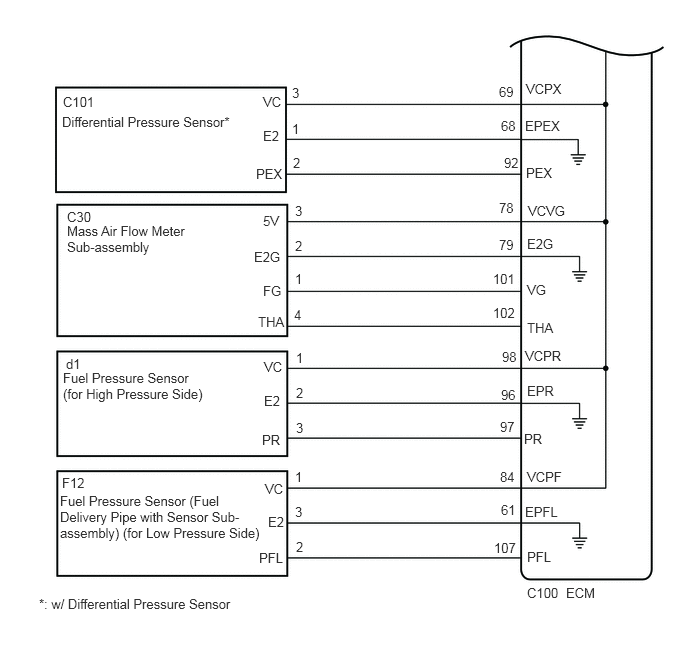
VC Output Circuit

A453889E02
0.5,0.323 0.813,0.521 0.313,0.198 10 false C27 0.51,0.49 2.031,0.958 1.521,0.469 10 false Throttle Body with Motor Assembly 0.5,1.906 0.813,2.104 0.313,0.198 10 false d4 0.49,2.083 2.375,2.521 1.885,0.438 10 false Crankshaft Position Sensor 0.51,4.667 2.125,5.167 1.615,0.5 10 false Camshaft Position Sensor (for Exhaust Camshaft) 0.49,4.5 0.802,4.698 0.313,0.198 10 false C77 0.49,5.771 0.802,5.969 0.313,0.198 10 false C28 0.479,5.958 2.167,6.479 1.688,0.521 10 false Manifold Absolute Pressure Sensor 0.51,3.177 0.823,3.375 0.313,0.198 10 false C18 0.51,3.365 2.115,3.844 1.604,0.479 10 false Camshaft Position Sensor (for Intake Camshaft) 0.469,7.083 1,7.375 0.531,0.292 10 false C102 0.469,7.271 1.708,7.906 1.24,0.635 10 false Oil Pressure and Temperature Sensor 2.542,0.417 2.854,0.615 0.313,0.198 10 false VC 2.563,0.771 2.875,0.969 0.313,0.198 10 false E2 2.469,1.156 3.333,1.406 0.865,0.25 10 false VTA 2.385,1.5 3.25,1.75 0.865,0.25 10 false VTA2 2.354,2.021 3.219,2.271 0.865,0.25 10 false VCNE 2.479,2.375 3.344,2.625 0.865,0.25 10 false NE- 2.469,2.75 3.333,3 0.865,0.25 10 false NE+ 2.531,3.292 2.844,3.49 0.313,0.198 10 false VC 2.458,3.646 2.771,3.844 0.313,0.198 10 false VVI- 2.438,4.01 2.823,4.292 0.385,0.281 10 false VVI+ 2.458,4.615 2.771,4.813 0.313,0.198 10 false VC2 2.396,4.958 3.26,5.208 0.865,0.25 10 false VVE- 2.375,5.333 3.24,5.583 0.865,0.25 10 false VVE+ 2.542,5.875 3.406,6.125 0.865,0.25 10 false VC 2.458,7.5 3.323,7.75 0.865,0.25 10 false GND 2.5,6.604 3.365,6.854 0.865,0.25 10 false PIM 2.531,7.229 3.396,7.479 0.865,0.25 10 false VC 2.563,6.25 3.427,6.5 0.865,0.25 10 false E2 2.385,7.75 3.25,8 0.865,0.25 10 false POUT 2.885,0.302 3.198,0.5 0.313,0.198 10 false 2 2.885,0.656 3.198,0.854 0.313,0.198 10 false 4 2.875,1.031 3.188,1.229 0.313,0.198 10 false 1 2.885,1.396 3.198,1.594 0.313,0.198 10 false 3 2.875,1.906 3.188,2.104 0.313,0.198 10 false 3 2.875,2.271 3.188,2.469 0.313,0.198 10 false 2 2.875,2.625 3.188,2.823 0.313,0.198 10 false 1 2.896,3.177 3.208,3.375 0.313,0.198 10 false 3 2.896,3.531 3.208,3.729 0.313,0.198 10 false 2 2.896,3.896 3.208,4.094 0.313,0.198 10 false 1 2.896,4.479 3.208,4.677 0.313,0.198 10 false 3 2.885,4.854 3.198,5.052 0.313,0.198 10 false 2 2.875,5.219 3.188,5.417 0.313,0.198 10 false 1 2.885,5.76 3.198,5.958 0.313,0.198 10 false 3 2.875,6.135 3.188,6.333 0.313,0.198 10 false 1 2.885,6.5 3.198,6.698 0.313,0.198 10 false 2 2.875,7.115 3.188,7.313 0.313,0.198 10 false 3 2.885,7.375 3.198,7.573 0.313,0.198 10 false 2 2.896,7.646 3.208,7.844 0.313,0.198 10 false 1 4.927,0.302 5.24,0.5 0.313,0.198 10 false 109 4.917,0.656 5.229,0.854 0.313,0.198 10 false 110 4.906,1.021 5.219,1.219 0.313,0.198 10 false 108 4.906,1.385 5.219,1.583 0.313,0.198 10 false 87 4.917,1.906 5.229,2.104 0.313,0.198 10 false 116 4.917,2.26 5.229,2.458 0.313,0.198 10 false 115 4.917,2.635 5.229,2.833 0.313,0.198 10 false 93 4.917,3.177 5.229,3.375 0.313,0.198 10 false 88 4.917,3.542 5.229,3.74 0.313,0.198 10 false 89 4.917,3.906 5.229,4.104 0.313,0.198 10 false 90 4.906,4.49 5.219,4.688 0.313,0.198 10 false 113 4.906,4.854 5.219,5.052 0.313,0.198 10 false 114 4.927,5.219 5.24,5.417 0.313,0.198 10 false 91 4.927,5.771 5.24,5.969 0.313,0.198 10 false 121 4.927,6.135 5.24,6.333 0.313,0.198 10 false 119 4.927,6.5 5.24,6.698 0.313,0.198 10 false 120 5.031,7.115 5.344,7.313 0.313,0.198 10 false 99 4.969,7.396 5.281,7.594 0.313,0.198 10 false 100 4.969,7.656 5.281,7.854 0.313,0.198 10 false 122 5.333,8.427 5.885,8.604 0.552,0.177 10 false C100 5.729,8.427 6.448,8.615 0.719,0.188 10 false ECM 5.302,0.292 5.969,0.552 0.667,0.26 10 false VCTA 5.302,0.656 5.969,0.917 0.667,0.26 10 false ETA 5.313,1.125 5.979,1.385 0.667,0.26 10 false VTA1 6.281,0.156 6.948,0.417 0.667,0.26 10 false 5 V 5.313,1.5 5.979,1.76 0.667,0.26 10 false VTA2 5.313,1.906 5.979,2.167 0.667,0.26 10 false VCNE 5.313,2.26 5.979,2.521 0.667,0.26 10 false NE- 5.313,2.74 5.979,3 0.667,0.26 10 false NE+ 5.302,3.188 5.969,3.448 0.667,0.26 10 false VCV1 5.313,3.552 5.979,3.813 0.667,0.26 10 false VV1- 5.313,4 5.979,4.26 0.667,0.26 10 false VV1+ 5.323,4.49 5.99,4.75 0.667,0.26 10 false VCE1 5.333,4.854 6,5.115 0.667,0.26 10 false EV1- 5.333,5.333 6,5.594 0.667,0.26 10 false EV1+ 5.313,5.771 5.979,6.031 0.667,0.26 10 false VCPM 5.323,6.135 5.99,6.396 0.667,0.26 10 false EPIM 5.313,6.604 5.979,6.865 0.667,0.26 10 false PIM 5.313,7.115 5.979,7.375 0.667,0.26 10 false VCPE 5.271,7.396 5.938,7.656 0.667,0.26 10 false EPEO 5.271,7.74 5.938,8 0.667,0.26 10 false PEO 5.271,8.052 5.885,8.25 0.615,0.198 10 false THEO 4.979,7.948 5.438,8.146 0.458,0.198 10 false 123 2.396,8.052 3.01,8.25 0.615,0.198 10 false TOUT 2.896,7.917 3.146,8.135 0.25,0.219 10 false 4

A453890E02
0.698,2.177 1.156,2.375 0.458,0.198 10 false C30 0.698,2.323 2.073,2.75 1.375,0.427 10 false Mass Air Flow Meter Sub-assembly 0.688,3.708 1.146,3.906 0.458,0.198 10 false d1 0.656,3.854 2.177,4.406 1.521,0.552 10 false Fuel Pressure Sensor (for High Pressure Side) 0.646,4.948 1.104,5.146 0.458,0.198 10 false F12 0.625,5.135 2.708,6.01 2.083,0.875 10 false Fuel Pressure Sensor (Fuel Delivery Pipe with Sensor Sub-assembly) (for Low Pressure Side) 2.74,2.219 3.198,2.417 0.458,0.198 10 false 5V 2.646,2.594 3.104,2.792 0.458,0.198 10 false E2G 2.74,2.948 3.198,3.146 0.458,0.198 10 false FG 2.688,3.271 3.146,3.469 0.458,0.198 10 false THA 2.75,3.74 3.208,3.938 0.458,0.198 10 false VC 2.75,4.094 3.208,4.292 0.458,0.198 10 false E2 2.729,4.5 3.188,4.698 0.458,0.198 10 false PR 2.76,5.01 3.219,5.208 0.458,0.198 10 false VC 2.792,5.354 3.25,5.552 0.458,0.198 10 false E2 2.698,5.729 3.156,5.927 0.458,0.198 10 false PFL 3.083,4.375 3.542,4.573 0.458,0.198 10 false 3 3.073,2.479 3.531,2.677 0.458,0.198 10 false 2 3.073,2.823 3.531,3.021 0.458,0.198 10 false 1 3.063,3.198 3.521,3.396 0.458,0.198 10 false 4 3.083,3.646 3.542,3.844 0.458,0.198 10 false 1 3.083,4.01 3.542,4.208 0.458,0.198 10 false 2 3.073,2.115 3.531,2.313 0.458,0.198 10 false 3 3.073,4.885 3.531,5.083 0.458,0.198 10 false 1 3.073,5.25 3.531,5.448 0.458,0.198 10 false 3 3.083,5.615 3.542,5.813 0.458,0.198 10 false 2 5.198,2.083 5.656,2.281 0.458,0.198 10 false 78 5.198,2.469 5.656,2.667 0.458,0.198 10 false 79 5.135,2.823 5.594,3.021 0.458,0.198 10 false 101 5.135,3.177 5.594,3.375 0.458,0.198 10 false 102 5.229,3.635 5.688,3.833 0.458,0.198 10 false 98 5.219,4.031 5.677,4.229 0.458,0.198 10 false 96 5.208,4.365 5.667,4.563 0.458,0.198 10 false 97 5.208,4.885 5.667,5.083 0.458,0.198 10 false 84 5.219,5.229 5.677,5.427 0.458,0.198 10 false 61 5.146,5.625 5.604,5.823 0.458,0.198 10 false 107 5.49,2.458 5.948,2.656 0.458,0.198 10 false E2G 5.5,2.115 5.958,2.313 0.458,0.198 10 false VCVG 5.49,2.938 5.948,3.135 0.458,0.198 10 false VG 5.49,3.333 5.948,3.531 0.458,0.198 10 false THA 5.469,3.625 5.927,3.823 0.458,0.198 10 false VCPR 5.49,3.99 5.948,4.188 0.458,0.198 10 false EPR 5.458,4.49 5.917,4.688 0.458,0.198 10 false PR 5.49,4.885 5.948,5.083 0.458,0.198 10 false VCPF 5.469,5.25 5.927,5.448 0.458,0.198 10 false EPFL 5.49,5.719 5.948,5.917 0.458,0.198 10 false PFL 5.896,6.094 6.354,6.292 0.458,0.198 10 false ECM 5.49,6.094 5.948,6.292 0.458,0.198 10 false C100 0.656,0.979 1.271,1.177 0.615,0.198 10 false C101 0.646,1.188 2.573,1.594 1.927,0.406 10 false Differential Pressure Sensor* 2.74,0.979 3.052,1.177 0.313,0.198 10 false VC 3.042,0.885 3.229,1.146 0.188,0.26 10 false 3 2.74,1.333 3.052,1.531 0.313,0.198 10 false E2 3.042,1.26 3.198,1.458 0.156,0.198 10 false 1 5.198,0.875 5.51,1.073 0.313,0.198 10 false 69 5.479,0.844 6.125,1.198 0.646,0.354 10 false VCPX 5.219,1.229 5.531,1.427 0.313,0.198 10 false 68 5.469,1.229 6.083,1.427 0.615,0.198 10 false EPEX 2.667,1.729 3.125,1.927 0.458,0.198 10 false PEX 3.052,1.615 3.208,1.813 0.156,0.198 10 false 2 5.25,1.615 5.563,1.813 0.313,0.198 10 false 92 5.479,1.719 5.938,1.917 0.458,0.198 10 false PEX 0.406,6.208 2.99,6.573 2.583,0.365 10 false *: w/ Differential Pressure Sensor


CAUTION / NOTICE / HINT

NOTICE:

Check the fuses for circuits related to this system before performing the following inspection procedure.


PROCEDURE

1.CHECK CONNECTION BETWEEN GTS AND ECM
a.

Connect the GTS to the DLC3.


b.

Turn the power switch on (IG).


c.

Turn the GTS on.


d.

Check the communication between the GTS and ECM.

HINT:

It can be checked using the "Engine" item of the Data List.


Result:
Result Proceed to
Communication is not possible A
Communication is possible B


A

2.CHECK EFI NO. 1 FUSE VOLTAGE

B

PROCEED TO NEXT SUSPECTED AREA SHOWN IN PROBLEM SYMPTOMS TABLE

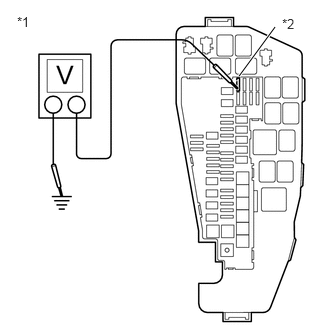
2.CHECK EFI NO. 1 FUSE VOLTAGE
A412032C01
2.49,0.792 2.865,0.281 true 0.177,0.146 0.49,0.302 0.313,0.156 10 false *1 2.938,0.167 3.25,0.323 0.313,0.156 10 false *2
*1 No. 1 Engine Room Relay Block and No. 1 Junction Block Assembly
*2 EFI NO. 1 Fuse


a.

Turn the power switch on (IG).


b.

Measure the voltage according to the value(s) in the table below.

Standard Voltage:
Tester Connection Condition Specified Condition
1 (EFI NO. 1 fuse) - Body ground Power switch on (IG) 11 to 14 V


HINT:
·

Check the fuse with it installed to the No. 1 engine room relay block and No. 1 junction block assembly.

·

If the result is not as specified, since current is not flowing to the +B and +B2 terminals of the ECM, the system may not be started.


Result:
Proceed to
OK
NG


OK

3.CHECK CONNECTION BETWEEN GTS AND ECM (THROTTLE POSITION SENSOR)

NG

3.CHECK CONNECTION BETWEEN GTS AND ECM (THROTTLE POSITION SENSOR)
a.

Disconnect the throttle body with motor assembly connector.


b.

Turn the power switch on (IG).


c.

Turn the GTS on.


d.

Check the communication between the GTS and ECM.

HINT:

It can be checked using the "Engine" item of the Data List.


Result:
Result Proceed to
Communication is not possible A
Communication is possible B


HINT:

Perform "Inspection After Repair" after replacing the throttle body with motor assembly.

Click hereEngine / Hybrid System>A25A-FXS (ENGINE CONTROL)>SFI SYSTEM (w/o Canister Pump Module)>INITIALIZATION


A

4.CHECK CONNECTION BETWEEN GTS AND ECM (CRANKSHAFT POSITION SENSOR)

B

REPLACE THROTTLE BODY WITH MOTOR ASSEMBLY

4.CHECK CONNECTION BETWEEN GTS AND ECM (CRANKSHAFT POSITION SENSOR)
a.

Disconnect the crankshaft position sensor connector.


b.

Turn the power switch on (IG).


c.

Turn the GTS on.


d.

Check the communication between the GTS and ECM.

HINT:

It can be checked using the "Engine" item of the Data List.


Result:
Result Proceed to
Communication is not possible A
Communication is possible B


A

5.CHECK CONNECTION BETWEEN GTS AND ECM (CAMSHAFT POSITION SENSOR (FOR INTAKE CAMSHAFT))

B

5.CHECK CONNECTION BETWEEN GTS AND ECM (CAMSHAFT POSITION SENSOR (FOR INTAKE CAMSHAFT))
a.

Disconnect the camshaft position sensor (for intake camshaft) connector.


b.

Turn the power switch on (IG).


c.

Turn the GTS on.


d.

Check the communication between the GTS and ECM.

HINT:

It can be checked using the "Engine" item of the Data List.


Result:
Result Proceed to
Communication is not possible A
Communication is possible B


A

6.CHECK CONNECTION BETWEEN GTS AND ECM (MANIFOLD ABSOLUTE PRESSURE SENSOR)

B

REPLACE CAMSHAFT POSITION SENSOR (FOR INTAKE CAMSHAFT)

6.CHECK CONNECTION BETWEEN GTS AND ECM (MANIFOLD ABSOLUTE PRESSURE SENSOR)
a.

Disconnect the manifold absolute pressure sensor connector.


b.

Turn the power switch on (IG).


c.

Turn the GTS on.


d.

Check the communication between the GTS and ECM.

HINT:

It can be checked using the "Engine" item of the Data List.


Result:
Result Proceed to
Communication is not possible A
Communication is possible B


A

7.CHECK CONNECTION BETWEEN GTS AND ECM (CAMSHAFT POSITION SENSOR (FOR EXHAUST CAMSHAFT))

B

REPLACE MANIFOLD ABSOLUTE PRESSURE SENSOR

7.CHECK CONNECTION BETWEEN GTS AND ECM (CAMSHAFT POSITION SENSOR (FOR EXHAUST CAMSHAFT))
a.

Disconnect the camshaft position sensor (for exhaust camshaft) connector.


b.

Turn the power switch on (IG).


c.

Turn the GTS on.


d.

Check the communication between the GTS and ECM.

HINT:

It can be checked using the "Engine" item of the Data List.


Result:
Result Proceed to
Communication is not possible A
Communication is possible B


A

8.CHECK CONNECTION BETWEEN GTS AND ECM (OIL PRESSURE AND TEMPERATURE SENSOR)

B

REPLACE CAMSHAFT POSITION SENSOR (FOR EXHAUST CAMSHAFT)

8.CHECK CONNECTION BETWEEN GTS AND ECM (OIL PRESSURE AND TEMPERATURE SENSOR)
a.

Disconnect the oil pressure and temperature sensor connector.


b.

Turn the power switch on (IG).


c.

Turn the GTS on.


d.

Check the communication between the GTS and ECM.

HINT:

It can be checked using the "Engine" item of the Data List.


Result:
Result Proceed to
Communication is not possible A
Communication is possible B


A

9.CHECK CONNECTION BETWEEN GTS AND ECM (FUEL PRESSURE SENSOR (FOR HIGH PRESSURE SIDE))

B

9.CHECK CONNECTION BETWEEN GTS AND ECM (FUEL PRESSURE SENSOR (FOR HIGH PRESSURE SIDE))
a.

Disconnect the fuel pressure sensor (for high pressure side) connector.


b.

Turn the power switch on (IG).


c.

Turn the GTS on.


d.

Check the communication between the GTS and ECM.

HINT:

It can be checked using the "Engine" item of the Data List.


Result:
Result Proceed to
Communication is not possible A
Communication is possible B


HINT:

Perform "Inspection After Repair" after replacing the fuel pressure sensor (for high pressure side).

Click hereEngine / Hybrid System>A25A-FXS (ENGINE CONTROL)>SFI SYSTEM (w/o Canister Pump Module)>INITIALIZATION


A

10.CHECK CONNECTION BETWEEN GTS AND ECM (FUEL PRESSURE SENSOR (FUEL DELIVERY PIPE WITH SENSOR SUB-ASSEMBLY) (FOR LOW PRESSURE SIDE))

B

REPLACE FUEL PRESSURE SENSOR (FOR HIGH PRESSURE SIDE)

10.CHECK CONNECTION BETWEEN GTS AND ECM (FUEL PRESSURE SENSOR (FUEL DELIVERY PIPE WITH SENSOR SUB-ASSEMBLY) (FOR LOW PRESSURE SIDE))
a.

Disconnect the fuel pressure sensor (fuel delivery pipe with sensor sub-assembly) (for low pressure side) connector.


b.

Turn the power switch on (IG).


c.

Turn the GTS on.


d.

Check the communication between the GTS and ECM.

HINT:

It can be checked using the "Engine" item of the Data List.


Result:
Result Proceed to
Communication is not possible (w/ Differential Pressure Sensor) A
Communication is not possible (w/o Differential Pressure Sensor) B
Communication is possible C


HINT:

Perform "Inspection After Repair" after replacing the fuel pressure sensor (fuel delivery pipe with sensor sub-assembly) (for low pressure side).

Click hereEngine / Hybrid System>A25A-FXS (ENGINE CONTROL)>SFI SYSTEM (w/o Canister Pump Module)>INITIALIZATION


A

11.CHECK CONNECTION BETWEEN GTS AND ECM (DIFFERENTIAL PRESSURE SENSOR)

B

12.CHECK CONNECTION BETWEEN GTS AND ECM (MASS AIR FLOW METER SUB-ASSEMBLY)

C

REPLACE FUEL PRESSURE SENSOR (FUEL DELIVERY PIPE WITH SENSOR SUB-ASSEMBLY) (FOR LOW PRESSURE SIDE)

11.CHECK CONNECTION BETWEEN GTS AND ECM (DIFFERENTIAL PRESSURE SENSOR)
a.

Disconnect the differential pressure sensor connector.


b.

Turn the power switch on (IG).


c.

Turn the GTS on.


d.

Check the communication between the GTS and ECM.

HINT:

It can be checked using the "Engine" item of the Data List.


Result:
Result Proceed to
Communication is not possible A
Communication is possible B


A

12.CHECK CONNECTION BETWEEN GTS AND ECM (MASS AIR FLOW METER SUB-ASSEMBLY)

B

12.CHECK CONNECTION BETWEEN GTS AND ECM (MASS AIR FLOW METER SUB-ASSEMBLY)
a.

Disconnect the mass air flow meter sub-assembly connector.


b.

Turn the power switch on (IG).


c.

Turn the GTS on.


d.

Check the communication between the GTS and ECM.

HINT:

It can be checked using the "Engine" item of the Data List.


Result:
Result Proceed to
Communication is not possible A
Communication is possible B


HINT:

Perform "Inspection After Repair" after replacing the mass air flow meter sub-assembly.

Click hereEngine / Hybrid System>A25A-FXS (ENGINE CONTROL)>SFI SYSTEM (w/o Canister Pump Module)>INITIALIZATION


A

13.CHECK HARNESS AND CONNECTOR

B

REPLACE MASS AIR FLOW METER SUB-ASSEMBLY

13.CHECK HARNESS AND CONNECTOR
a.

Disconnect the throttle body with motor assembly connector.


b.

Disconnect the crankshaft position sensor connector.


c.

Disconnect the camshaft position sensor (for intake camshaft) connector.


d.

Disconnect the manifold absolute pressure sensor connector.


e.

Disconnect the camshaft position sensor (for exhaust camshaft) connector.


f.

Disconnect the oil pressure and temperature sensor connector.


g.

Disconnect the fuel pressure sensor (for high pressure side) connector.


h.

Disconnect the fuel pressure sensor (fuel delivery pipe with sensor sub-assembly) (for low pressure side) connector.


i.

Disconnect the mass air flow meter sub-assembly connector.


j.

Disconnect the differential pressure sensor connector (w/ Differential Pressure Sensor).


k.

Disconnect the ECM connectors.


l.

Measure the resistance according to the value(s) in the table below.

Standard Resistance:
Tester Connection Condition Specified Condition
C100-109 (VCTA) - Body ground Always 10 kΩ or higher
C100-116 (VCNE) - Body ground Always 10 kΩ or higher
C100-88 (VCV1) - Body ground Always 10 kΩ or higher
C100-113 (VCE1) - Body ground Always 10 kΩ or higher
C100-121 (VCPM) - Body ground Always 10 kΩ or higher
C100-99 (VCPE) - Body ground Always 10 kΩ or higher
C100-78 (VCVG) - Body ground Always 10 kΩ or higher
C100-98 (VCPR) - Body ground Always 10 kΩ or higher
C100-84 (VCPF) - Body ground Always 10 kΩ or higher
C100-69 (VCPX) - Body ground Always 10 kΩ or higher


m.

Remove the VVT, EFI-MAIN NO. 2 and EFI-MAIN NO. 3 relays from the No. 1 engine room relay block and No. 1 junction block assembly.

HINT:

Remove the VVT, EFI-MAIN NO. 2 and EFI-MAIN NO. 3 relays connected between the checked terminals as the coil inside the relay influences the measurement value.


n.

Measure the resistance according to the value(s) in the table below.

Standard Resistance:
Tester Connection Condition Specified Condition
A22-9 (+B) - 1 (EFI NO. 1 fuse) Always Below 1 Ω
A22-35 (+B2) - 1 (EFI NO. 1 fuse) Always Below 1 Ω
A22-9 (+B) - Body ground Always 10 kΩ or higher
A22-35 (+B2) - Body ground Always 10 kΩ or higher


Result:
Proceed to
OK
NG


OK

NG

REPAIR OR REPLACE HARNESS OR CONNECTOR