HEATING / AIR CONDITIONING CONDENSER INSTALLATION
PROCEDURE

 88460
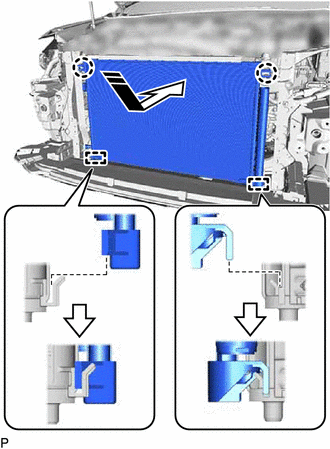
1.INSTALL COOLER CONDENSER ASSEMBLY

|
Install in this Direction |
Engage the 2 guides and 2 claws to install the cooler condenser assembly as shown in the illustration.
- NOTICE:
-
Do not damage the cooler condenser assembly or radiator assembly when installing the cooler condenser assembly.
- HINT:
-
If a new cooler condenser assembly is installed, add compressor oil to the cooler condenser assembly as follows.
- Capacity:
Add 40 cc (1.35 fl. oz)
- Compressor Oil:
ND-OIL 11 or equivalent
53205
2.INSTALL UPPER RADIATOR SUPPORT SUB-ASSEMBLY
88710E
3.CONNECT AIR CONDITIONING TUBE AND ACCESSORY ASSEMBLY
Remove the vinyl tape from the cooler condenser assembly and air conditioning tube and accessory assembly.
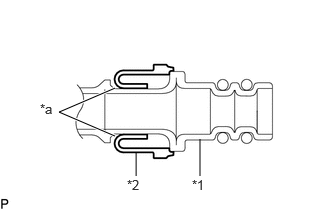
| *1 | Air Conditioning Tube and Accessory Assembly |
| *2 | Piping Clamp |
| *a | Groove |
Install a new piping clamp to the air conditioning tube and accessory assembly.
- NOTICE:
- ·
Securely engage the piping clamp to the groove of the air conditioning tube and accessory assembly.
·Do not open the piping clamp more than the diameter of the air conditioning tube and accessory assembly when installing it.
·Do not install the piping clamp with the large diameter section facing the wrong direction.
Thoroughly coat 2 new O-rings and the contact surface of the air conditioning tube and accessory assembly with compressor oil.
- Compressor Oil:
ND-OIL 11 or equivalent
Install the 2 O-rings to the air conditioning tube and accessory assembly.
- NOTICE:
-
Keep the O-rings and O-ring fitting surfaces free of foreign matter.
Connect the air conditioning tube and accessory assembly to the cooler condenser assembly.
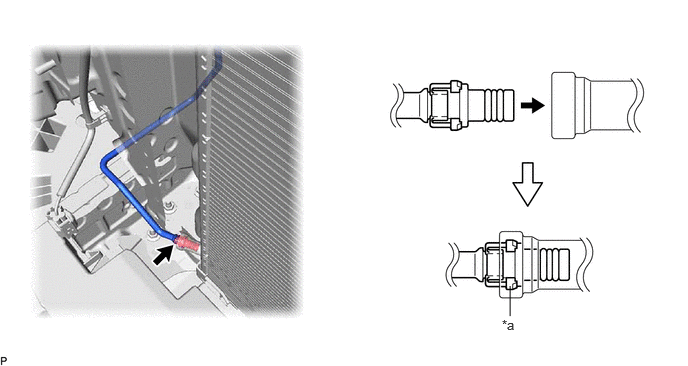
| *a | Large Diameter Section of Piping Clamp | - | - |
- NOTICE:
-
Connect the parts by holding the pipe, not the piping clamp.
Securely insert the piping clamp to the point where the large diameter section of the piping clamp is covered by the cooler condenser assembly.
- HINT:
- ·
When inserting, make sure that a click sound is heard.
·Check that the air conditioning tube and accessory assembly is securely connected by pulling it.
88711
4.CONNECT NO. 1 COOLER REFRIGERANT DISCHARGE HOSE SUB-ASSEMBLY
Remove the vinyl tape from the No. 1 cooler refrigerant discharge hose sub-assembly and the connecting part of the cooler condenser assembly.
Sufficiently apply compressor oil to a new O-ring and the fitting surface of the No. 1 cooler refrigerant discharge hose sub-assembly.
- Compressor Oil:
ND-OIL 11 or equivalent
Install the O-ring to the No. 1 cooler refrigerant discharge hose sub-assembly.
- HINT:
-
Keep the O-ring and O-ring fitting surface free of foreign matter.
Connect the No. 1 cooler refrigerant discharge hose sub-assembly to the cooler condenser assembly with the bolt.
- Torque:
- 5.4 N*m (55 kgf*cm, 48 in.*lbf)
16593B
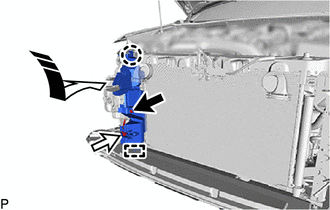
5.INSTALL NO. 1 RADIATOR AIR GUIDE RH (w/o Grille Shutter)
|
|
Install in this Direction |
Engage the guide and claw to install the No. 1 radiator air guide RH as shown in the illustration.
Install the clip.
Connect the connector.
16595B
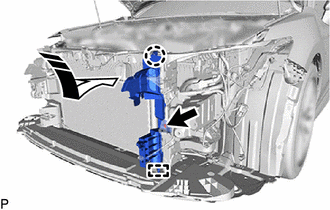
6.INSTALL NO. 1 RADIATOR AIR GUIDE LH (w/o Grille Shutter)
|
|
Install in this Direction |
Engage the guide and claw to install the No. 1 radiator air guide LH as shown in the illustration.
Install the clip.
16593B
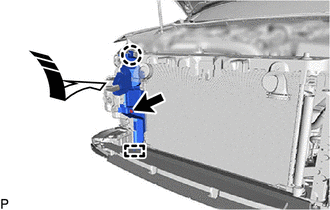
7.INSTALL NO. 1 RADIATOR AIR GUIDE RH (w/ Grille Shutter)
|
|
Install in this Direction |
Engage the guide and claw to install the No. 1 radiator air guide RH as shown in the illustration.
Install the clip.
16595B
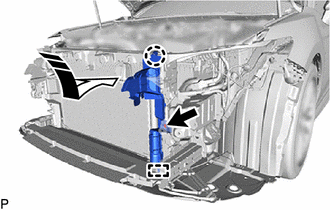
8.INSTALL NO. 1 RADIATOR AIR GUIDE LH (w/ Grille Shutter)
|
|
Install in this Direction |
Engage the guide and claw to install the No. 1 radiator air guide LH as shown in the illustration.
Install the clip.
53510
9.INSTALL HOOD LOCK ASSEMBLY
17750A
10.INSTALL INLET AIR CLEANER ASSEMBLY
53253B
11.INSTALL UPPER RADIATOR MOUNTING BRACKET
52131A
12.INSTALL FRONT BUMPER REINFORCEMENT
52611
13.INSTALL FRONT BUMPER ENERGY ABSORBER
16691A
14.INSTALL FRONT RADIATOR SIDE AIR GUIDE PLATE RH (w/o Grille Shutter)
15.INSTALL HEADLIGHT ASSEMBLY LH (for LED Type Turn Signal Light)
16.INSTALL HEADLIGHT ASSEMBLY RH (for LED Type Turn Signal Light)
- HINT:
-
Use the same procedure as for the LH side.
17.INSTALL HEADLIGHT ASSEMBLY LH (for Bulb Type Turn Signal Light)
18.INSTALL HEADLIGHT ASSEMBLY RH (for Bulb Type Turn Signal Light)
- HINT:
-
Use the same procedure as for the LH side.
53019F
19.INSTALL RADIATOR SHUTTER SUB-ASSEMBLY (w/ Grille Shutter)
20.CHARGE AIR CONDITIONING SYSTEM WITH REFRIGERANT
for HFC-134a (R134a):
Click hereVehicle Interior>HEATING / AIR CONDITIONING>REFRIGERANT>REPLACEMENT
for HFO-1234yf (R1234yf):
Click hereVehicle Interior>HEATING / AIR CONDITIONING>REFRIGERANT (for HFO-1234yf(R1234yf))>REPLACEMENT
21.WARM UP COMPRESSOR
for HFC-134a (R134a):
Click hereVehicle Interior>HEATING / AIR CONDITIONING>REFRIGERANT>REPLACEMENT
for HFO-1234yf (R1234yf):
Click hereVehicle Interior>HEATING / AIR CONDITIONING>REFRIGERANT (for HFO-1234yf(R1234yf))>REPLACEMENT
22.INSPECT FOR REFRIGERANT LEAK
for HFC-134a (R134a):
Click hereVehicle Interior>HEATING / AIR CONDITIONING>REFRIGERANT>REPLACEMENT
for HFO-1234yf (R1234yf):
Click hereVehicle Interior>HEATING / AIR CONDITIONING>REFRIGERANT (for HFO-1234yf(R1234yf))>REPLACEMENT
53301
23.ADJUST HOOD SUB-ASSEMBLY