CLUTCH CLUTCH UNIT(for M15#) INSTALLATION
PROCEDURE

 33311W
1.INSTALL INPUT SHAFT BEARING
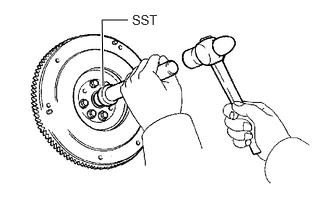
Using SST and hammer, install a new input shaft bearing.
- SST
- 09304-12012
- HINT:
-
After installing the input shaft bearing to the hub, make sure that it rotates smoothly.
Install the 2 bolts.
- Torque:
190 N*m (1937 kgf*cm, 140 ft.*lbf)
33311W
2.INSPECT INPUT SHAFT BEARING
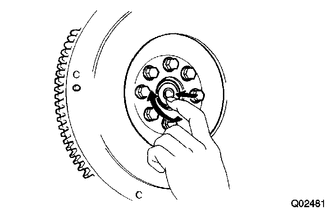
Turn the input shaft bearing by hand while applying force in the rotation direction.
If the input shaft bearing is stuck or difficult to turn, replace the input shaft bearing.
- HINT:
-
The input shaft bearing is permanently lubricated and requires no cleaning or lubrication.
31250
3.INSTALL CLUTCH DISC ASSEMBLY
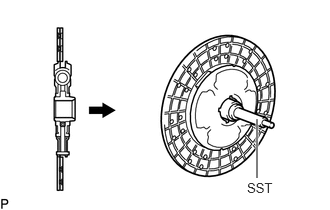
Insert SST into the clutch disc assembly, then insert them into the flywheel sub-assembly.
- SST
- 09301-00110

|
Manual Transmission Assembly Side |
- NOTICE:
-
Insert the clutch disc assembly in the correct orientation.
31210
4.INSTALL CLUTCH COVER ASSEMBLY
Align the matchmarks on the clutch cover assembly and flywheel sub-assembly.
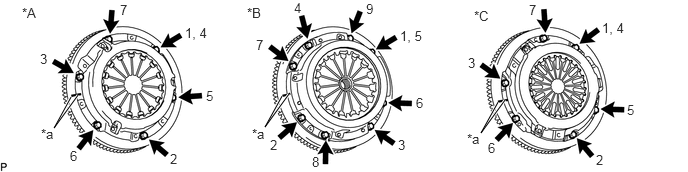
| *A | for M152 and M155 with 1HZ | *B | for M155 with 1BZ-FPE |
| *C | for M156 | - | - |
| *a | Matchmark | - | - |
for M155 with 1BZ-FPE:
Following the procedures shown in the illustration, tighten the 8 bolts in the order starting with the bolt located near the knock pin on the top.
- Torque:
39 N*m (400 kgf*cm, 29 ft.*lbf)
- HINT:
- ·
Following the order in the illustration, uniformly tighten the bolts.
·Move SST up and down, right and left lightly, after checking that the clutch disc assembly is in the center, and tighten the bolts.
except M155 with 1BZ-FPE:
Following the procedures shown in the illustration, tighten the 6 bolts in the order starting with the bolt located near the knock pin on the top.
- Torque:
19 N*m (194 kgf*cm, 14 ft.*lbf)
- HINT:
- ·
Following the order in the illustration, uniformly tighten the bolts.
·Move SST up and down, right and left lightly, after checking that the clutch disc assembly is in the center, and tighten the bolts.
31210
5.INSPECT AND ADJUST CLUTCH COVER ASSEMBLY
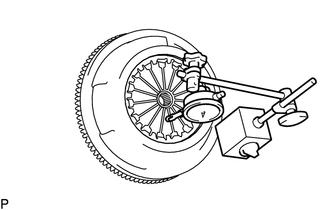
Using a dial indicator with roller instrument, check the diaphragm spring tip alignment.
- Maximum non-alignment:
0.5 mm (0.0197 in.)
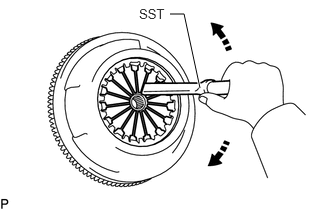
If the alignment is not as specified, adjust the diaphragm spring tip alignment using SST.
- SST
- 09333-00013
|
|
Adjust |
31236B
6.INSTALL RELEASE FORK SUPPORT
Install the release fork support onto the manual transmission assembly.
- Torque:
- for M156:
39 N*m (398 kgf*cm, 29 ft.*lbf)
- except M156:
47 N*m (480 kgf*cm, 35 ft.*lbf)
31232A
7.INSTALL RELEASE BEARING HUB CLIP
31204
8.INSTALL CLUTCH RELEASE FORK SUB-ASSEMBLY
Apply release hub grease to the clutch release fork sub-assembly and clutch release bearing assembly contact surfaces, clutch release fork sub-assembly and push rod contact surface and release fork pivot point.
- Grease:
Toyota Genuine Release Hub Grease or equivalent
Install the clutch release fork sub-assembly onto the clutch release bearing assembly.
31230
9.INSTALL CLUTCH RELEASE BEARING ASSEMBLY
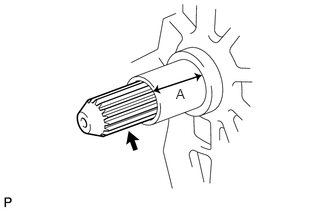
Apply clutch spline grease to the input shaft spline.
- Grease:
Toyota Genuine Clutch Spline Grease or equivalent
|
|
Toyota Genuine Clutch Spline Grease or equivalent |
- NOTICE:
-
Do not apply grease to portion A shown in the illustration.
Install the clutch release bearing assembly onto the clutch release fork sub-assembly, and then install them onto the manual transmission assembly.
- NOTICE:
-
After installation, move the fork forward and backward to check that the clutch release bearing assembly slides smoothly.
33110
10.INSTALL MANUAL TRANSMISSION ASSEMBLY