N04C-VL ENGINE CONTROL DIESEL THROTTLE BODY INSTALLATION
PROCEDURE

 26100
1.INSTALL VENTURI ASSEMBLY
Remove any seal packing material from the contact surface.
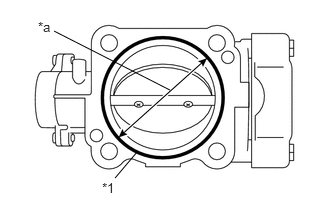
Apply a continuous bead of seal packing (width: 1.5 to 2.5 mm (0.059 to 0.098 in.)) as shown in the illustration.
- Seal packing:
Toyota Genuine Seal Packing Black, Three Bond 1207B or equivalent
| *1 | Seal Packing |
| *a | 70 mm (2.75 in.) |
- NOTICE:
- ·
Remove any oil from contact surface.
·Apply seal packing to the inner side of the bolt holes.
·Install the venturi assembly within 3 minutes of applying the seal packing.
·Do not run the engine for at least 2 hours after installing.
Install the venturi assembly with the 4 nuts onto the intake pipe.
- Torque:
29 N*m (291 kgf*cm, 21 ft.*lbf)
2.INSTALL INTAKE PIPE WITH VENTURI ASSEMBLY
Remove any seal packing material from the contact surface.
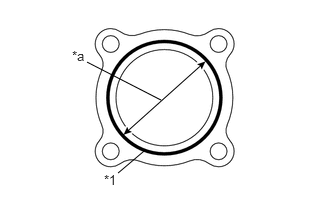
Apply a continuous bead of seal packing (width: 1.5 to 2.5 mm (0.059 to 0.098 in. )) as shown in the illustration.
- Seal packing:
Toyota Genuine Seal Packing Black, Three Bond 1207B or equivalent
| *1 | Seal Packing |
| *a | 70 mm (2.75 in.) |
- NOTICE:
- ·
Remove any oil from contact surface.
·Apply seal packing to the inner side of the bolt holes.
·Install the venturi assembly within 3 minutes of applying the seal packing.
·Do not run the engine for at least 2 hours after installing.
Install the intake pipe with venturi assembly with the 2 nuts and 2 bolts.
- Torque:
29 N*m (291 kgf*cm, 21 ft.*lbf)
Install the oil level dipstick guide with the bolt.
- Torque:
29 N*m (291 kgf*cm, 21 ft.*lbf)
Connect the vacuum hose to the intake pipe.
Connect the throttle position sensor connector and the throttle control motor connector.
17342P
3.INSTALL NO. 2 AIR HOSE
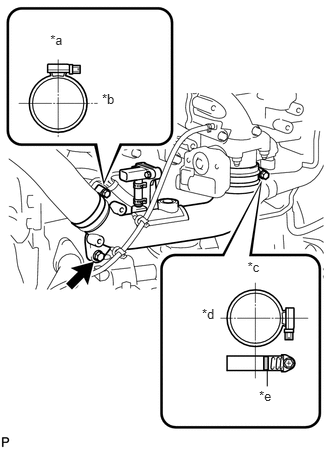
Connect the No. 2 air hose and install the bolt.
- Torque:
18 N*m (184 kgf*cm, 13 ft.*lbf)
| *a | Upper Side |
| *b | Outside |
| *c | Inside |
| *d | Front Side |
| *e | Paint Mark |
Tighten the hose clamp (intercooler air hose side), as shown in the illustration.
- Torque:
6.5 N*m (66 kgf*cm, 58 in.*lbf)
Tighten the hose clamp (venturi side) until its end portion overlaps the paint mark.
Connect the connector and the 2 hose clamps.
53712C
4.INSTALL FRONT FENDER APRON LH
Install the front fender apron LH with the 6 bolts.
- Torque:
7.0 N*m (71 kgf*cm, 62 in.*lbf)
51441D
5.INSTALL NO. 1 ENGINE UNDER COVER
58701A
6.INSTALL FRONT ENGINE SERVICE COVER PANEL SUB-ASSEMBLY
33503F
7.INSTALL FLOOR SHIFT SHIFT LEVER SUB-ASSEMBLY
33820B
8.CONNECT TRANSMISSION CONTROL CABLE ASSEMBLY
58286
9.INSTALL NO. 1 SHIFT AND SELECT LEVER BOOT
58534A
10.INSTALL TRANSMISSION COVER MAT
33504F
11.INSTALL SHIFT KNOB
58420
12.INSTALL NO. 2 ENGINE SERVICE HOLE COVER ASSEMBLY
58521D
13.INSTALL ENGINE SERVICE HOLE COVER MAT
58734B
14.INSTALL REAR ENGINE SERVICE COVER WEATHERSTRIP
58410
15.INSTALL ENGINE SERVICE HOLE COVER