N04C-VL INTAKE TURBOCHARGER INSTALLATION
PROCEDURE

 17201
1.CLEAN TURBOCHARGER SUB-ASSEMBLY
17201
2.INSTALL TURBOCHARGER SUB-ASSEMBLY
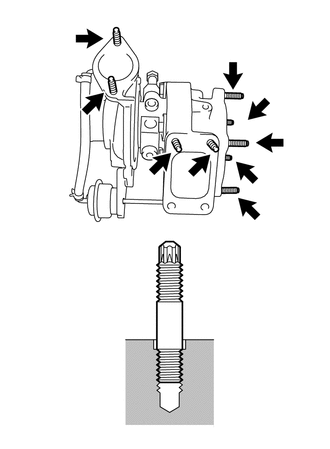
Tighten the 9 stud bolts into the turbocharger sub-assembly until the unthreaded section of the stud bolts is touching the female screw sections of the turbocharger sub-assembly, as shown in the illustration.
- NOTICE:
- ·
If the bolts are not securely tightened, they may fall out.
·Excessively tightening the bolts may crack the female screw section.
Install a new gasket and the turbocharger sub-assembly with 4 new nuts and 4 spacers.
- Torque:
70 N*m (714 kgf*cm, 52 ft.*lbf)
Retighten the 4 nuts.
- Torque:
70 N*m (714 kgf*cm, 52 ft.*lbf)
Engage the 3 claws and connect the engine wire harness.
16028
3.INSTALL NO. 1 TURBO WATER PIPE SUB-ASSEMBLY
Install 4 new gaskets and the No. 1 turbo water pipe sub-assembly with the 2 union bolts and the bolt.
- Torque:
- for Union Bolt:
25 N*m (250 kgf*cm, 18 ft.*lbf)
- for Bolt:
29 N*m (291 kgf*cm, 21 ft.*lbf)
Engage the 2 wire harness clamps.
15474
4.INSTALL TURBO OIL OUTLET PIPE
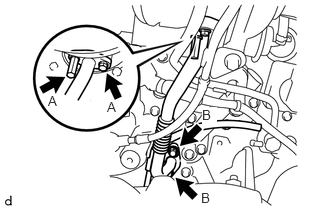
Install 2 new gaskets and the turbo oil outlet pipe and water drain pipe with the 4 bolts.
- Torque:
- for Bolt A:
12 N*m (122 kgf*cm, 9 ft.*lbf)
- for Bolt B:
29 N*m (291 kgf*cm, 21 ft.*lbf)
15407
5.INSTALL TURBO OIL INLET PIPE SUB-ASSEMBLY
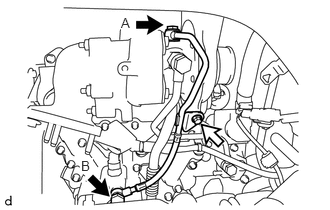
Install 4 new gaskets and the turbo oil inlet pipe sub-assembly with the 2 union bolts and the bolt.
- Torque:
- for Union Bolt A:
20 N*m (204 kgf*cm, 15 ft.*lbf)
- for Union Bolt B:
25 N*m (250 kgf*cm, 18 ft.*lbf)
- for Bolt:
29 N*m (291 kgf*cm, 21 ft.*lbf)

|
Union Bolt |

|
Bolt |
17291
6.INSTALL TURBINE OUTLET ELBOW
Install a new gasket and the turbine outlet elbow with the 2 bolts and the 5 nuts.
- Torque:
- for Bolt:
29 N*m (291 kgf*cm, 21 ft.*lbf)
- for Nut:
36 N*m (370 kgf*cm, 27 ft.*lbf)
17341F
7.CONNECT NO. 1 AIR HOSE
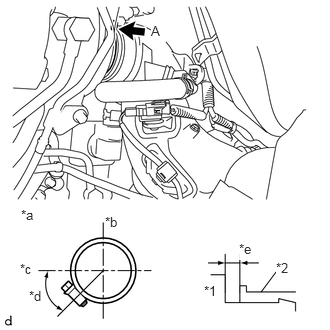
Connect the No. 1 air hose with the hose clamp as shown in the illustration.
- Torque:
5.0 N*m (51 kgf*cm, 44 in.*lbf)
| *1 | Turbocharger Sub-assembly |
| *2 | No. 1 Air Hose |
| *a | View A |
| *b | Upper Side |
| *c | RH Side |
| *d | 45° |
| *e | 0 to 1.2 mm |
Install the bolt.
- Torque:
18 N*m (184 kgf*cm, 13 ft.*lbf)
Connect the air hose with the clamp.
Engage the 4 clamps to the No. 1 air hose.
16028
8.INSTALL NO. 2 TURBO WATER PIPE SUB-ASSEMBLY
Install a new O-ring onto the No. 2 turbo water pipe sub-assembly.
Install 2 new gaskets and the No. 2 turbo water pipe sub-assembly with the union bolt and bolt.
- Torque:
- for Union Bolt:
25 N*m (250 kgf*cm, 18 ft.*lbf)
- for Bolt:
29 N*m (291 kgf*cm, 21 ft.*lbf)
17271
9.INSTALL NO. 1 TURBO INSULATOR
Install the No. 1 turbo insulator with the 3 bolts.
- Torque:
29 N*m (291 kgf*cm, 21 ft.*lbf)
17700
10.INSTALL AIR CLEANER ASSEMBLY
Install the air cleaner assembly with the 4 bolts.
- Torque:
18 N*m (184 kgf*cm, 13 ft.*lbf)
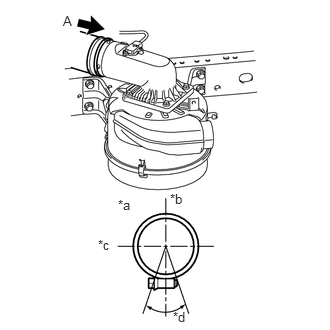
Connect the No. 1 air hose with the hose clamp as shown in the illustration.
| *a | View A |
| *b | Upper Side |
| *c | RH Side |
| *d | 30° |
Connect the intake mass air flow meter sub-assembly connector and engage the clamp to the air cleaner assembly.
17113D
11.INSTALL NO. 1 INTAKE PIPE
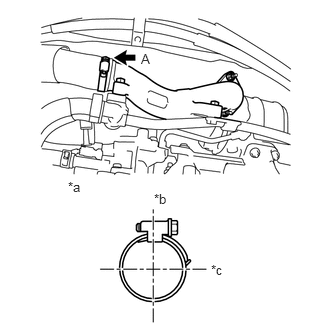
Install a new gasket and the No. 1 intake pipe with the 2 nuts and the 3 bolts.
- Torque:
29 N*m (291 kgf*cm, 21 ft.*lbf)
| *a | View A |
| *b | Upper Side |
| *c | RH Side |
Connect the intercooler air hose.
58701A
12.INSTALL FRONT ENGINE SERVICE COVER PANEL SUB-ASSEMBLY
33503F
13.INSTALL FLOOR SHIFT SHIFT LEVER SUB-ASSEMBLY
33820B
14.CONNECT TRANSMISSION CONTROL CABLE ASSEMBLY
58286
15.INSTALL NO. 1 SHIFT AND SELECT LEVER BOOT
58534A
16.INSTALL TRANSMISSION COVER MAT
17.INSTALL EXHAUST PIPE ASSEMBLY
18.ADD ENGINE COOLANT
19.CONNECT CABLE TO NEGATIVE BATTERY TERMINAL
- Torque:
3.9 N*m (40 kgf*cm, 35 in.*lbf)
20.INSPECT FOR COOLANT LEAK
21.INSPECT FOR OIL LEAK
22.CHECK ENGINE OIL LEVEL
23.INSPECT FOR EXHAUST GAS LEAK
53711C
24.INSTALL FRONT FENDER APRON RH
Install the front fender apron RH with the 7 bolts.
- Torque:
7.0 N*m (71 kgf*cm, 62 in.*lbf)
51441D
25.INSTALL NO. 1 ENGINE UNDER COVER
Install the No. 1 engine under cover with the 6 bolts.
- Torque:
18 N*m (184 kgf*cm, 13 ft.*lbf)
58420
26.INSTALL NO. 2 ENGINE SERVICE HOLE COVER ASSEMBLY
58521D
27.INSTALL ENGINE SERVICE HOLE COVER MAT
58734B
28.INSTALL REAR ENGINE SERVICE COVER WEATHERSTRIP
58410
29.INSTALL ENGINE SERVICE HOLE COVER