SEAT REAR SEAT ASSEMBLY(for 2-Passenger Seat with Bench Type Seatback) REASSEMBLY
CAUTION / NOTICE / HINT
- CAUTION:
-
Wear protective gloves. Sharp areas on the parts may injure your hands.
- HINT:
- ·
Use the same procedure for RHD and LHD vehicles.
·The procedure listed below is for RHD vehicles.
·The procedure listed below is for 1st row to 7th row for long body, and 1st row to 6th row for standard body.
·The procedure listed below is a representative example.
·Use the same procedure for all rows, unless otherwise specified.
PROCEDURE

 79180A
1.INSTALL NO. 1 SEATBACK SPRING ASSEMBLY RH
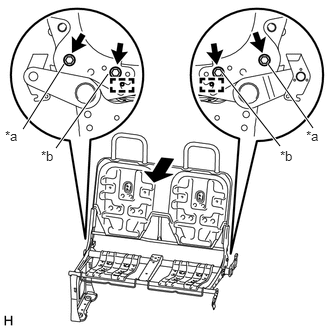
except Middle-back Seat Type B:
Attach the 2 guides and temporarily install the No. 1 seatback spring assembly RH with the 4 bolts.
| *a | Bolt A |
| *b | Bolt B |
- HINT:
-
w/ Seat Belt:
-
Use the installation bolt for the floor anchors of rear No. 2 seat inner belt assembly RH as bolt B.
w/ Seat Belt:
While pushing the No. 1 seatback spring assembly RH forward, tighten the 2 bolts labeled A.
- Torque:
42 N*m (428 kgf*cm, 31 ft.*lbf)
Remove the 2 bolts labeled B.
w/o Seat Belt:
While pushing the No. 1 seatback spring assembly RH forward, tighten the 4 bolts.
- Torque:
42 N*m (428 kgf*cm, 31 ft.*lbf)
for Middle-back Seat Type B:
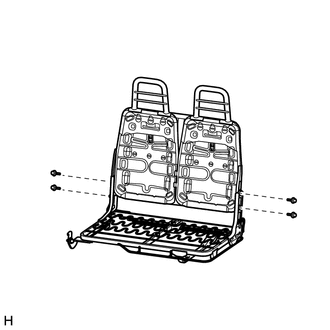
Install the No. 1 seatback spring assembly RH with the 4 bolts.
- Torque:
18 N*m (184 kgf*cm, 13 ft.*lbf)
79405A
2.INSTALL NO. 4 SEAT LEG SUB-ASSEMBLY RH (for Middle-back Seat Type B)
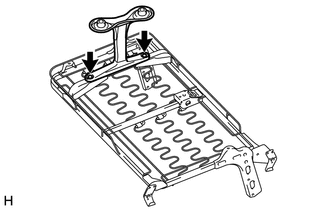
Install the No. 4 seat leg sub-assembly RH with the 2 bolts.
- Torque:
18 N*m (184 kgf*cm, 13 ft.*lbf)
72345A
3.INSTALL RECLINING CONNECTING PIPE (except Middle-back Seat Type B)
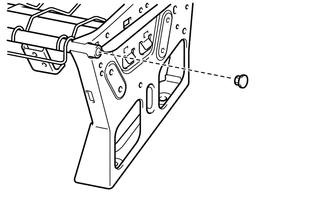
Install the reclining connecting pipe.
73330G
4.INSTALL REAR SEAT LAP TYPE BELT ASSEMBLY (w/ Seat Belt)
79021
5.INSTALL NO. 2 SEAT CUSHION COVER SUB-ASSEMBLY RH
- HINT:
- ·
When installing the seat cover, refer to the precautions in order to prevent wrinkles from forming.
Click hereVehicle Interior>SEAT>FRONT SEAT ASSEMBLY>PRECAUTION
·Align the seam allowance in a single direction as shown in the illustration.
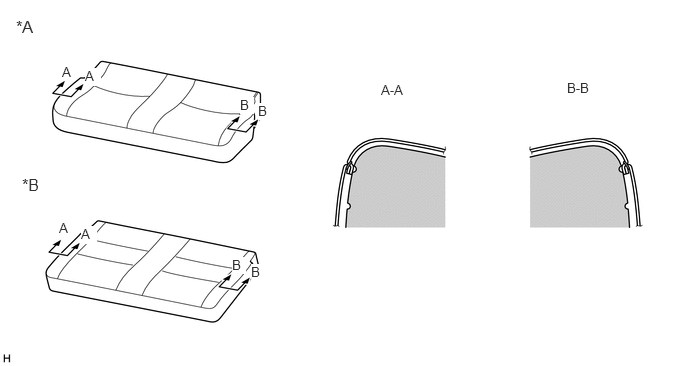 0.167,0.177 0.542,0.417 0.375,0.24 12 false *A 0.229,1.823 0.604,2.063 0.375,0.24 12 false *B 3.969,0.854 4.427,1.094 0.458,0.24 10 false A-A 5.906,0.833 6.365,1.073 0.458,0.24 10 false B-B 0.646,0.667 0.813,0.906 0.167,0.24 10 false A 0.615,2.292 0.781,2.531 0.167,0.24 10 false A 0.885,0.708 1.052,0.896 0.167,0.188 10 true A 0.844,2.354 1.01,2.542 0.167,0.188 10 true A 2.5,1.01 2.646,1.188 0.146,0.177 10 true B 2.417,2.677 2.563,2.854 0.146,0.177 10 true B 2.688,1.073 2.833,1.25 0.146,0.177 10 true B 2.615,2.75 2.76,2.927 0.146,0.177 10 true B
Text in Illustration *A except Middle-back Seat Type B *B for Middle-back Seat Type B
Set the No. 2 seat cushion cover sub-assembly RH in place.
except Middle-back Seat Type B:
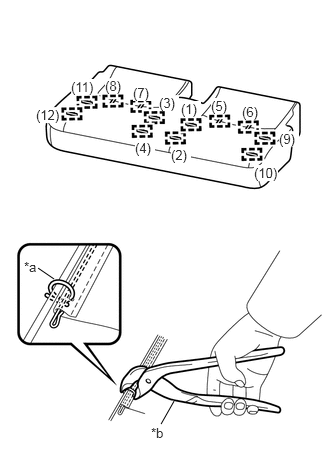
Using hog ring pliers, install the No. 2 seat cushion cover sub-assembly RH to the No. 2 seat cushion pad sub-assembly RH with 12 new hog rings in the order shown in the illustration.
| *a | Cutout |
| *b | Hog Ring Pliers |
- NOTICE:
- ·
Do not dirty or damage the No. 2 seat cushion cover sub-assembly RH.
·Be sure to securely install the hog rings as shown in the illustration while preventing wrinkles from forming on the No. 2 seat cushion cover sub-assembly RH.
- HINT:
-
Install the hog rings at the cutouts if they are there.
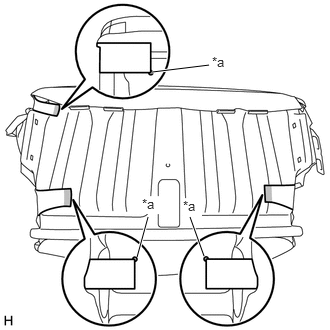
Attach the 3 pieces of fastening tape to install the strap of the No. 2 seat cushion cover sub-assembly RH as shown in the illustration.
| *a | Alignment Hole |

|
Fastening Tape |
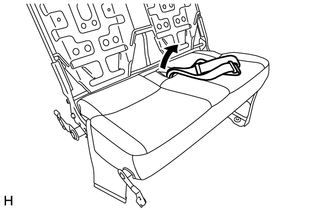
w/ Seat Belt:
Pass the rear seat lap type belt assembly through the hole in the No. 2 seat cushion cover sub-assembly RH.
Set the No. 2 seat cushion cover RH with pad on the No. 1 seat leg sub-assembly RH.
Attach the 9 hooks to install the No. 2 seat cushion cover sub-assembly RH with pad to the No. 1 seat leg sub-assembly RH as shown in the illustration.
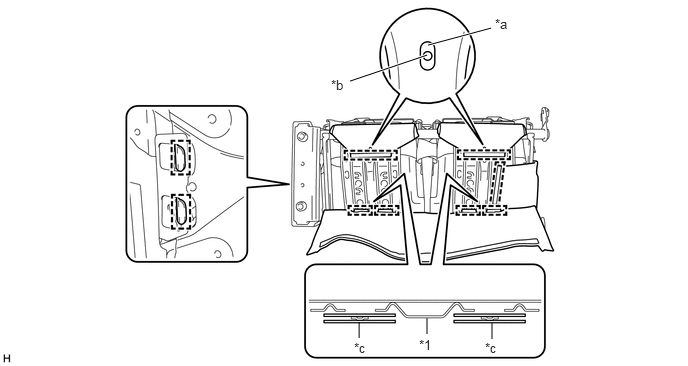
| *1 | No. 1 Seat Leg Sub-assembly RH | - | - |
| *a | Frame Hole | *b | Pad Hole |
| *c | Hook | - | - |
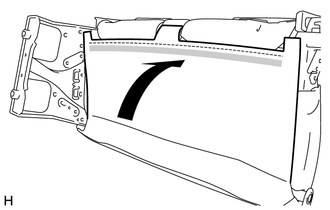
Attach the fastening tape and close the No. 2 seat cushion cover sub-assembly RH.
|
|
Fastening Tape |
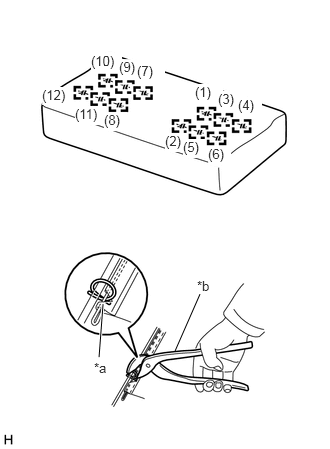
for Middle-back Seat Type B:
Using hog ring pliers, install the No. 2 seat cushion cover sub-assembly RH to the No. 2 seat cushion pad sub-assembly RH with 12 new hog rings in the order shown in the illustration.
| *a | Cutout |
| *b | Hog Ring Pliers |
- NOTICE:
- ·
Do not dirty or damage the No. 2 seat cushion cover sub-assembly RH.
·Be sure to securely install the hog rings as shown in the illustration while preventing wrinkles from forming on the No. 2 seat cushion cover sub-assembly RH.
- HINT:
-
Install the hog rings at the cutouts if they are there.
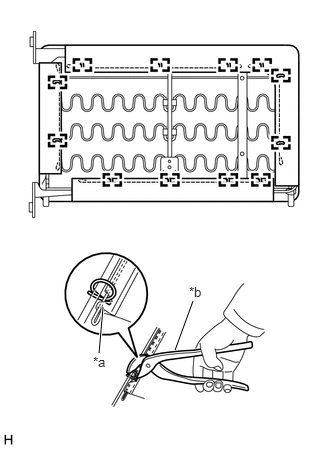
Using hog ring pliers, install the No. 2 seat cushion cover sub-assembly RH with 12 new hog rings.
| *a | Cutout |
| *b | Hog Ring Pliers |
- NOTICE:
- ·
Do not dirty or damage the No. 2 seat cushion cover sub-assembly RH.
·Be sure to securely install the hog rings as shown in the illustration while preventing wrinkles from forming on the No. 2 seat cushion cover sub-assembly RH.
- HINT:
-
Install the hog rings at the cutouts if they are there.
79017A
6.INSTALL NO. 1 SEATBACK PAD SUB-ASSEMBLY RH
Install the No. 1 rear seatback pad sub-assembly RH.
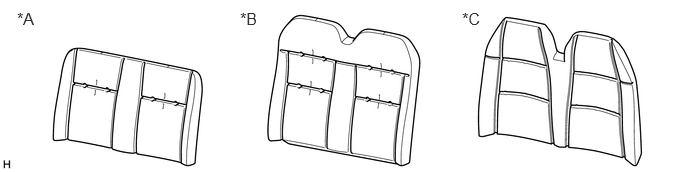
| *A | for Low-back Seat Type | *B | for Middle-back Seat Type A |
| *C | for Middle-back Seat Type B | - | - |
79013
7.INSTALL NO. 1 SEATBACK COVER SUB-ASSEMBLY RH
- HINT:
- ·
When installing the seat cover, refer to the precautions in order to prevent wrinkles from forming.
Click hereVehicle Interior>SEAT>FRONT SEAT ASSEMBLY>PRECAUTION
·Align the seam allowance in a single direction as shown in the illustration.
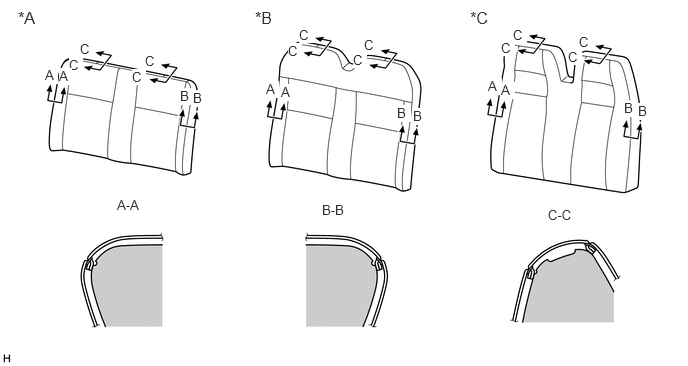 0.469,0.698 0.604,0.875 0.135,0.177 10 true A 0.719,0.594 0.865,0.76 0.146,0.167 10 true C 1.875,0.917 2.021,1.094 0.146,0.177 10 true B 1.219,2.052 1.813,2.25 0.594,0.198 10 false A-A 3.354,2.104 3.948,2.302 0.594,0.198 10 false B-B 5.708,2.156 6.302,2.354 0.594,0.198 10 false C-C 0.615,0.708 0.75,0.885 0.135,0.177 10 true A 2.771,0.844 2.906,1.021 0.135,0.177 10 true A 2.927,0.875 3.063,1.052 0.135,0.177 10 true A 5.083,0.813 5.229,0.99 0.146,0.177 10 true A 5.219,0.854 5.365,1.031 0.146,0.177 10 true A 0.833,0.427 0.979,0.594 0.146,0.167 10 true C 1.51,0.552 1.656,0.719 0.146,0.167 10 true C 1.375,0.719 1.521,0.885 0.146,0.167 10 true C 3,0.448 3.146,0.615 0.146,0.167 10 true C 3.115,0.281 3.26,0.448 0.146,0.167 10 true C 3.792,0.385 3.938,0.552 0.146,0.167 10 true C 3.677,0.542 3.823,0.708 0.146,0.167 10 true C 5.219,0.417 5.365,0.583 0.146,0.167 10 true C 5.344,0.281 5.49,0.448 0.146,0.167 10 true C 6.031,0.354 6.177,0.521 0.146,0.167 10 true C 5.917,0.51 6.063,0.677 0.146,0.167 10 true C 2.01,0.938 2.156,1.115 0.146,0.177 10 true B 4.135,1.094 4.281,1.271 0.146,0.177 10 true B 4.302,1.125 4.448,1.302 0.146,0.177 10 true B 6.5,1.042 6.646,1.219 0.146,0.177 10 true B 6.646,1.073 6.792,1.25 0.146,0.177 10 true B 0.188,0.083 0.563,0.323 0.375,0.24 12 false *A 2.656,0.083 3.031,0.323 0.375,0.24 12 false *B 4.896,0.083 5.271,0.323 0.375,0.24 12 false *C
Text in Illustration *A for Low-back Seat Type *B for Middle-back Seat Type A *C for Middle-back Seat Type B - -
Set the No. 1 seatback cover sub-assembly RH.
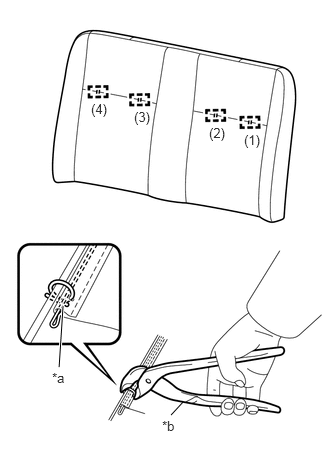
for Low-back Seat Type:
Using hog ring pliers, install the No. 1 seatback cover sub-assembly RH to the No. 1 seatback pad sub-assembly RH with 2 new hog rings in the order shown in the illustration.
| *a | Cutout |
| *b | Hog Ring Pliers |
- NOTICE:
- ·
Do not dirty or damage the No. 1 seatback cover sub-assembly RH.
·Be sure to securely install the hog rings as shown in the illustration while preventing wrinkles from forming on the No. 1 seatback cover sub-assembly RH.
- HINT:
-
Install the hog rings at the cutouts if they are there.
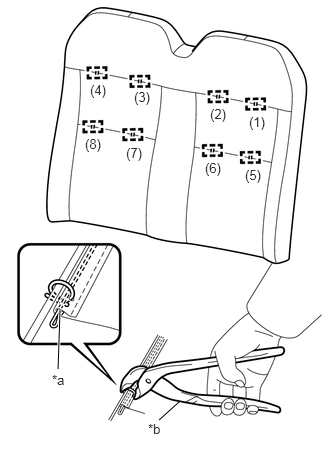
for Middle-back Seat Type A:
Using hog ring pliers, install the No. 1 seatback cover sub-assembly RH to the No. 1 seatback pad sub-assembly RH with 8 new hog rings in the order shown in the illustration.
| *a | Cutout |
| *b | Hog Ring Pliers |
- NOTICE:
- ·
Do not dirty or damage the No. 1 seatback cover sub-assembly RH.
·Be sure to securely install the hog rings as shown in the illustration while preventing wrinkles from forming on the No. 1 seatback cover sub-assembly RH.
- HINT:
-
Install the hog rings at the cutouts if they are there.
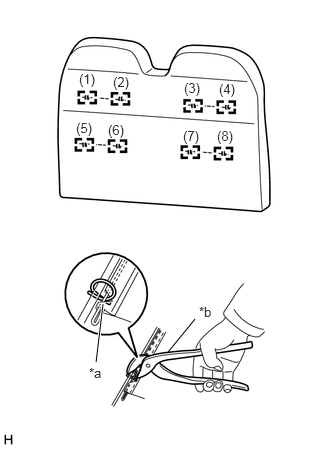
for Middle-back Seat Type B:
Using hog ring pliers, install the No. 1 seatback cover sub-assembly RH to the No. 1 seatback pad sub-assembly RH with 8 new hog rings in the order shown in the illustration.
| *a | Cutout |
| *b | Hog Ring Pliers |
- NOTICE:
- ·
Do not dirty or damage the No. 1 seatback cover sub-assembly RH.
·Be sure to securely install the hog rings as shown in the illustration while preventing wrinkles from forming on the No. 1 seatback cover sub-assembly RH.
- HINT:
-
Install the hog rings at the cutouts if they are there.
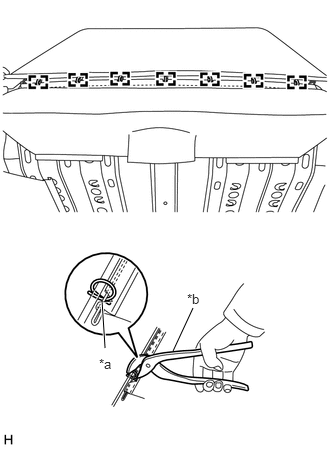
Using hog ring pliers, install the No. 1 seatback cover sub-assembly RH with 7 new hog rings.
| *a | Cutout |
| *b | Hog Ring Pliers |
- NOTICE:
- ·
Do not dirty or damage the No. 1 seatback cover sub-assembly RH.
·Be sure to securely install the hog rings as shown in the illustration while preventing wrinkles from forming on the No. 1 seatback cover sub-assembly RH.
- HINT:
-
Install the hog rings at the cutouts if they are there.
74145A
8.INSTALL REAR ASH RECEPTACLE PLATE (w/ Ashtray)
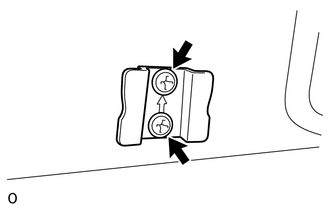
Install the rear ash receptacle plate with the 2 screws.
74130C
9.INSTALL REAR ASH RECEPTACLE ASSEMBLY (w/ Ashtray)
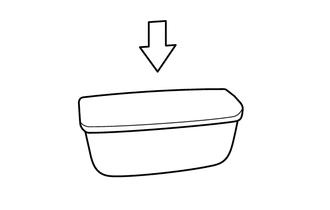
Install the rear ash receptacle assembly.
74610A
10.INSTALL ASSIST GRIP SUB-ASSEMBLY (w/ Assist Grip)
- HINT:
-
Use the same procedure for the other assist grip sub-assemblies.
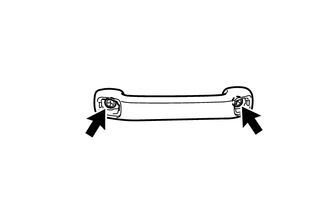
except Middle-back Seat Type B:
Install the assist grip sub-assembly with 2 new screws.
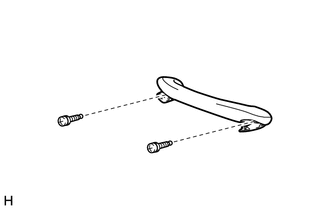
for Middle-back Seat Type B:
Install the assist grip sub-assembly with 2 new screws.
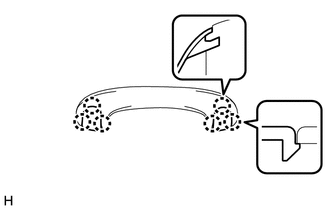
Attach the 6 claws to close the 2 covers.
74617C
11.INSTALL ASSIST GRIP PLUG (w/ Assist Grip)
- HINT:
-
Use the same procedure for the other assist grip plugs.
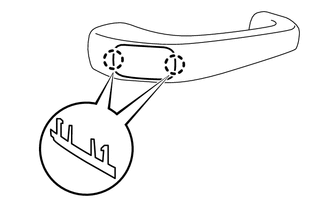
except Middle-back Seat Type B:
Attach the 2 claws to install the assist grip plug.
71149K
12.INSTALL REAR SEAT INNER LEG COVER
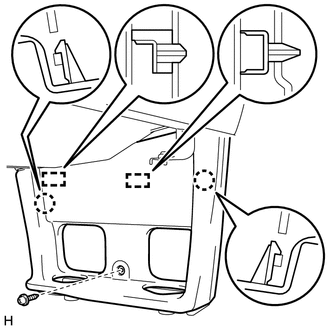
Attach the 2 claws and 2 guides to install the rear seat inner leg cover.
Install the screw.
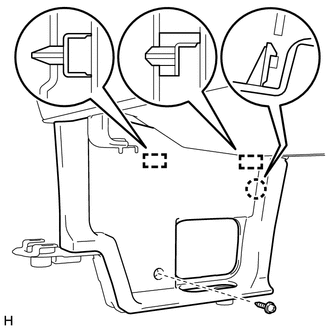
for LHD:
for 1st Row Seat Type A:
Attach the claw and 2 guides to install the rear seat inner leg cover.
Install the screw.
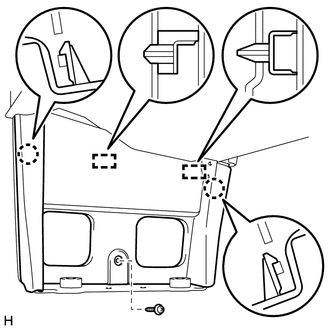
for Seat Layout with Luggage Compartment 6th row seat:
Attach the 2 claws and 2 guides to install the rear seat inner leg cover.
Install the screw.
71148N
13.INSTALL REAR SEAT OUTER LEG COVER
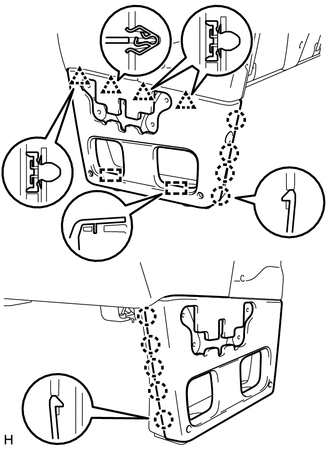
Attach the 2 guides, 9 claws and 4 clips to install the rear seat outer leg cover.
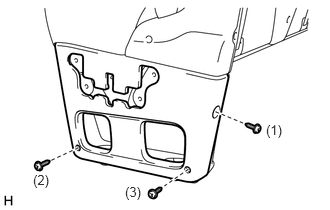
Install the 3 screws in the order shown in the illustration.
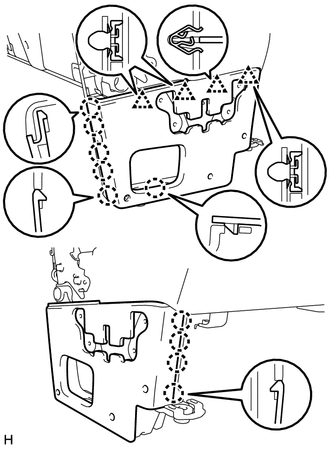
for LHD:
for 1st Row Seat Type A:
Attach the 10 claws and 4 clips to install the rear seat outer leg cover.
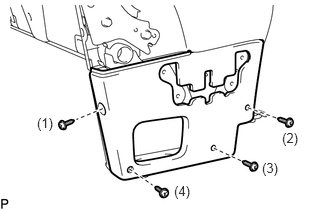
Install the 4 screws in the order shown in the illustration.
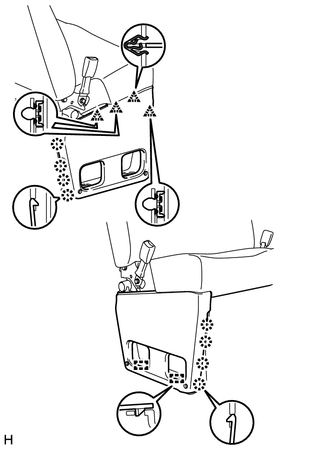
for 1st Row Seat Type B:
Attach the 2 guides, 8 claws and 4 clips to install the rear seat outer leg cover.
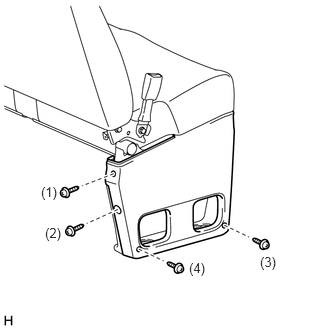
Install the 4 screws in the order shown in the illustration.
73580
14.INSTALL REAR NO. 2 SEAT INNER BELT ASSEMBLY RH (w/ Seat Belt)
71812C
15.INSTALL RECLINING ADJUSTER COVER LH
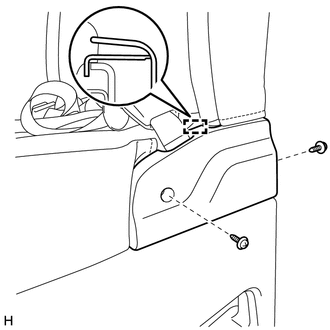
Attach the guide to install the reclining adjuster cover LH.
Install the 2 screws.
71811C
16.INSTALL RECLINING ADJUSTER COVER RH
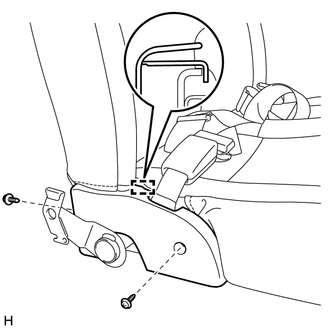
Attach the guide to install the reclining adjuster cover RH.
Install the 2 screws.
17.INSTALL SUB SEAT ASSEMBLY (w/ Sub Seat)