N04C-VL ENGINE CONTROL ECD SYSTEM P0504 Brake Switch "A" / "B" Correlation
DESCRIPTION
In this system, signals of the stop light switch assembly are used to judge whether the brake system is abnormal or not.
The stop light switch assembly has a duplex system (signals STP and ST1-) to memorize the abnormality when the signals indicating that the brake pedal is depressed and released are detected simultaneously.
- HINT:
-
Normal condition is as shown in the table below.
Signal (ECM Terminal) Brake Pedal Released In Transition Brake Pedal Depressed STP OFF ON ON ST1- ON ON OFF
- HINT:
- ·
[OFF] denotes ground potential.
·[ON] denotes battery potential (+B).
| DTC No. | DTC Detection Condition | Trouble Area |
|---|---|---|
| P0504 | Conditions (a) and (b) continue for 0.5 seconds or more (1 trip detection logic):
(a) Ignition switch ON (b) Open or short in stop light switch signal circuit |
·
Short in stop light switch signal circuit ·
Stop light switch assembly ·
Ignition switch assembly ·
ECM |
WIRING DIAGRAM
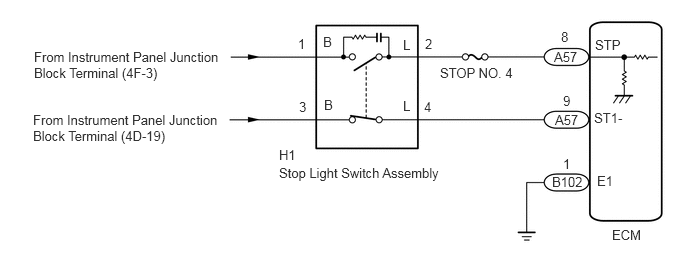
CAUTION / NOTICE / HINT
- NOTICE:
- ·
Inspect the fuses for circuits related to this system before performing the following inspection procedure.
·After replacing the ECM, the new ECM needs registration (Click hereEngine / Hybrid System>N04C-VL (ENGINE CONTROL)>ECD SYSTEM>REGISTRATION) and initialization (Click hereEngine / Hybrid System>N04C-VL (ENGINE CONTROL)>ECD SYSTEM>INITIALIZATION).
- HINT:
- ·
Read freeze frame data using the GTS. The ECM records vehicle and driving condition information as freeze frame data the moment a DTC is stored. When troubleshooting, freeze frame data can be helpful in determining whether the vehicle was moving or stationary, whether the engine was warmed up or not, as well as other data recorded at the time of a malfunction.
·STP signal conditions can be checked using the GTS.
(a)Connect the GTS to the DLC3.
(b)Turn the ignition switch to ON.
(c)Turn the GTS on.
(d)Enter the following menus: Powertrain / Engine and ECT / Data List / Stop Light Switch.
(e)Check the Data List indication when the brake pedal is depressed and released.
Brake Pedal Operation Specified Condition Depressed ON (STP signal ON) Released OFF (STP signal OFF)
PROCEDURE
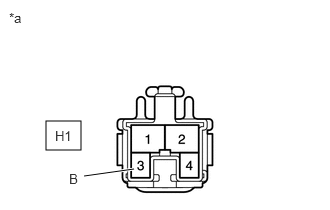
Disconnect the stop light switch assembly connector.
Turn the ignition switch to ON.
Measure the voltage according to the value(s) in the table below.
- Standard Voltage:
Tester Connection Switch Condition Specified Condition H1-3 (B) - Body ground Ignition switch ON 11 to 14 V
| *a | Front view of wire harness connector
(to Stop Light Switch Assembly) |
- Result:
Proceed to OK NG
OK
NG
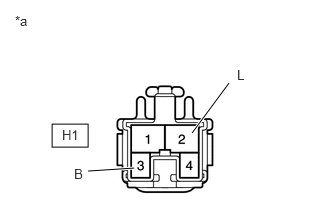
Disconnect the stop light switch assembly connector.
Measure the voltage according to the value(s) in the table below.
- Standard Voltage:
Tester Connection Condition Specified Condition H1-2 (L) - Body ground Always 11 to 14 V H1-3 (B) - Body ground IG ON 11 to 14 V
| *a | Front view of wire harness connector
(to Stop Light Switch Assembly) |
- Result:
Proceed to OK NG
OK
NG
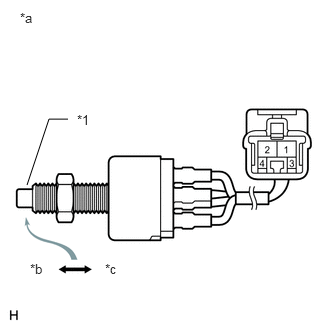
Remove the stop light switch assembly.
Measure the resistance according to the value(s) in the table below.
- Standard Resistance:
Tester Connection Condition Specified Condition 1 - 2 Switch pin not pushed Below 1 Ω Switch pin pushed 10 kΩ or higher 3 - 4 Switch pin not pushed 10 kΩ or higher Switch pin pushed Below 1 Ω
| *a | Component without harness connected
(Stop Light Switch Assembly) |
| *b | Free |
| *c | Pushed in |
| *1 | Pin |
- Result:
Proceed to OK NG
OK
NG
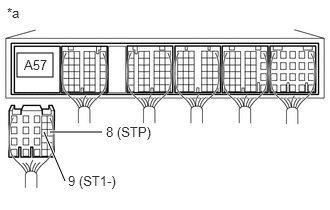
Disconnect the ECM connector.
Turn the ignition switch to ON.
Measure the voltage according to the value(s) in the table below.
- Standard Voltage:
Tester Connection Condition Specified Condition A57-9 (ST1-) - Body ground Depressed Below 1 V Released 11 to 14 V A57-8 (STP) - Body ground Depressed 11 to 14 V Released Below 1 V
| *a | Rear view of wire harness connector
(to ECM) |
- Result:
Proceed to OK NG
OK
NG