WINDOW / GLASS FRONT SIDE WINDOW GLASS(for Front Passenger Side) INSTALLATION
CAUTION / NOTICE / HINT
- HINT:
- ·
Use the same procedure for RHD and LHD vehicles.
·The procedure listed below is for RHD vehicles.
PROCEDURE

 1.INSTALL FRONT SIDE WINDOW GLASS LH
Clean and shape the contact surface of the vehicle body.
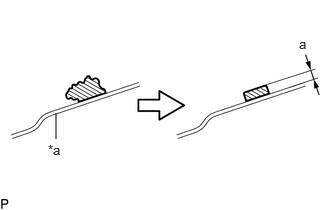
| *a | Vehicle Body |

|
Adhesive |
On the contact surface of the vehicle body, use a knife to cut away excess adhesive as shown in the illustration.
- Standard:
Area Specified Condition a 1.0 to 3.0 mm (0.0394 to 0.118 in.)
Clean the contact surface of the vehicle body with non-residue solvent.
Position the front side window glass LH.
Using suction cups, place the front side window glass LH in the correct position.
Check that the entire contact surface of the glass rim is perfectly even.
Using suction cups, remove the front side window glass LH.
Using a brush or sponge, apply body primer to the exposed part of the vehicle body.
- NOTICE:
- ·
Do not apply too much primer.
·Do not apply primer to the adhesive.
·When applying the primer, take care of the seams of the panel and spot welds.
Using a brush or sponge, apply primer to the contact surface of the front side window glass LH (for Slide Glass Type).
- NOTICE:
- ·
Do not apply too much primer.
·Allow the primer to dry for 3 minutes or more.
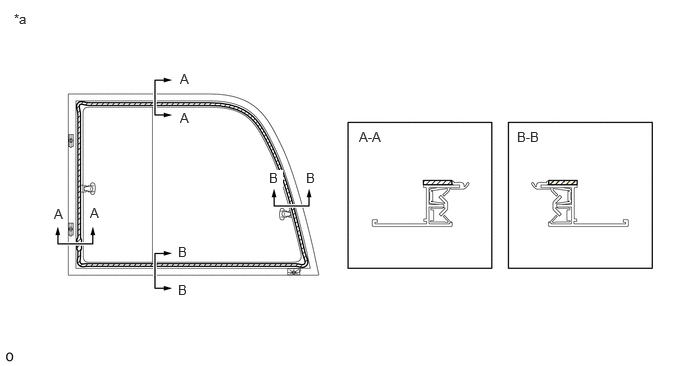
| *a | Back Side | - | - |
|
|
Primer Application Area | - | - |
Using a brush or sponge, apply primer to the contact surface of the front side window glass LH (for Fixed Glass Type).
- NOTICE:
- ·
Do not apply too much primer.
·Allow the primer to dry for 3 minutes or more.
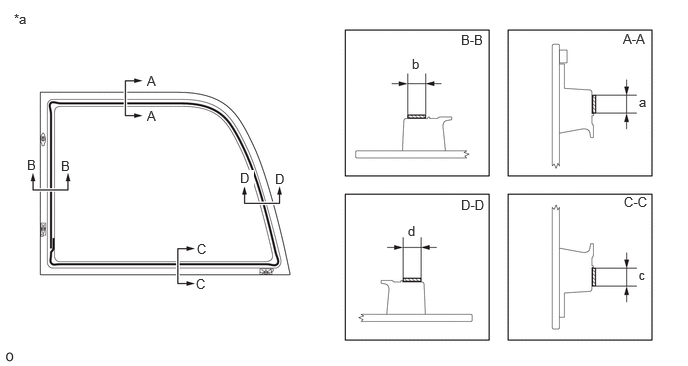
| *a | Back Side | - | - |
|
|
Primer Application Area | - | - |
- Standard:
Area Specified Condition a 14.5 mm (0.571 in.) b 15.1 mm (0.594 in.) c 15.1 mm (0.594 in.) d 12.1 to 13.7 mm (0.476 to 0.539 in.)
Apply adhesive to the front side window glass LH.
- Adhesive:
Toyota Genuine Windshield Glass Adhesive or Equivalent
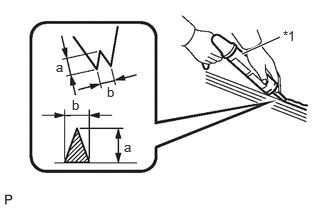
| *1 | Sealer Gun |
Cut off the tip of the cartridge nozzle as shown in the illustration.
- Standard:
Area Specified Condition a 12.0 mm (0.472 in.) b 8.0 mm (0.315 in.)
for Slide Glass Type:
Apply adhesive to the glass as shown in the illustration.
- NOTICE:
-
Allow the primer to dry for 3 minutes or more.
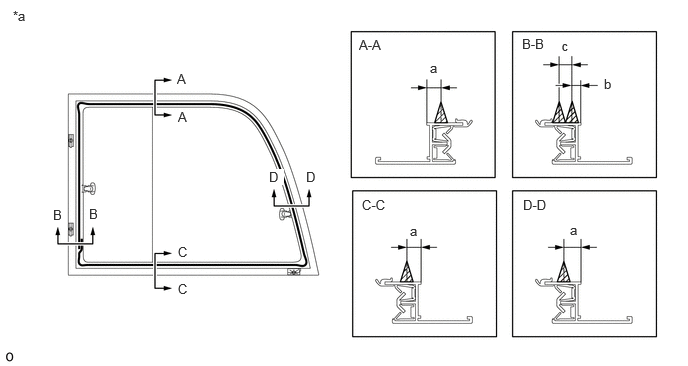
| *a | Back Side | - | - |
|
|
Adhesive | - | - |
- Standard:
Area Specified Condition a 9.0 mm (0.354 in.) b 5.0 mm (0.197 in.) c 8.0 mm (0.315 in.)
for Fixed Glass Type:
Apply adhesive to the glass as shown in the illustration.
- NOTICE:
-
Allow the primer to dry for 3 minutes or more.
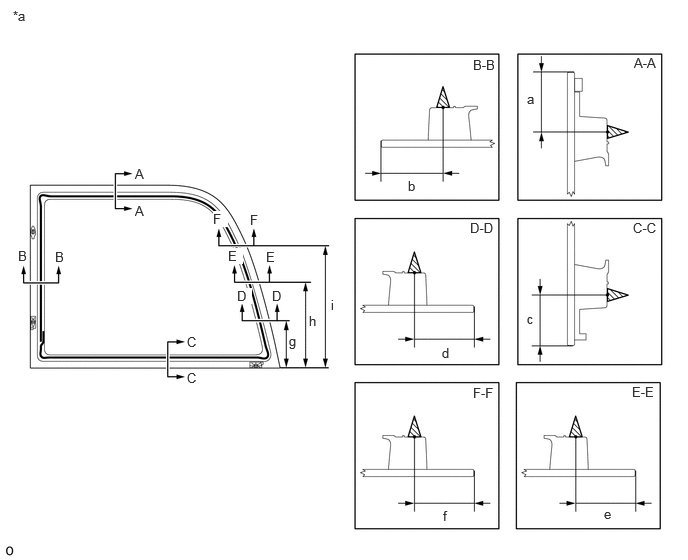
| *a | Back Side | - | - |
|
|
Adhesive | - | - |
- Standard:
Area Specified Condition a 42.2 mm (1.66 in.) b 48.7 mm (1.92 in.) c 43 mm (1.69 in.) d 44.6 mm (1.76 in.) e 45.4 mm (1.79 in.) f 47.9 mm (1.89 in.) g 270 mm (10.6 in.) h 465 mm (18.3 in.) i 660 mm (26.0 in.)
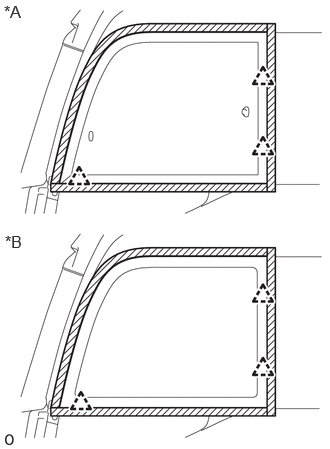
| *A | for Slide Glass Type |
| *B | for Fixed Glass Type |
Using suction cups, attach the 3 No. 1 side window clips and install the front side window glass LH.
Press it in gently along the rim.
- NOTICE:
- ·
Check that the stoppers are attached to the vehicle body correctly.
·Check that the vehicle body and glass have a small gap between them.
- HINT:
-
Press the glass with force of 98 N (10 kgf, 22.0 lbf) or more.
Using a scraper, remove any excess or protruding adhesive.
- NOTICE:
-
Apply adhesive to the glass rim.
2.INSPECT FOR LEAKS AND REPAIR
After the adhesive has hardened, apply water from the outside of the vehicle. Check that no water leaks into the cabin.
If water leaks into the cabin, allow the water to dry and add adhesive.
Remove the protective tape.
62520G
3.INSTALL NO. 1 SIDE TRIM ASSEMBLY LH
62540A
4.INSTALL NO. 2 SIDE TRIM ASSEMBLY LH
67676
5.INSTALL FRONT SIDE TRIM BOARD COVER LH
73224
6.INSTALL FRONT SEAT BELT RETRACTOR COVER LH (for 1st Row Seat)
62638A
7.INSTALL QUARTER PILLAR GARNISH RH
62989
8.INSTALL CENTER DOOR LOCK COVER (for Folding Type)
63310
9.INSTALL ROOF HEADLINING ASSEMBLY
63651B
10.INSTALL AIR INTAKE NET (w/ Rear Air Duct)
63656D
11.INSTALL CENTER AIR INTAKE COVER (w/ Rear Air Duct)
63812
12.INSTALL NO. 2 ROOF VENTILATOR COVER (w/o Rear Air Duct)
55905H
13.INSTALL CONTROL KNOB SUB-ASSEMBLY (w/o Rear Air Duct)
87810
14.INSTALL INNER REAR VIEW MIRROR ASSEMBLY
83910G
15.INSTALL CLOCK ASSEMBLY (w/ Clock)
63310A
16.INSTALL ROOF HEADLINING ASSEMBLY HOLE PLUG (w/ Cover)
74320
17.INSTALL VISOR ASSEMBLY LH (w/ Passenger Side Visor)
74310
18.INSTALL VISOR ASSEMBLY RH
63610
19.INSTALL NO. 1 AIR OUTLET REGISTER ASSEMBLY (w/ Rear Air Duct)
65938
20.INSTALL NO. 3 CURTAIN RAIL (w/ Curtain)
63371B
21.INSTALL NO. 1 ROOF BOARD SET MOULDING
63375B
22.INSTALL NO. 1 ROOF HEADLINING MOULDING RH (w/o Rear Air Duct)
63375D
23.INSTALL ROOF HEADLINING MOULDING (w/o Rear Air Duct)
62547B
24.INSTALL NO. 3 PILLAR GARNISH LH
73220
25.CONNECT FRONT SEAT OUTER BELT ASSEMBLY LH (w/ Rear No. 1 Seat)
74730
26.INSTALL HAND GRIP FRAME ASSEMBLY (w/ Hand Grip Frame)
62425
27.INSTALL CENTER PILLAR GARNISH COVER (w/ Hand Grip Frame)
62212
28.INSTALL FRONT PILLAR GARNISH LH
62211
29.INSTALL FRONT PILLAR GARNISH RH
74603
30.INSTALL FRONT ASSIST GRIP SUB-ASSEMBLY
74617V
31.INSTALL ASSIST GRIP PLUG
63951
32.INSTALL COOLER PIPE COVER
62413A
33.INSTALL LOWER CENTER PILLAR GARNISH RH
73210
34.CONNECT FRONT SEAT OUTER BELT ASSEMBLY RH
73233
35.INSTALL OUTER LAP BELT ANCHOR COVER
62311C
36.INSTALL FRONT DOOR OPENING TRIM WEATHERSTRIP RH
58651A
37.INSTALL FRONT DOOR NO. 1 MAT PLATE
46243
38.INSTALL PARKING BRAKE LEVER COVER
39.INSTALL FRONT PILLAR END COVER LH
53182A
40.INSTALL HEADLIGHT COVER LH
87940
41.INSTALL OUTER REAR VIEW MIRROR ASSEMBLY LH
87945
42.INSTALL OUTER MIRROR COVER LH
43.INSTALL FRONT SEAT
44.CONNECT BATTERY NEGATIVE TERMINAL