U241E AUTOMATIC TRANSMISSION / TRANSAXLE VALVE BODY ASSEMBLY INSTALLATION
PROCEDURE

 35410
1.INSTALL TRANSMISSION VALVE BODY ASSEMBLY
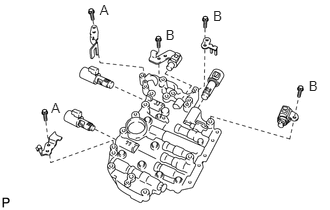
Install the 5 shift solenoid valves with the 5 bolts and 4 plates.
- Torque:
- 6.6 N*m (67 kgf*cm, 58 in.*lbf)
for bolt A
- 11 N*m (112 kgf*cm, 8 ft.*lbf)
for bolt B
- HINT:
-
Each bolt length is indicated below.
- Bolt length:
12 mm (0.47 in.) for Bolt A
45 mm (1.77 in.) for Bolt B
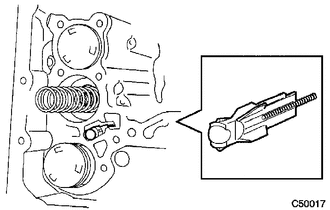
Install the spring and check ball body.
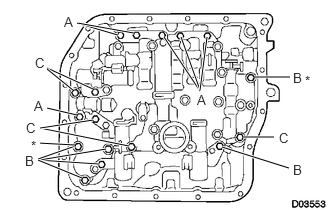
Align the groove of the manual valve with the pin of lever.
Install the 17 bolts.
- Torque:
- 11 N*m (112 kgf*cm, 8 ft.*lbf)
- NOTICE:
- ·
Push the valve body against the accumulator piston spring and the check ball body to install it.
·Tighten the bolts marked by * in the illustration first temporarily because they are positioning bolts.
- HINT:
-
Each bolt length is indicated below.
- Bolt length:
25 mm (0.984 in.) for Bolt A
41 mm (1.614 in.) for Bolt B
45 mm (1.771 in.) for Bolt C
82125J
2.INSTALL TRANSMISSION WIRE
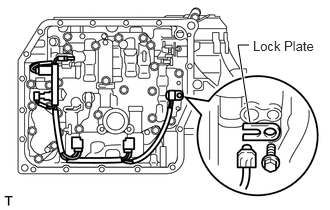
Coat the O-ring with ATF.
Install the ATF temperature sensor with the lock plate and bolt.
- Torque:
- 6.6 N*m (67 kgf*cm, 58 in.*lbf)
Connect the 5 shift solenoid valve connectors.
35330
3.INSTALL VALVE BODY OIL STRAINER ASSEMBLY
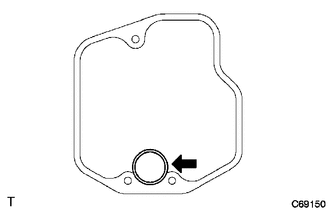
Coat a new O-ring with ATF.
Install the O-ring to the oil strainer.
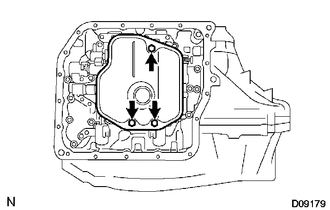
Install the oil strainer with the 3 bolts.
- Torque:
- 11 N*m (112 kgf*cm, 8 ft.*lbf)
35106D
4.INSTALL AUTOMATIC TRANSAXLE OIL PAN SUB-ASSEMBLY
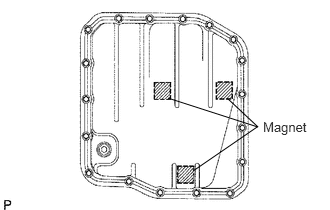
Install the 3 magnets in the oil pan.
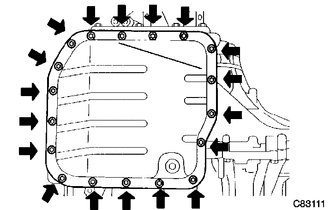
Install a new gasket and the oil pan with the 18 bolts.
- Torque:
- 7.8 N*m (80 kgf*cm, 69 in.*lbf)
51441
5.INSTALL NO. 1 ENGINE UNDER COVER
6.CONNECT CABLE TO NEGATIVE BATTERY TERMINAL
7.ADD AUTOMATIC TRANSAXLE FLUID
- Fluid type:
Toyota Genuine ATF WS
8.INSPECT TRANSAXLE FLUID LEVEL
Inspect the fluid level (see page Drivetrain>U241E (AUTOMATIC TRANSMISSION / TRANSAXLE)>AUTOMATIC TRANSAXLE FLUID>ON-VEHICLE INSPECTION).
9.PERFORM RESET MEMORY
Perform the RESET MEMORY procedures (A/T initialization) (see page Drivetrain>U241E (AUTOMATIC TRANSMISSION / TRANSAXLE)>AUTOMATIC TRANSAXLE SYSTEM>INITIALIZATION).
10.PERFORM INITIALIZATION
Perform initialization (see page General>INTRODUCTION>REPAIR INSTRUCTION>INITIALIZATION).
- NOTICE:
-
Certain systems need to be initialized after disconnecting and reconnecting the cable from the negative (-) battery terminal.