2011-2016 FJ Cruiser · Service Manual RESTRAINTS

SRS Warning Light Remains ON

Circuit diagnosis · Vehicles built Jul 2007 – Jul 2011

Versions by build date: Jul 2007 – Jul 2011 from Aug 2011

DESCRIPTION

The SRS warning light is located on the combination meter.
When the SRS condition is normal, the SRS warning light illuminates for approximately 6 seconds after the ignition switch is turned from off to on, and then goes off automatically.
If there is a malfunction in the SRS, the SRS warning light illuminates or blinks to inform the driver of the problem. When terminals TC and CG of the DLC3 are connected, the SRS warning light blinks to indicate DTCs.
The center airbag sensor assembly is equipped with a voltage-increase circuit (DC-DC converter) in case the source voltage decreases. When the battery voltage decreases, the voltage-increase circuit (DC-DC converter) boosts the SRS voltage up to the normal level.
Malfunctions relating to battery voltage decreases cause the SRS warning light to illuminate, however, no DTCs are recorded in the center airbag sensor assembly. The SRS warning light goes off automatically when the source voltage returns to normal.
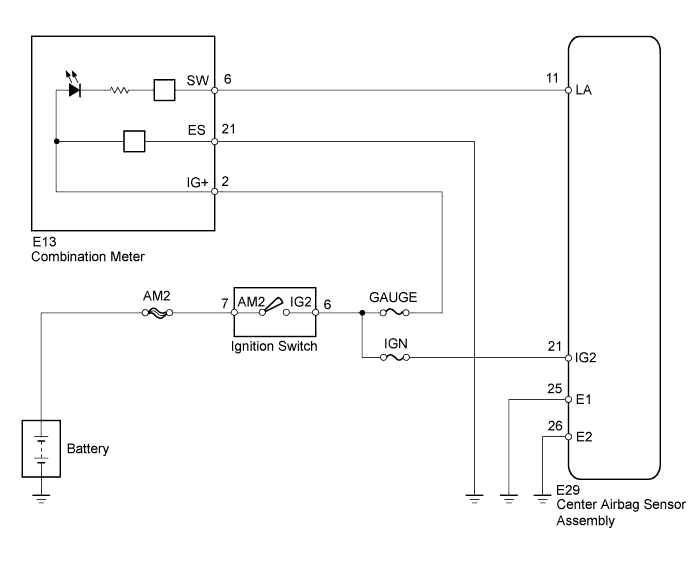
Signals to illuminate the SRS warning light are transmitted from the center airbag sensor assembly to the combination meter.

WIRING DIAGRAM

C169754E01

INSPECTION PROCEDURE

NOTICE:
In order to prevent unexpected airbag deployment, disconnect the following connectors before inspecting parts such as wire harnesses, if the application of tester probes to the center airbag sensor assembly connector is necessary.

  1. Turn the ignition switch to the lock position.
  2. Disconnect the negative (-) terminal cable from the battery, and wait for at least 90 seconds.
  3. Disconnect the connector from the center airbag sensor assembly.
  4. Disconnect the connectors from the steering pad.
  5. Disconnect the connectors from the front passenger airbag assembly.
  6. Disconnect the connector from the front seat outer belt assembly LH.
  7. Disconnect the connector from the front seat outer belt assembly RH.

    HINT:
    Skip the following steps if side and curtain shield airbags are not fitted.

  8. Disconnect the connector from the front seat side airbag assembly LH.
  9. Disconnect the connector from the front seat side airbag assembly RH.
  10. Disconnect the connector from the curtain shield airbag assembly LH.
  11. Disconnect the connector from the curtain shield airbag assembly RH.

1. CHECK BATTERY
  1. Measure the voltage of the battery.

    Standard voltage:
    11 to 14 V


NG
CHECK AND REPLACE BATTERY OR CHARGING SYSTEM
OK


2. CHECK CONNECTOR (INSTRUMENT PANEL WIRE - CENTER AIRBAG SENSOR ASSEMBLY)
  1. Turn the ignition switch off.

  1. Disconnect the negative (-) terminal cable from the battery, and wait for at least 90 seconds.

  1. Check the instrument panel wire connector and terminals (on the center airbag sensor assembly side) and check that the connector is properly connected to the center airbag sensor assembly.

    Result:
    Result
    Proceed to
    No problem.
    A
    Connector or terminals incorrect.
    B
    Connector connected improperly.
    C


B
REPAIR OR REPLACE INSTRUMENT PANEL WIRE

C
CONNECT CONNECTOR PROPERLY
A


3. CHECK SOURCE VOLTAGE (CENTER AIRBAG SENSOR ASSEMBLY)

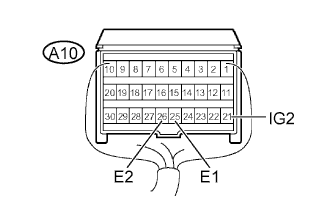
  1. G027651E42
    Disconnect the connector from the center airbag sensor assembly.

  1. Connect the negative (-) terminal cable to the battery, and wait for at least 2 seconds.

  1. Turn the ignition switch on.

  1. Operate all components of the electrical system (defogger, wipers, headlights, heater blower, etc.).

  1. Measure the voltage.

    Standard voltage:
    Tester connection
    Switch Condition
    Specified condition
    E29-21 (IG2) -
    Body ground
    Ignition switch on
    11 to 14 V

  1. Turn the ignition switch off.

  1. Measure the resistance.

    Standard resistance:
    Tester connection
    Condition
    Specified condition
    E29-25 (E1) -
    Body ground
    Always
    Below 1 Ω
    E29-26 (E2) -
    Body ground
    Always
    Below 1 Ω


NG
REPAIR OR REPLACE HARNESS OR CONNECTOR
OK


4. CHECK CONNECTOR (INSTRUMENT PANEL WIRE - COMBINATION METER)
  1. Disconnect the negative (-) terminal cable from the battery, and wait for at least 90 seconds.

  1. Check the instrument panel wire connector and terminals (on the combination meter side) and check that the connector is properly connected to the combination meter.
    Result:
    Result
    Proceed to
    No problem.
    A
    Connector or terminals incorrect.
    B
    Connector connected improperly.
    C


B
REPAIR OR REPLACE INSTRUMENT PANEL WIRE

C
CONNECT CONNECTOR PROPERLY
A


5. CHECK INSTRUMENT PANEL WIRE (CENTER AIRBAG SENSOR ASSEMBLY - COMBINATION METER)

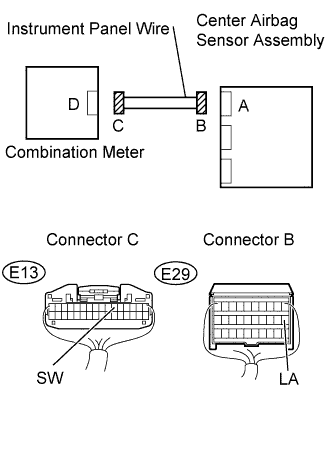
  1. C127744E01
    Disconnect the connectors from the center airbag sensor assembly and combination meter.

  1. Check for short to B+ in the circuit.

    1. Connect the negative (-) terminal cable to the battery, and wait for at least 2 seconds.

    2. Turn the ignition switch on.

    3. Measure the voltage.

      Standard voltage:
      Tester Connection
      Switch Condition
      Specified Condition
      E13-6 (SW) - Body ground
      Ignition switch on
      Below 1 V

  1. Check for open in the circuit.

    1. Turn the ignition switch off.

    2. Disconnect the negative (-) terminal cable from the battery, and wait for at least 90 seconds.

    3. Measure the resistance.

      Standard resistance:
      Tester Connection
      Condition
      Specified Condition
      E13-6 (SW) - E29-11 (LA)
      Always
      Below 1 Ω

  1. Check for short to ground in the circuit.

    1. Measure the resistance.

      Standard resistance:
      Tester Connection
      Condition
      Specified Condition
      E13-6 (SW) - Body ground
      Always
      1 MΩ or higher


NG
REPAIR OR REPLACE INSTRUMENT PANEL WIRE
OK


6. INSPECT CENTER AIRBAG SENSOR ASSEMBLY

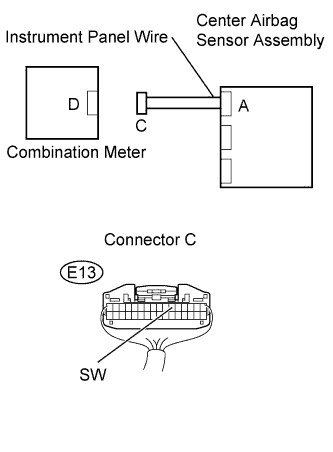
  1. C127745E01
    Connect the instrument panel wire to the center airbag sensor assembly.

  1. Connect the negative (-) terminal cable to the battery, and wait for at least 2 seconds.

  1. Measure the voltage.

    Standard voltage:
    Tester connection
    Switch Condition
    Specified condition
    E13-6 (SW) - Body ground .
    For 6 seconds after ignition switch turned on.
    Below 1 V
    E13-6 (SW) - Body ground .
    After 6 seconds have passed since ignition switch turned on.
    11 to 14 V

  1. Turn the ignition switch off.

  1. Measure the resistance.

    Standard resistance:
    Tester connection
    Condition
    Specified condition
    E13-6 (SW) - Body ground .
    Always
    Below 1 Ω


NG
REPLACE CENTER AIRBAG SENSOR ASSEMBLY (Click here)
OK

GO TO COMBINATION METER SYSTEM (PROBLEM SYMPTOMS TABLE)


← B1905/74 Short in Front Passenger Side Pretensioner Squib Circuit (+ B1906/74, B1907/74, B1908/74) (Nov 2010 – Jul 2012)SRS Warning Light Remains ON (from Aug 2011) →